I will throw my hat in the ring.
Nov 4, 2013 19:27:32 #
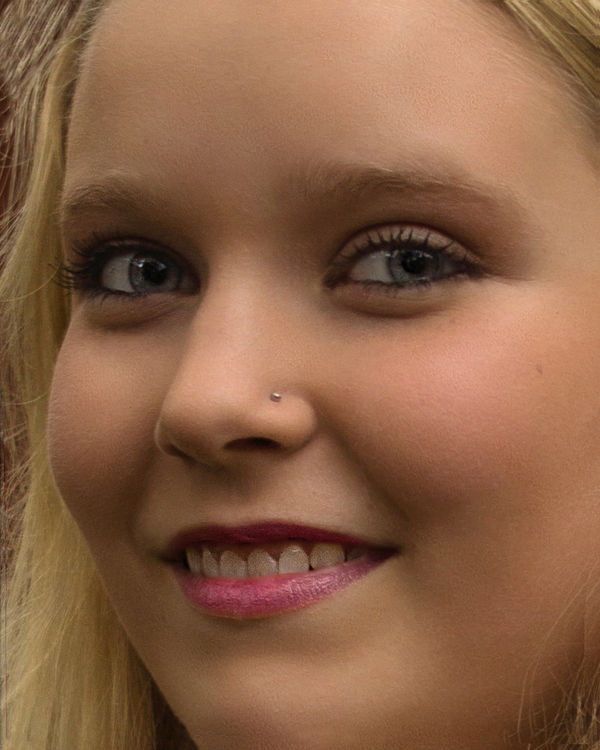
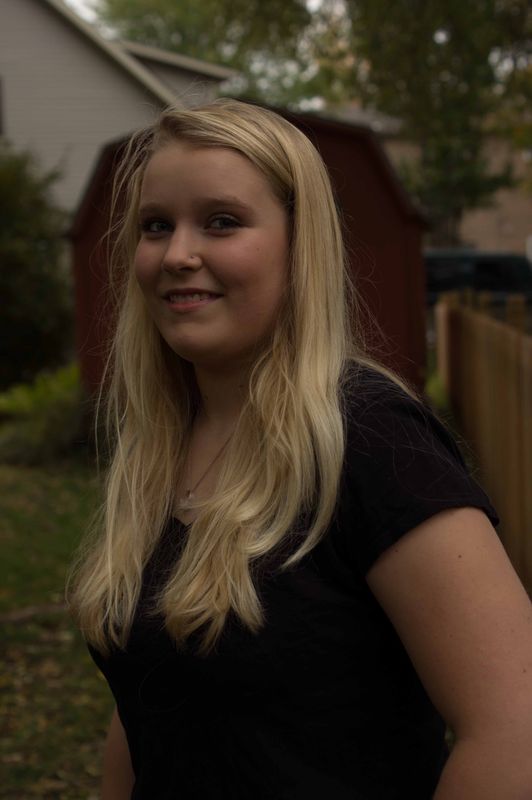
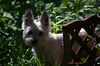
I took this today at exactly 4:30pm outdoors, no flash, heavy overcast.
Sony 50mm prime lens
F3.5
1/160/sec.
1SO 100
Metering mode: center weighted averaging
Shot from about 8 ft. away/cropped.
Lightroom 5/ photoshop CC.
Sony 50mm prime lens
F3.5
1/160/sec.
1SO 100
Metering mode: center weighted averaging
Shot from about 8 ft. away/cropped.
Lightroom 5/ photoshop CC.
Freind of the family.
Nov 4, 2013 19:30:46 #
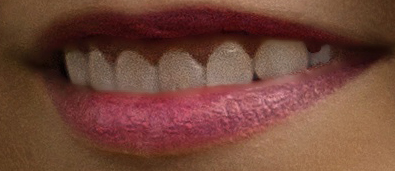
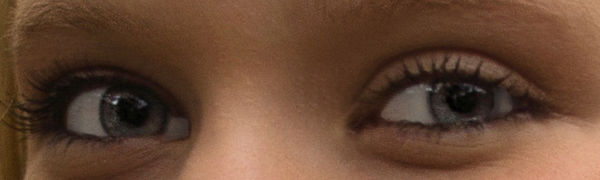
Can definitely tell it was cropped and pretty heavily apparently. It makes this very pixelated and it really shows on her teeth and in her eyes. If you did some pp work in these areas to maybe smooth things out a little it probably wouldn't be as noticeable.
Nov 4, 2013 19:30:56 #
Nov 4, 2013 19:34:46 #
Tea8 wrote:
Can definitely tell it was cropped and pretty heavily apparently. It makes this very pixelated and it really shows on her teeth and in her eyes. If you did some pp work in these areas to maybe smooth things out a little it probably wouldn't be as noticeable.
Agreed on the PP, up close and personal will need work 98 percent of the time. I have copped the areas in question, but when you do teeth and eyes, just eye drop the area in question for color, go to chart and lighten a few shades, the air brush with an opacity of about 30 percent, same with the eyes.
Teeth
Eyes and eye lids.
Nov 4, 2013 19:38:05 #
Tea8 wrote:
I concur. Will you post the OoC original?Can definitely tell it was cropped and pretty heavily apparently. It makes this very pixelated and it really shows on her teeth and in her eyes. If you did some pp work in these areas to maybe smooth things out a little it probably wouldn't be as noticeable.
Nov 4, 2013 19:39:38 #
Tea8 wrote:
Very good. Thank you. I purposely did no noise reduction because I wanted to see what it would be like being enlarged so much at ISO 100 (if this makes any sense). I did try very much to whiten the teeth. I kept messing it up. The strange thing here is that in reality, her teeth seemed much whiter than here. This is a good start. I appreciate it very much. Oh, and you can hit me between the eyes anytime. I do not like it when people are trying to be polite and hiding their true thoughts.Can definitely tell it was cropped and pretty heavily apparently. It makes this very pixelated and it really shows on her teeth and in her eyes. If you did some pp work in these areas to maybe smooth things out a little it probably wouldn't be as noticeable.
Nov 4, 2013 19:40:10 #
Nikonian72 wrote:
O.k. It may be a bit. Got to put kids in the bath.I concur. Will you post the OoC original?
Nov 4, 2013 19:44:11 #
tainkc wrote:
Very good. Thank you. I purposely did no noise r... (show quote)
Not a problem. When someone says they are throwing their hat in the ring on this board I take it seriously. I understand about whitening the teeth, I've done it a few times and there are times that I still mess up and have problems getting it done. Could be the white balance in the camera was a little bit off and that's why they aren't as white?
Nov 4, 2013 20:16:21 #
Nikonian72 wrote:
O.k. here is the original original as shot before doing anything.I concur. Will you post the OoC original?
Nov 4, 2013 20:18:43 #
Nov 4, 2013 20:20:21 #
Bill Houghton wrote:
I kept missing areas with the brush and it also looked fake. I need practice in this department. Sometimes I do o.k..Agreed on the PP, up close and personal will need work 98 percent of the time. I have copped the areas in question, but when you do teeth and eyes, just eye drop the area in question for color, go to chart and lighten a few shades, the air brush with an opacity of about 30 percent, same with the eyes.
Nov 4, 2013 20:21:21 #
Tea8 wrote:
Could be. I was using 5600k for my wb and no filters.Not a problem. When someone says they are throwing their hat in the ring on this board I take it seriously. I understand about whitening the teeth, I've done it a few times and there are times that I still mess up and have problems getting it done. Could be the white balance in the camera was a little bit off and that's why they aren't as white?
Nov 4, 2013 21:19:50 #
tainkc wrote:
I kept missing areas with the brush and it also looked fake. I need practice in this department. Sometimes I do o.k..
I used to have a hard time also I understand that. Here is the best way to work that area:
1. Zoom in on the area you wish to work on.
2. Select the Quick select Tool.
3. Set Pixel to a small size to allow to get into corners.
4. Use the Alt Key to de-select areas not wanted.
5. Use you eye Dropper and sample the area you wish to lighten.
6. Click on the color box to bring up the color selection.
7. Chose a lighter color but not to white.
8. Select the Air Brush Tool.
9. Set Opacity to 30 or less.
10. Set brush to as large as you want to cover area.
11. Click on air brush and cover all the selected area in one brush click. If you click again it will add another 30 percent of shading.
This should help, key is selection of area before painting and Opacity of brush setting. Good Luck.
Nov 4, 2013 21:22:15 #

I don't know a lot about portrait photography, but I can make a few suggestions.
I would sharpen the eyes and lighten them, using highpass and then a soft light or hardlight blend mode. You might have to dodge them a bit to lighten also.
I would run a slight Gaussian blur on her skin. Make sure to keep the lips and eyes sharp. I like to sharpen the eyes with highpass and keep it in the top layer so they stay sharp no matter what you do with the lower layers.
That is about the limit of my knowledge on portraits.
Nov 4, 2013 22:03:02 #
I guess the only thing I can say is I wouldn't have cropped in so tight, maybe just to the point of the barn behind her, then run a color correction to lighten up the photo
sorry need to ask permission first to post my version
sorry need to ask permission first to post my version
If you want to reply, then register here. Registration is free and your account is created instantly, so you can post right away.