Please help me remove her
Nov 4, 2013 14:21:29 #
drg
Loc: Portland, OR
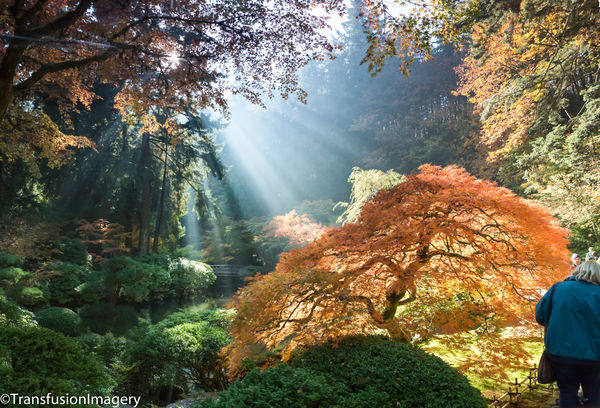
If you will be using photoshop to remove her, please detail all the steps, detail by detail, tool by tool, defining words like layers, masks, curves, etc. which mean nothing to me. As I am starting to learn about Photoshop, doing this would help me. I really like this image but obviously, she ruins it. Thanks.
Greg
Greg
Nov 4, 2013 14:32:15 #
There is a great book by Scott Kelby called "The Adobe Photoshop cs (add #) for digital photographers. Its the only book I could ever follow.
There is no way that I know of that you can remove her.
unless
If you have two pictures of this, and in another picture she is in another location and no one else is in the spot she is, then I can tell you how to do it. So let me know.
Another option is to add a heavy vignette to the photo and cover her with it.
there's an easy way to do that so you can determine exactly what the vignette looks like. if you are interested I can send it to you in a private message.
Nov 4, 2013 14:32:42 #

drg wrote:
If you will be using photoshop to remove her, please detail all the steps, detail by detail, tool by tool, defining words like layers, masks, curves, etc. which mean nothing to me. As I am starting to learn about Photoshop, doing this would help me. I really like this image but obviously, she ruins it. Thanks.
Greg
Greg
Why not just crop her and the kids out?
Nov 4, 2013 14:35:35 #
drg wrote:
If you will be using photoshop to remove her, please detail all the steps, detail by detail, tool by tool, defining words like layers, masks, curves, etc. which mean nothing to me. As I am starting to learn about Photoshop, doing this would help me. I really like this image but obviously, she ruins it. Thanks.
Greg
Greg
Before I try removing the intruder from this beautiful photo, did you know that Photoshop Elements 12 (and I assume new versions of Photoshop) have a content-aware move tool? I am going to buy PSE12 because of this feature. All you do is select the tool, use it to draw a loose selection around the object you want to move, then slide your selection to where you want it. In this case, that would be out of the frame completely. The background will automatically fill in as it would appear if the intruder had never been there at all. Magic? It must be.
Nov 4, 2013 14:44:00 #
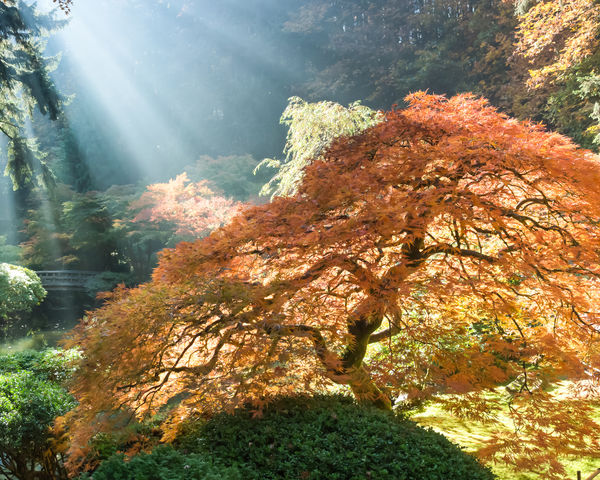
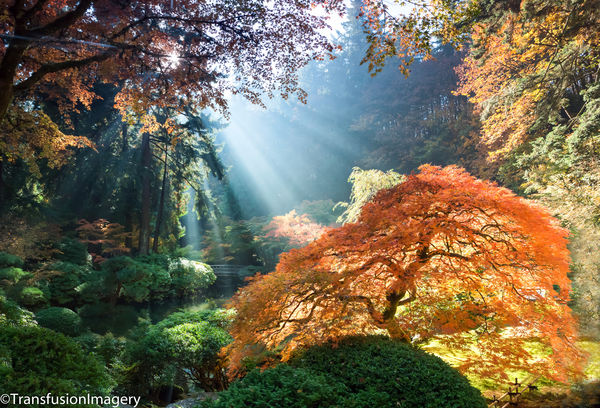
This is a great image. However, I think you have several pictures in here, and "la gorda" is only part of the problem. I made no adjustments, I only cropped. In the original, the two light areas compete for attention, not allowing your eye to rest on a center of interest. In the vertical version, I kept the sunbeam and small stream, but minimized the "burning bush". If the bush is your focus, I cropped for that in the second version. My only manip was to crop.

Nov 4, 2013 14:46:03 #
cs5 has it, but I think you need space all around the object you want to move. If it works along the edge like this then its even better than I imagined it could be.
Nov 4, 2013 14:58:38 #
drg
Loc: Portland, OR
buckwheat wrote:
This is a great image. However, I think you have several pictures in here, and "la gorda" is only part of the problem. I made no adjustments, I only cropped. In the original, the two light areas compete for attention, not allowing your eye to rest on a center of interest. In the vertical version, I kept the sunbeam and small stream, but minimized the "burning bush". If the bush is your focus, I cropped for that in the second version. My only manip was to crop.
Hey wheat, I have tried both crop versions but I was experimenting to see if I could remove the human factor. I am learning PS at the moment so I am open to all editions and recs..thanks for the feedback..
Nov 4, 2013 15:01:54 #

Multiple applications of the Clone Stamp Tool in CS6, but when folks said you can't remove her they were essentially correct. She's "gone" but the results are so horrible (a blurry mess, looks like pudding) it would have been better to leave her in. The only other thing I did was lower the contrast, add a bit of blurring, and darken the corner so your eye wouldn't be tempted to go there.
Nov 4, 2013 15:08:46 #
Ok, I used the clone tool and paint brush. No mask no selection no layers. I am kind of old school when it come to PP. I do use CS6. What I did was go to the larger size cloning tool and worked on the orange tree. Then I set it on the bamboo rail along the walk and extend that along the walk. Setting the source on one of the support brackets and placed it on the start point on the rail near her and extend that. I then went to the Light colored trees and cloned them over the people that were standing there and down to where the walk way should have been. Know all that was left was about one half of you female friend. I then selected the paint brush and click on the color block to get a brown color. Setting the pressure to about 80 I spayed the women away as a walk way. I added a lighter brown to break up the contrast of the walk way. I didn't try to make this a keep sake being that it for infrastructural use only and you are to complete you photo to your liking.
It would be nice if you did your complected drawing so we can see what you did and maybe give you a few pointer.
It would be nice if you did your complected drawing so we can see what you did and maybe give you a few pointer.

Nov 4, 2013 15:14:11 #
Nov 4, 2013 15:14:32 #
drg
I downloaded the picture and was able to remove her. but the image is too large for me to upload. what version of photoshop do you have?
I downloaded the picture and was able to remove her. but the image is too large for me to upload. what version of photoshop do you have?
Nov 4, 2013 15:17:27 #
Bills looks better than mine, with mid the branches go to the edge of the photo.
Nov 4, 2013 15:21:03 #
drg wrote:
If you will be using photoshop to remove her, please detail all the steps, detail by detail, tool by tool, defining words like layers, masks, curves, etc. which mean nothing to me. As I am starting to learn about Photoshop, doing this would help me. I really like this image but obviously, she ruins it. Thanks.
Greg
Greg
Hi Greg, This is far from perfect but the people are gone. I used the content aware healing brush and the clone stamp tool in PSE11 to remove the people, and make the background look as natural as I know how with such skills as I currently possess. I also applied "saturated film effect" to make the color slightly richer, and used "auto sharpen." At any rate, here it is for your consideration. I am sure the content aware move tool in PSE12 would do a better job but I don't have it yet.
Nov 4, 2013 15:25:52 #
Heirloom Tomato wrote:
Hi Greg, This is far from perfect but the people a... (show quote)
Sorry, meant to hit store original. Resending.

Nov 4, 2013 15:28:29 #
jim quist wrote:
.
unless
If you have two pictures of this, and in another picture she is in another location and no one else is in the spot she is, then I can tell you how to do it. So let me know.
.
unless
If you have two pictures of this, and in another picture she is in another location and no one else is in the spot she is, then I can tell you how to do it. So let me know.
.
What is being said is very good advise for future use. If you are trying get a picture of something, and some body is in the photo you can take the picture, Then after they a little future away, take the picture again. You can then over lay the area where the first picture was with the back ground from the second photo or vise a versa.
If you want to reply, then register here. Registration is free and your account is created instantly, so you can post right away.