Topaz Re-Mask question
Nov 4, 2013 09:38:32 #

I have been struggling with a problem using Topaz Re-Mask 3 and would appreciate any help you might offer. I have watched the tutorials but still have a problem. I am trying to mask out a dull sky see through a tree with lots of leaves - so there are lots of intricate details to mask. I have watched tutorials on this same process but evidently I am still doing something wrong because I am still going in circles - so far, with no success.
These are the steps I am taking:
1) Move photo from Photoshop to Re-Mask 3 from the filters menu in Photoshop.
2) go through the Re-Mask steps of identifying which portions of the photo to keep and which ones to mask out (red & green).
3) while in Re-Mask 3, I click on "compute mask".
4) When it is finished computing, I click on "OK" and expect to see a finished mask as a new layer back in Photoshop.
5) When I go back to Photoshop, I see a new layer has been added which is labled "background copy", and a message is on the screen that says "You are using Topaz plug-in. To return to Photoshop, terminate the Topaz plug-in".
6) When I look back in Re-Mask 3, my mask is gone and the original image is there (all in green) and ready for me to begin the masking process all over again.
Obviously, I am missing something or taking a wrong turn somewhere. Can someone please tell what I am doing wrong?
Thanks,
Nov 4, 2013 10:30:05 #
Sounds like you're mostly on the right track. I'm using Elements but I think it works the same. Couple of things to try:
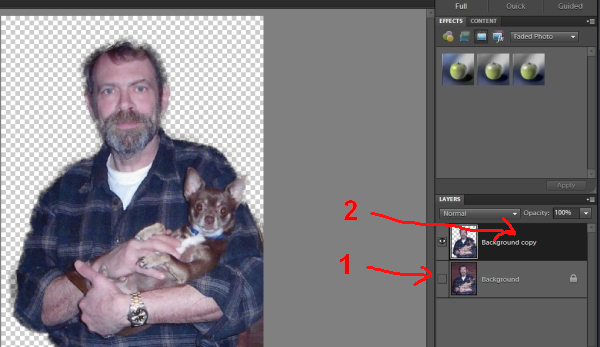
1 - After you create your mask and click ok to return to PS, all layers will be visible. Click on the eyeball next to your background layer to turn it off and you'll only see your mask layer.
2 - Click on the bar next to the background copy layer to select it. Then when you start ReMask again, you'll be working on that layer. If the background layer (original) is selected, ReMask will use the original image and start the masking process anew. Sometimes helpful if you want to work with more than one mask, but doesn't sound like that's what you want to do.
Hope that helps! :-D
Pardon the shakies, I need more coffee.
Nov 4, 2013 11:00:36 #
OddJobber wrote:
Sounds like you're mostly on the right track. I'm... (show quote)
I have tried that and made some progress. I now see the mask in Photoshop (just like your posted picture) with the undesired background grayed out. Now in Photoshop, I want to overlay the portion I have kept on to a new sky - so why would I be going back to Re-Mask? Also, in Photshop I am used to seeing a black and white mask but this is something different?
Nov 4, 2013 11:18:34 #
If you mean is ReMask different, yes. After you compute your mask, ReMask gives you several choices at top left, Image, Trimap, Keep, Cut, and you can open two or all four at once. Makes it easier to work on the details of the mask.
Back to PS, in your case, you wouldn't want to go back to ReMask, unless you want to tweak your mask. (Again in Elements), I would now go to Open > Place to put your sky image in. But you first want to select the layer below your mask layer, in this case, the background layer, so the sky will be placed under the masked layer (background copy).
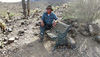
I sometimes go back to ReMask to make multiple masks. E.g., in the photo I showed, I removed the brick wall background. Now I might want to make a separate mask of just the puppy's eyes to tweak them, or I may want to select just the shadow to lighten or remove it.
I'm still pretty new to working with layers and having lots of fun!
Back to PS, in your case, you wouldn't want to go back to ReMask, unless you want to tweak your mask. (Again in Elements), I would now go to Open > Place to put your sky image in. But you first want to select the layer below your mask layer, in this case, the background layer, so the sky will be placed under the masked layer (background copy).
I sometimes go back to ReMask to make multiple masks. E.g., in the photo I showed, I removed the brick wall background. Now I might want to make a separate mask of just the puppy's eyes to tweak them, or I may want to select just the shadow to lighten or remove it.
I'm still pretty new to working with layers and having lots of fun!
Nov 4, 2013 11:25:19 #
OddJobber wrote:
If you mean is ReMask different, yes. After you c... (show quote)
Okay - you've given me some stuff to work on. Can't do it right now but later today will spend some time on it again and let you know.
By the way - I notice your from Portland, OR - My home town!
Nov 4, 2013 12:21:43 #
I'm really not a reader nor writer, so if I do over something already covered just look the other way.
I have remask to be a useful tool when doing a complex (meaning background matching the object of re-masking)..
I also found it rather difficult to master.
When you click on ReMask it will make an additional layer in you PS or CS. Then you will get you message saying that you are use ReMask. You will then get your Remask Screen. You have gone threw the masking stages which I find to the most challenging but found use the solid Red or Green to very Helpful in the mask process. I have found the color selection to be a challenge but bring the color range down into the single digits a great help.
Once you click ok as OddJobber mentioned, you will see you see the object you have masked out on that layer. It is not at this time a Mask. To make a mask out of it, you need to do the following
Turn off the back ground so all you see is the your object that you want masked. I use the wand and select the empty area. Then I invert the selection. Your object of desire should now be selected.
Click on the camera type Icon on the lower right corner and that will now place a Layer Mask on the selected Layer.
The advantage of a layer being that you can now use your Layer Mask to help define you Object. You can use the eraser to (black or white) to add or subtract from you object. If you were going to use a different back ground this would really help clean up you selection.
Nov 4, 2013 13:10:39 #
Bill Houghton wrote:
I'm really not a reader nor writer, so if I do ove... (show quote)
Wow - more things to look in to. I will work with this and see how it goes. Even though I thought I was making progress, I often find after clicking OK in Re-Mask and going back to Photshop, that Photoshop is frozen. However, once or twice that has not happened and I am not sure what I did differently - so ???????
I will try what you suggest and see how it goes.
Thanks for your help.
Nov 4, 2013 13:17:16 #
I only get frozen occasionally. Depending on your setup, working with layers and TIFF's can create some huge files. Sometimes my puter just needs a break.
Nov 4, 2013 13:18:28 #
OddJobber wrote:
I only get frozen occasionally. Depending on your setup, working with layers and TIFF's can create some huge files. Sometimes my puter just needs a break.
Amen to that LOL...
Nov 4, 2013 13:39:20 #
OddJobber wrote:
I only get frozen occasionally. Depending on your setup, working with layers and TIFF's can create some huge files. Sometimes my puter just needs a break.
I think that is what is going on is probably more of a computer issue. What you guys are telling me makes sense but, when I go back to Phtoshop I have the same message "You are using Topaz plug-in. To return to Photoshop terminate the Topaz plug-in" I am not able to click on the background copy, turn off the background layer or do anything - FROZEN. when I go back To re-mask. the original image is all green again - ready to start over.
I appreciate your pointers though. I am learning a few things in the process.
Thanks to both
Nov 4, 2013 13:49:21 #
I had that problem a few times, I just hit the enter bar. I think that cleared it up. I think it happens when you don't click on the right button, don't know for sure. But it only happens once in a blue moon on my end.
Nov 5, 2013 10:16:36 #
TerryG wrote:
I have been struggling with a problem using Topaz ... (show quote)
Step 4.1 You have to save your work before returning to ps. ?
Nov 5, 2013 10:49:59 #
mrtobin wrote:
Step 4.1 You have to save your work before returning to ps. ?
When I click on "OK" in the bottom right hand corner of Re-Mask, that sends it back to Phtoshop. Is there another "save" button somewhere, because I haven't found one. Sorry if I am being dense.
Nov 5, 2013 11:11:32 #
TerryG wrote:
When I click on "OK" in the bottom right hand corner of Re-Mask, that sends it back to Phtoshop. Is there another "save" button somewhere, because I haven't found one. Sorry if I am being dense.
Yes clicking ok should save it back to ps. Sorry I am no help.
Nov 5, 2013 11:24:36 #
mrtobin wrote:
Yes clicking ok should save it back to ps. Sorry I am no help.
every once in awhile, it does hang up, I think a lot has to do with each system and what is running when it does do this.
If you want to reply, then register here. Registration is free and your account is created instantly, so you can post right away.