Panos for A-Pee-R
Oct 27, 2013 15:18:42 #

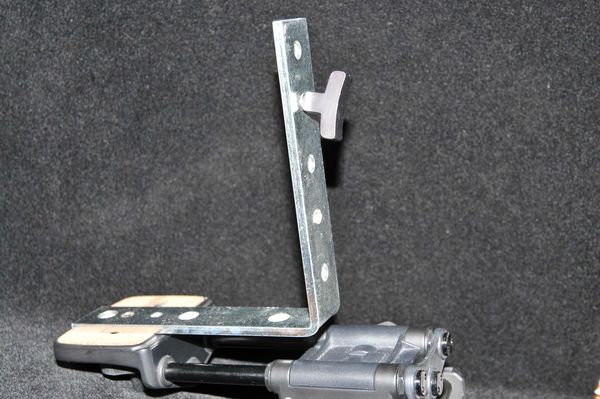
Yesterday I messed up my DIY project and had to start over. This one is an "L" bracket drilled and tapped so that I could mount my D300 in the vertical view on a Macro sliding rail. It's kinda flimsy so I'm not sure I would use it in the field. It's raining anyway...so I did these inside.
I rendered these in Helicon Focus using the Panorama mode. On the first one you can see some blur at the top. Otherwise, I might want to try some other "Pano software"
These are pretty much "crop only" other than I opened the shadows a bit on the flower. This was just a test to see what I could do.
I rendered these in Helicon Focus using the Panorama mode. On the first one you can see some blur at the top. Otherwise, I might want to try some other "Pano software"
These are pretty much "crop only" other than I opened the shadows a bit on the flower. This was just a test to see what I could do.


Oct 27, 2013 15:24:27 #

Can you provide a link to, or photos of, your DIY project? I am thinking of doing the same.
Oct 27, 2013 15:46:43 #
St3v3M wrote:
\\Can you provide a link to, or photos of, your DIY project? I am thinking of doing the same.
Sure. This was constructed from an angle brace for a little over $3.00. I drilled two holes: On the upright for the 1/4"-20 that threads into my camera's tripod socket. I used one from my "junk drawer". A word of caution, here: watch the length-- one would hate to punch a light hole through the bottom of a DSLR.
The hole on the bottom was the nominal size to run a 1/4"-20 tap through the horizontal part which is attached to the plate of the Velbon slider.
A note here: angle braces are made of a very low grade steel. If you can find a piece of aluminum-- that would be much easier to run the tap through.

Oct 27, 2013 15:49:34 #
LoneRangeFinder wrote:
\\ br br Sure. This was constructed from an angl... (show quote)
I had the same idea in mind. Thank you!
Do you think a rubber washer would reduce vibration and provide seating between the two?
Oct 27, 2013 15:59:38 #
St3v3M wrote:
I had the same idea in mind. Thank you!
Do you think a rubber washer would reduce vibration and provide seating between the two?
Do you think a rubber washer would reduce vibration and provide seating between the two?
That might work. The project I scrapped was made of wood and I had intended to glue a sheet of cork to reduce vibration. I really wanted to construct something with more adjustment options-- but I'll probably make that one from aluminum-- maybe 1/4"x 2" stock. At some point, it's no longer "cost effective", but in a sense, that's not what motivates me-- I like making stuff. Just wish I had access to a machine shop....
Oct 27, 2013 16:01:35 #
LoneRangeFinder wrote:
... that's not what motivates me-- I like making stuff. Just wish I had access to a machine shop....
It is the satisfaction of knowing you made it, much like crafting a photograph!
Oct 27, 2013 22:18:56 #

Results look good Allen. If you get a chance and are so inclined please upload originals as I like to pour over the fine details.
Your preliminary rig intrigues me but I can't quite figure out how you ate using it. Mind mounting the camera on it and snapping a picture?
I too enjoy cobbling together rigs and such for photography. One of these days I'm going to get a small mill, and then a lathe, and then..........
Your preliminary rig intrigues me but I can't quite figure out how you ate using it. Mind mounting the camera on it and snapping a picture?
I too enjoy cobbling together rigs and such for photography. One of these days I'm going to get a small mill, and then a lathe, and then..........
Oct 27, 2013 23:35:45 #
A-PeeR wrote:
Results look good Allen. If you get a chance and are so inclined please upload originals as I like to pour over the fine details.
Your preliminary rig intrigues me but I can't quite figure out how you ate using it. Mind mounting the camera on it and snapping a picture?
I too enjoy cobbling together rigs and such for photography. One of these days I'm going to get a small mill, and then a lathe, and then..........
Your preliminary rig intrigues me but I can't quite figure out how you ate using it. Mind mounting the camera on it and snapping a picture?
I too enjoy cobbling together rigs and such for photography. One of these days I'm going to get a small mill, and then a lathe, and then..........
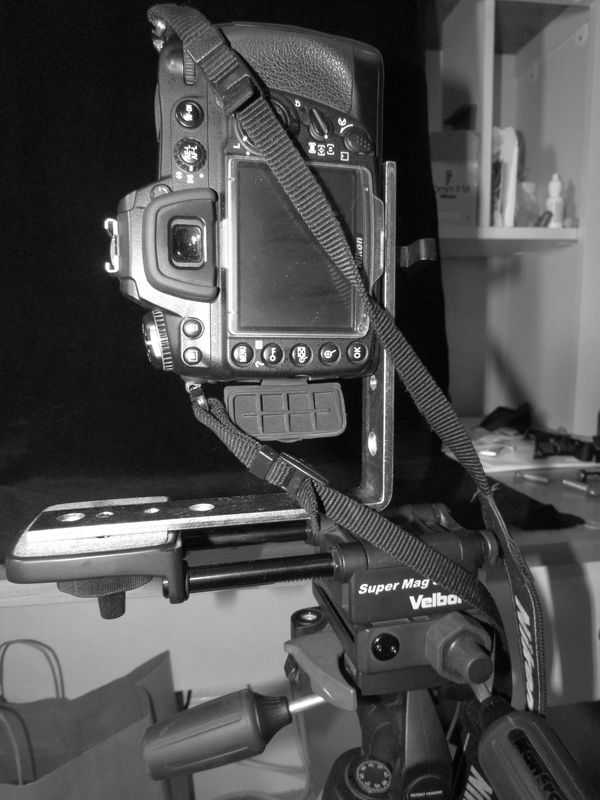
I was a machinist a long time ago. Now, I have no place to put a mill and lathe. I'd like to get access to a shop, though. The place I worked went out of business a long time ago. I had stretches of unemployment due to the contract nature of the industry. Here's a photo. The macro rig allows lateral movement of the camera between shots. Also reposted the shots.....

Oct 28, 2013 21:12:23 #

Are you using this for kind of like a horizontal (sideways)
Focus stack? Macro/close-up panoramic?
Glen
Focus stack? Macro/close-up panoramic?
Glen
Oct 28, 2013 21:29:57 #
Glen H wrote:
Are you using this for kind of like a horizontal (sideways)
Focus stack? Macro/close-up panoramic?
Glen
Focus stack? Macro/close-up panoramic?
Glen
When framing a pano with the camera in the horizontal position, the resulting pano would be long and narrow. The point of the vertical orientation with a pano in the closeup -macro range is to fit more into the "final" (stitched) frame. My first step was to do the pano with 3-4 images in the vertical orientation. Later I intend to stack the individual 3-4 images that will be combined in the second step into a pano-stitch. Make sense?
Oct 28, 2013 21:35:52 #
Thanks Allen, of the two the alignment on the coaster looks better. Seeing some wavy artifacts on the right side near the sun flares but hard to tell if it's an alignment issue or just a damage to the surface.
I don't have the room for a proper mill and lathe, I was thinking of the mini ones. Should be good enough for machining aluminum pieces for photography and microscopy. Until I find a decent used mill, I have resigned myself to using 1/4 or 1/2 plexiglass for my photography DIY projects.
Since you were a machinist do you have a machinist vise? Those are very accurate and if you had one it would be interesting to see how it handled the horizontal travel.
LoneRangeFinder wrote:
I was a machinist a long time ago. Now, I have no place to put a mill and lathe. I'd like to get access to a shop, though. The place I worked went out of business a long time ago. I had stretches of unemployment due to the contract nature of the industry. Here's a photo. The macro rig allows lateral movement of the camera between shots. Also reposted the shots.....
Oct 28, 2013 21:39:57 #
A-PeeR wrote:
Thanks Allen, of the two the alignment on the coas... (show quote)
No. I had to sell all of my tools to pay the rent during some lean times....
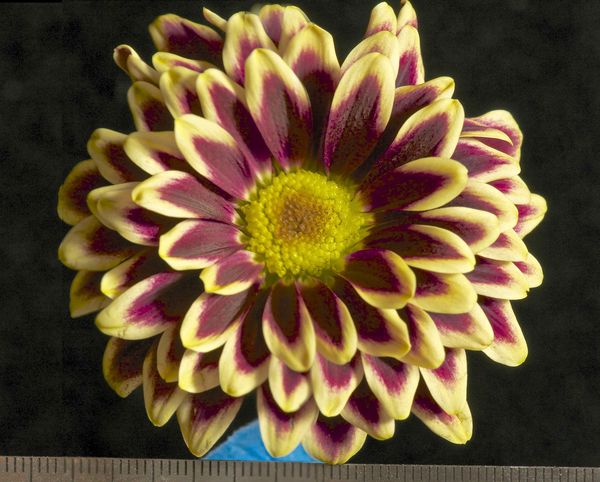
Regarding the coaster... What you see is exactly what I see. If you look at the bottom where I included the metal metric rule, you will see where the three images were stitched together: 29 in from the left, you can see the darker more narrow marker inside the full marker. You can see the same imperfect blend as you move toward the point you identified. See what I mean? This pano was comprised of three images. I included the metal rule so the blend could be examined more closely.
Oct 28, 2013 21:46:45 #
Ouch......
LoneRangeFinder wrote:
No. I had to sell all of my tools to pay the rent during some lean times....
Oct 28, 2013 21:48:48 #
Oct 28, 2013 21:54:47 #
LoneRangeFinder wrote:
When framing a pano with the camera in the horizontal position, the resulting pano would be long and narrow. The point of the vertical orientation with a pano in the closeup -macro range is to fit more into the "final" (stitched) frame. My first step was to do the pano with 3-4 images in the vertical orientation. Later I intend to stack the individual 3-4 images that will be combined in the second step into a pano-stitch. Make sense?
You do realize, that you have just introduced me to something new! And now I'm going to have to try it out LOL
That looks cool!!!
If you want to reply, then register here. Registration is free and your account is created instantly, so you can post right away.