Over writing digi' image
Oct 19, 2013 11:23:09 #

Canon 400d. Is it possible to purposely overwriite (double expose) an image (file) for a specifice purpose as I could do in my film days? Against a blank background (for instance) it was possible to record a subject moving, followed quickly (about 1/2 sec) with another exposure. A project I have in mind. Can see nothing on line re' my camera or PS.
I am waiting to be bombarded, telling me how easy it is. "A little knowledge is a dangerous thing" - no knowledge is even worse. kitcar
I am waiting to be bombarded, telling me how easy it is. "A little knowledge is a dangerous thing" - no knowledge is even worse. kitcar
Oct 19, 2013 11:31:45 #
Some cameras do allow this, but it is a specific to a camera. Most do not have this capability, so you need to check your manual
Oct 19, 2013 12:18:04 #

kitcar wrote:
Canon 400d. Is it possible to purposely overwriite... (show quote)
kitcar,
Some cameras do have this option, but like film you never know what you'll get. But digital Post Processing (PP) software has the built in tools to import two or more images, and parts of images onto a primary image. This may be called "Copy & Paste as a Layer".
You take several images for all the parts you will need, then open the primary image and Paste as a Layer each additional part. What makes this work so well is you have total control over all aspects of the final project, from the capture of each image to the pasting in of all the parts. You get to see it all happen while you are working on the project during each step.
Michael G
Oct 19, 2013 13:14:09 #

Oct 20, 2013 07:38:30 #
kitcar wrote:
Canon 400d. Is it possible to purposely overwriite... (show quote)
I didn't check these links, but it seems to be possible.
http://www.google.com/search?q=canon+400d+multiple+exposures&oq=canon+400d+double+exposures&aqs=chrome.1.69i57j0l5.12814j0j4&sourceid=chrome&espv=210&es_sm=122&ie=UTF-8
Oct 20, 2013 12:01:27 #
kitcar wrote:
Canon 400d. Is it possible to purposely overwriite... (show quote)
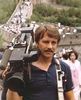
It's actually pretty easy to edit such photos with software. I use a program called Photo Scape to do "double" exposures as in the one below. For this however the camera must be on a tripod and not moved between exposures.

Oct 20, 2013 12:07:12 #
There is a technique called "multiplicity." It's fairly easy to do, and you can get some good effects. Google it for more info.
Multiplicity - Photography
1 Mount camera securely on a tripod.
2. Focus on the scene and switch to manual focus.
3. Set camera to M or A.
4. Get the exposure set right and, using a remote, take a photo with the model at the left.
5. Take additional photos with the model in various positions.
6. Open Photoshop and click on File > Scripts > Open into Stacks.
7. Select the images and let them compile.
8. You should see all your pictues in the Layers window.
9. Select the top layer and click New Mask Layer (at the bottom).
10. Make a layer mask for all the frames.
11. Take a black brush (soft) and brush over the person in that frame.
12. Click that layer mask and invert it by clicking Ctrl-I.
13. Click on the second layer and brush out the second character.
14. Do Ctrl-I again to bring him back.
15. When the last character is showing, go to Layer > Flatten Image
*************************************
You have to user layers and then layer masks on each layer and either paint in or paint out what you want in or out. There should be no trancparency since each layer should be put in at 100%. Now while you paint things out you may want to be at a reduced opacity so that you can see where exactly you are working.
To do the layers where you have one overlapping another, there is a good deal more work compared to simply pasting into a scene, especially when you have to make sure you don't show any fringing around any edges.
First you must think up a scenerio and then work out in your mind where everything should be placed, then go about shooting it and of course keep everything on manual for consitency. After that it is just a matter of time and close work in Photoshop.
*************************************
Shooting Sequential Images
A. Open the first photo of the series in Photoshop: this will be the base of the sequential photos
B. Open the second photo of the series:
Select all (Select > All or Ctrl-A)
Copy that selection (Edit > Copy or Ctrl-C)
Paste that selection on top of the first photo (Edit > Paste or Ctrl-V)
C. Add a Reveal All Layer Mask to the top of the first photo (Laye r> Add Layer Mask > Reveal All)
D. Select a large-sized paintbrush (Brush Tool) with opacity set to 100%
E. With the Layer Mask selected simply paint with the color black the areas where the subject, in this case a skateboarder, is located on the previous photo. This way the subject shows through the mask remember to paint over the shadows as well!
F. Open the third, forth, fifth . photos of the series and repeat from step B
G. Make photo adjustments
http://www.youtube.com/watch?v=3spT03p0XAQ
Oct 20, 2013 18:11:13 #
[jerryc41]
(Quote:- There is a technique called "multiplicity." It's fairly easy to do, and you can get some good effects. Google it for more info.)
Jerry. Thanks. that should keep me busy.
(Quote:- There is a technique called "multiplicity." It's fairly easy to do, and you can get some good effects. Google it for more info.)
Jerry. Thanks. that should keep me busy.
Oct 21, 2013 09:19:06 #
Jerry, thanks for the tutorials. I've done the bottom one before but have not tried the top one yet. Should be fun.
If you want to reply, then register here. Registration is free and your account is created instantly, so you can post right away.