005 Indexed
Oct 14, 2013 13:51:16 #

Magic Extractor - I'll try and give some instructions how to use it.
The software is Photoshop Elements, and Magic Extractor can be found in versions 9, 10, and 11 .
I don't know about earlier versions, and it has been removed from version 12.
I have used the ME to extract elements from a photo or drawing to use in my scrapbooking projects; to extract a person or group of people from a background and replace with another background; to extract a face, mouth, piece of clothing, etc. to place on another photo.
I worked in PSE11, but the instructions should be the same or at least very similar for all versions of PSE that have the Magic Extractor.
Here goes:
Make a duplicate of the photo you want to work on - never work on the original, once it's altered and saved it's gone forever.
Meet Tido - he's a member of my son and d-i-l's family. (Image 1)
So, you have the photo open in PSE, now select Image -> Magic Extractor.
On the left side are some tool icons, on the right side some other settings.
I usually start with setting the brush size larger, the default is 20 pixels, but on a large-resolution image, 20 pixels disappear. Play with different sizes and see what happens. I went to 100 pixels.
With the first brush on the left (it will paint in red) selected and using the mouse (or tablet if you have one), paint the parts you want to keep. It doesn't have to be exactly against the lines, and I probably paint way more than I actually need. Then select the second brush and do the same with this blue brush for the parts you want to delete.
For parts where the colours are very similar, you will want to paint as close to the dividing line as possible, both in the area to be kept and in the area to be deleted. (See about halfway down the post on the right-hand side.
For small areas, reduce the brush in size. When you think you're finished, click the preview button. Look carefully, use the eraser tool to delete those parts that "went over the line".
To bring the picture back, click on the Display down-arrow in the Preview area on the right and select Original Photo. Before rendering the extracted photo, you can also select to defringe the image, I did here by 3 pixels. I think it makes for nicer edges. Click on OK. The extracted picture will no open in your work area. Inspect again. In this image you can see some green left behind around the foot. Use the eraser tool to remove that.
The background is now a grey-and-white checkerboard (or whatever you've chosen it to be in preferences), indicating transparency. (Image 3 - except it shows in plain white here).
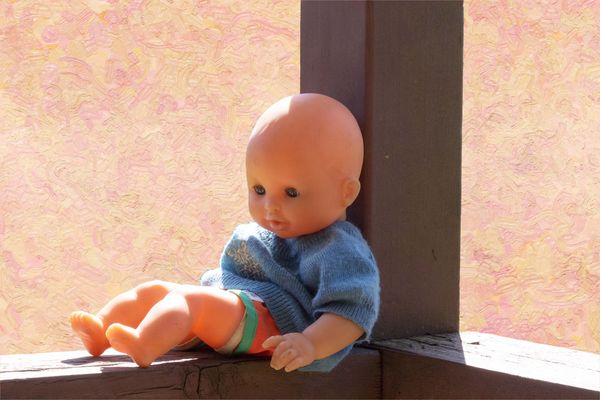
Now open the background you want to use.
Select the Move tool (Arrow with +sign) and drag and drop the background to the extracted image.
Don't be shocked if the background now sits in front of your image. Just drag the layer in the layers palette so it sits between the original and the extracted image.
Save this new composition. Leave as is and save as a psd file if you think you would like to come back to it later and make more changes.
Merge the two top layers and Save As (name).jpg if you're finished. (Image 4).
It will be clear that this background is not the best, but it happened to be the first one I found in my files. This background doesn't account for the sunshine/shadows, but I think that for the purpose of this explanation it worked fine.
If there is anything you don't understand, please feel free to ask - here in the forum, so that everyone can benefit ;-)
EstherP
The software is Photoshop Elements, and Magic Extractor can be found in versions 9, 10, and 11 .
I don't know about earlier versions, and it has been removed from version 12.
I have used the ME to extract elements from a photo or drawing to use in my scrapbooking projects; to extract a person or group of people from a background and replace with another background; to extract a face, mouth, piece of clothing, etc. to place on another photo.
I worked in PSE11, but the instructions should be the same or at least very similar for all versions of PSE that have the Magic Extractor.
Here goes:
Make a duplicate of the photo you want to work on - never work on the original, once it's altered and saved it's gone forever.
Meet Tido - he's a member of my son and d-i-l's family. (Image 1)
So, you have the photo open in PSE, now select Image -> Magic Extractor.
On the left side are some tool icons, on the right side some other settings.
I usually start with setting the brush size larger, the default is 20 pixels, but on a large-resolution image, 20 pixels disappear. Play with different sizes and see what happens. I went to 100 pixels.
With the first brush on the left (it will paint in red) selected and using the mouse (or tablet if you have one), paint the parts you want to keep. It doesn't have to be exactly against the lines, and I probably paint way more than I actually need. Then select the second brush and do the same with this blue brush for the parts you want to delete.
For parts where the colours are very similar, you will want to paint as close to the dividing line as possible, both in the area to be kept and in the area to be deleted. (See about halfway down the post on the right-hand side.
For small areas, reduce the brush in size. When you think you're finished, click the preview button. Look carefully, use the eraser tool to delete those parts that "went over the line".
To bring the picture back, click on the Display down-arrow in the Preview area on the right and select Original Photo. Before rendering the extracted photo, you can also select to defringe the image, I did here by 3 pixels. I think it makes for nicer edges. Click on OK. The extracted picture will no open in your work area. Inspect again. In this image you can see some green left behind around the foot. Use the eraser tool to remove that.
The background is now a grey-and-white checkerboard (or whatever you've chosen it to be in preferences), indicating transparency. (Image 3 - except it shows in plain white here).
Now open the background you want to use.
Select the Move tool (Arrow with +sign) and drag and drop the background to the extracted image.
Don't be shocked if the background now sits in front of your image. Just drag the layer in the layers palette so it sits between the original and the extracted image.
Save this new composition. Leave as is and save as a psd file if you think you would like to come back to it later and make more changes.
Merge the two top layers and Save As (name).jpg if you're finished. (Image 4).
It will be clear that this background is not the best, but it happened to be the first one I found in my files. This background doesn't account for the sunshine/shadows, but I think that for the purpose of this explanation it worked fine.
If there is anything you don't understand, please feel free to ask - here in the forum, so that everyone can benefit ;-)
EstherP
Image 1

Image 2
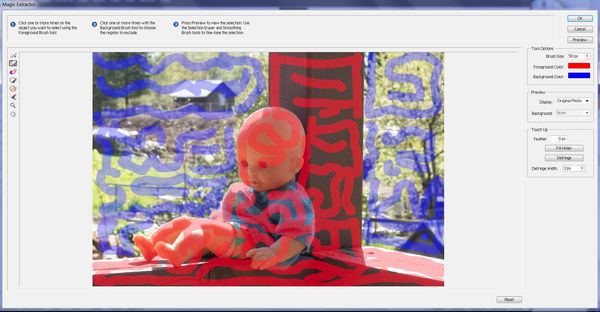
Image 3
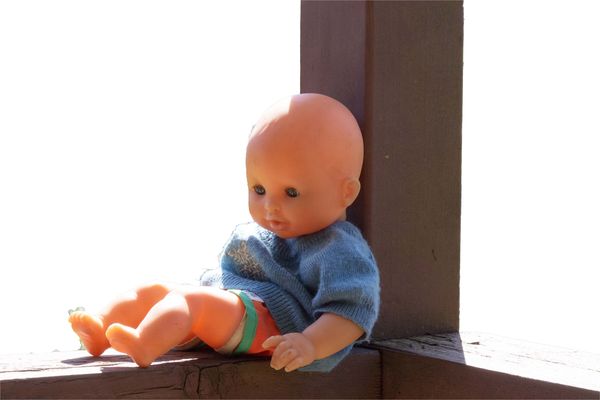
Image 4
Oct 14, 2013 14:13:13 #

Oct 14, 2013 14:25:26 #

Oct 14, 2013 14:28:46 #

That's great, Esther, thank you so much. I'll give it a go and see whether I can do this, and will come back if I have further questions. But I appreciate your doing this for us :o)
Oct 14, 2013 14:45:13 #
Oct 14, 2013 15:27:13 #
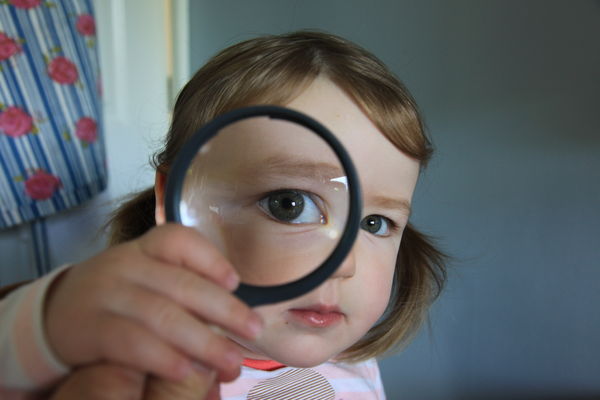
Hi Esther, here's my first effort. I didn't do a good job, as I just wanted to see whether I could follow your instructions and make them work for me, so I did the whole thing quite quickly. As you see, your instructions worked fine, thank you. But even if I had done a better job of going around my grand-daughter's face and hair, how could I make it not so obvious that she is a "cut-out"? Would that be by defringing the area by a larger number of pixels. I used 3, as you suggested, but I would like the edges to look softer.
Grand-daughter original
Experimental First Try with Magic Extractor

Oct 14, 2013 15:31:17 #
On looking at the two images, I see that the second one, the "Magic Extracted" one, is a slightly different colour: it is a bit lighter. Any idea why this should be, as nothing in your instructions, and nothing I did that I am aware of, should have altered the colour? Or is that just a "trompe l'oeil" because the second background is lighter? I don't think it is, her hair doesn't seem to be as brown in the second image as in the first.
Oct 14, 2013 15:32:34 #

Oct 14, 2013 15:36:31 #
photosarah wrote:
Hi Esther, here's my first effort. I didn't do a... (show quote)
You did well, Sarah! I'm afraid that the cut-out look cannot always be avoided, especially when working with hair. I think I would try this one without the defringing.
Defringing cleans up the edges, makes them look sharper, and yes that translates into the cut-out look.
Hair has got to be the trickiest thing to "lift" from a background. The greater the contrast between hair and background, the better it will work.
But if this is your first go at it, you did very well!
EstherP
Oct 14, 2013 15:41:52 #
Here's another little trick: Look at photosarah's second picture: There is a bit of black along the child's sleeve that shouldn't be there.
Once the picture has been rendered, select the eraser, set the edge of the circle right against the sleeve but not on it, press the shift-key and hold it, click your left mouse-button, move the eraser to the other end of the sleeve, still holding the shift-key, and left-click again. You now have a nice, straight line where the black is gone.
This works on curved lines as well, if you click just short distances away, all the while holding the shift-key.
EstherP
Oct 14, 2013 17:18:59 #

EstherP wrote:
Magic Extractor - I'll try and give some instructions how to use it.
The software is Photoshop Elements, and Magic Extractor can be found in versions 9, 10, and 11 .
I don't know about earlier versions, and it has been removed from version 12.
The software is Photoshop Elements, and Magic Extractor can be found in versions 9, 10, and 11 .
I don't know about earlier versions, and it has been removed from version 12.
Esther, what did Adobe replace the Magic Extractor with in PSE12? In CS they have a Magic Wand and Quick Selection tools and Refine Edge for getting an even better selection.
Oct 14, 2013 18:33:05 #
jeep_daddy wrote:
Esther, what did Adobe replace the Magic Extractor with in PSE12? In CS they have a Magic Wand and Quick Selection tools and Refine Edge for getting an even better selection.
Replace? I don't think that work is in their dictionary. However, somewhere on the Adobe website found:
"Alternative: Use the Quick select tool together with the Refine Edge tool to quickly select and extract anything from your photos."
Sounds similar to CS, although I haven't tried it yet.
EstherP
Oct 14, 2013 18:36:31 #
EstherP wrote:
Here's another little trick: Look at photosarah's ... (show quote)
Hey Esther, how did you learn all this stuff about Elements; just messing with it or taking classes? And do you work on a PC?
Oct 14, 2013 19:11:57 #
EstherP wrote:
Magic Extractor - I'll try and give some instructions how to use it.
The software is Photoshop Elements, and Magic Extractor can be found in versions 9, 10, and 11 .
I don't know about earlier versions, and it has been removed from version 12.
The software is Photoshop Elements, and Magic Extractor can be found in versions 9, 10, and 11 .
I don't know about earlier versions, and it has been removed from version 12.
EstherP,
Thanks so much! This is an excellent tutorial, a well-written one.
I would like to add this bit of information. The Magic Extractor was introduced with PSE 4 and it is also available in PSE 5 through PSE 8.
Oct 14, 2013 19:15:33 #
Ziza wrote:
EstherP,
Thanks so much! This is an excellent tutorial, a well-written one.
I would like to add this bit of information. The Magic Extractor was introduced with PSE 4 and it is also available in PSE 5 through PSE 8.
Thanks so much! This is an excellent tutorial, a well-written one.
I would like to add this bit of information. The Magic Extractor was introduced with PSE 4 and it is also available in PSE 5 through PSE 8.
Thank you, Ziza.
I've used PSE since version 7, then 8, 9, 11 and now 12.
Uninstalled 7 and 8 a long time ago, and couldn't remember if they had the magic extractor.
EstherP
If you want to reply, then register here. Registration is free and your account is created instantly, so you can post right away.