From color to pencil like, I guess
Sep 11, 2013 23:29:52 #

The last time I posted some sort of tutorial I was flamed so now, I just post a before and after. If you want to know how it is done, ask.
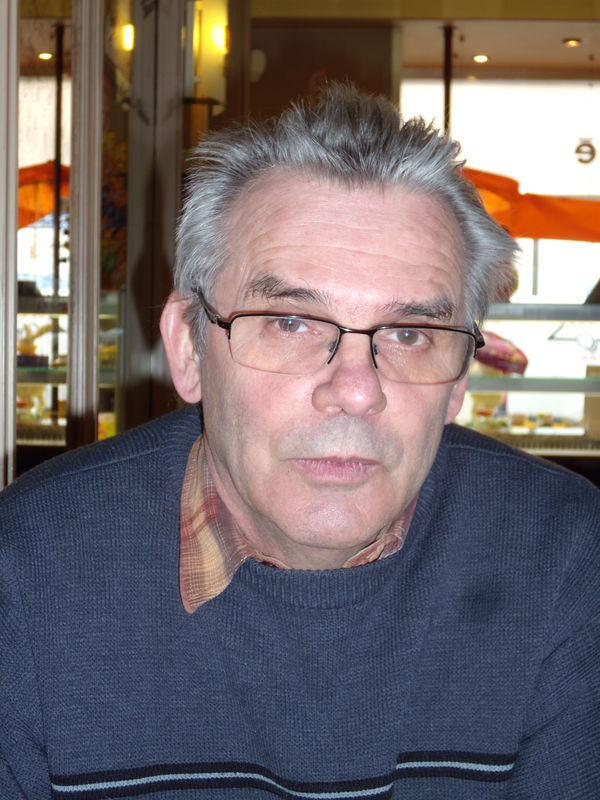
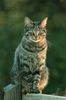
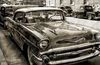
Before
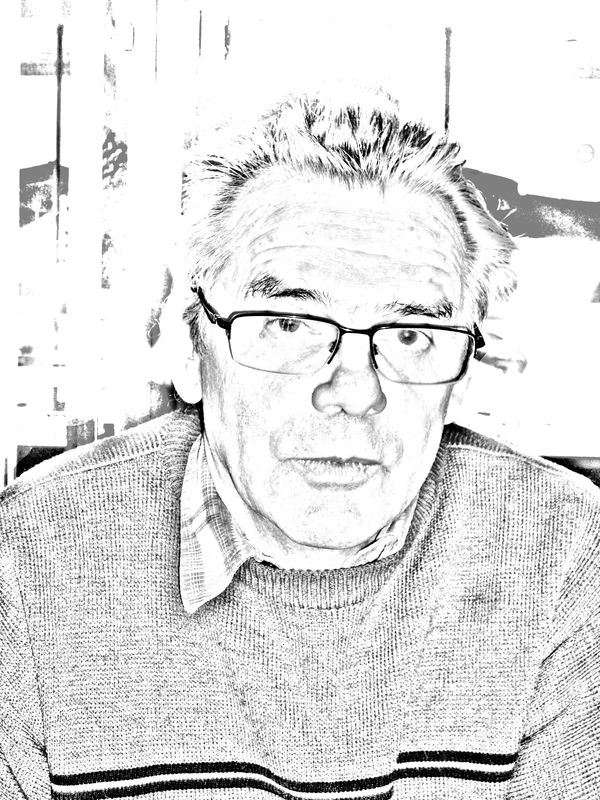
After
Sep 12, 2013 00:03:34 #

Sep 12, 2013 00:35:49 #

I remember that last one and I thought you got a raw deal all the way around. I do think your 'final tweak' should find a place on your wall. I assume that is you.
Sep 12, 2013 00:42:01 #
Sep 12, 2013 02:43:47 #
Sep 12, 2013 09:02:46 #
Rongnongno wrote:
The last time I posted some sort of tutorial I was flamed so now, I just post a before and after. If you want to know how it is done, ask.
I'm sorry to hear you got so much grief the last time you tried to post any kind of tutorial. If people don't like it they should not read the post.
I, for one, am very much interested in how you arrived at your final image. I really like a well done conversion to "pencil" but my attempts usually seem to fall a little short.
Can I just mention that, now that we have a section specifically for post processing, maybe the knowledge you have to impart might be more appreciated there than in other sections where the hardcore purists tend to roam?
Sep 12, 2013 10:04:39 #
The third one is very good. I'm going to have to try that. And pay no attention to the negative nellies on here. Some people just gotta hate. They haven't figured out their karma yet! :mrgreen:
Sep 12, 2013 10:05:51 #
Sep 12, 2013 10:34:52 #
Picdude wrote:
To prevent comments that will distract from the information I am creating a page that will reside on my profile. I will publish it shortly.... for one, am very much interested in how you arrived at your final image. I really like a well done conversion to "pencil" but my attempts usually seem to fall a little short...
Please note that that, as for skinning a cat, PS offers multiple ways to do the same thing. I just use the simplest (in my opinion).
Sep 12, 2013 13:32:34 #
Picdude wrote:
I, for one, am very much interested in how you arrived at your final image. I really like a well done conversion to "pencil" but my attempts usually seem to fall a little short.
Open image
Change color mode to 16bit (A pet peeve of mine)
Duplicate background layers (Ctrl-J)
- Start -
Create an Adjustment layer Hue/Saturation. Reduce the saturation to -100 using the slider (or type it in)
Select the duplicated background layerChange the blend mode to color dodge.
Invert it CTL-I. The image is now white. This is normal.
Tip: As this first process is repeatitive create an action
Go to filter, Select blur then Gausian blur
Use the glider so that the image starts to look like what you want to acheive. (Here, this is really up to you.)
WarningGet this one right otherwise you will need to start over from this step.
Create a level adjustment layer to adjust the density of your changes
Slide the left slider to the right until you get the effect you feel is right.
- Adjusting areas That are not even near the effect you research open the brush tool.
- Adjust the brush size to your liking AND proportional to the areas you want to change.
- As there will be areas of transition do not paint too close to sensitive areas yet.
- For these areas, change the brush tool feathering to what you think is appropriate (I use 100%) Make sure you cover the hard edges created by the previous brush. I did not do it in this particular case. Check picture 2 using contrast to see the mistakes. Adjust the brush size to reach narrow areas of your picture. Please note that you do not need to be all that precise here
You are basically done now.
To get an 'old look' as described as 'last tweak'
This one is the simplest of all
Create a fill layer
Select radius fill
Select colors or B&W as here. You can use sepia, colors I think.
Create a layer mask
Select opacity 100%. The image is now invisible
Select a circular brush. Tweak the brush settings and set feather to 100%
- Enlarge the brush so that it covers 90% of the image
- Change the shape to oval, the top or side pointing toward the longest side of the picture.
Click once on the picture . Use ctrl-Z if not aligned as you wish and click again. Since the brush effects are cumulative, do not click twice or drag the brush, the results become unpredictable.
Done
Please post your results.
I will write the page later on, possible less detailed as I will not have a sample with it
Sep 13, 2013 09:20:11 #
Sep 13, 2013 09:30:43 #
Sep 13, 2013 10:30:35 #
Love what you did with a basically plain photo of a gentlemen. I've tried several times to do similar conversion and I always end up sending them to the recycle bin. Thank you SO much for the tutorial - something to do in my 'spare time' this weekend :)
As to the criticisms (I recall the incident to which you refer) - ignore them if you can. This is a place to show what we've done and to learn new techniques (such as this one). I see absolutely no reason in the world for anybody to ever be rude to another photographer ... as I learned growing up if you can't say something nice then don't say anything.
Keep up the good work my friend!
Sep 13, 2013 10:50:28 #
Well, I got the pencil sketch part done, but am having difficulties with the last tweak part.
I will keep working on it.
I will keep working on it.
Sep 19, 2013 02:15:18 #
wtompkins wrote:
Well, I got the pencil sketch part done, but am having difficulties with the last tweak part.
I will keep working on it.
I will keep working on it.
Any luck?
If you want to reply, then register here. Registration is free and your account is created instantly, so you can post right away.