How to create a movable Light layer in Photoshop
Dec 4, 2011 13:11:33 #
I learned this technique from a German Photographer named Calvin Hollywood. Calvin has Photoshop training videos on Kelby-Online Training. He is a very good instructor and a Master of Photoshop. Okay so heres what we are going to do. We are going to create light on a layer that you can move around anywhere in your shot, fully adjustable and transformable.
1. Open your photo in Photoshop.
2. Hold down the Ctrl key and J key to duplicate your background layer. I believe it's Option key on the Mac.
3. Now from your Adjustments pallet, choose the Curves Adjustments icon. This will put a curves adjustment layer right above your duplicated background layer.
4. Now using the Adjustment slider choose the FAR Right slider and slide it to the left to darken down the photo. Do this to your taste.
5. Now using the Middle adjust slider move it to the right to adjust the midtones.
6. Now from the tools pallet, choose a brush and make sure the Opacity at the top of the screen is set to 100% and that your foreground color on the tools pallet is set to black.
7. Now using your brush place a small dot in the center of your photo.
8. Now you can change the position of your light by using the " FREE TRANSFORM" selection. From the top menu options choose. EDIT> Free Transform. The shortcut for this is CRTL L or Option L on a Mac.
9. Now using your move tool you can re-position the light anywhere on your photo. You can also change the size of the light by holding down the SHIFT and ALT Key and then dragging the corners of the bounding box out to the size you want. then CLICK OK
10. You can change the OPACITY of the brightness down to taste if you like.
11. You can also use the move tool to move the light around on your photo.
Enjoy
Dec 4, 2011 19:15:55 #
phoneguy55
Loc: upstate NY
I totally enjoy the varied tutorials on Kelby Training also. This one was easy to do, thanks for the steps, since I hadn't seen it on that site yet. Another way to play with light patterns in some photo edits is by using a plug-in set of brushes that are in the shape of different light beam patterns. I have PSE9 and they were pretty easy to incorporate into my brush list.
Thanks for this heads up, as it is yet another way to add that perfect "tweak" when called for in a given photo..
Thanks for this heads up, as it is yet another way to add that perfect "tweak" when called for in a given photo..
Dec 5, 2011 07:09:53 #
Dec 5, 2011 13:23:19 #
What am I doing wrong?
The curves adjustment only has two sliders and the one on the far right lightens the picture when moved to the left ther is no middle slider.
The curves adjustment only has two sliders and the one on the far right lightens the picture when moved to the left ther is no middle slider.
Dec 5, 2011 14:52:21 #
mookieandme wrote:
What am I doing wrong?
The curves adjustment only has two sliders and the one on the far right lightens the picture when moved to the left ther is no middle slider.
The curves adjustment only has two sliders and the one on the far right lightens the picture when moved to the left ther is no middle slider.
Me too!
Dec 5, 2011 17:53:16 #
mookieandme wrote:
What am I doing wrong?
The curves adjustment only has two sliders and the one on the far right lightens the picture when moved to the left ther is no middle slider.
The curves adjustment only has two sliders and the one on the far right lightens the picture when moved to the left ther is no middle slider.
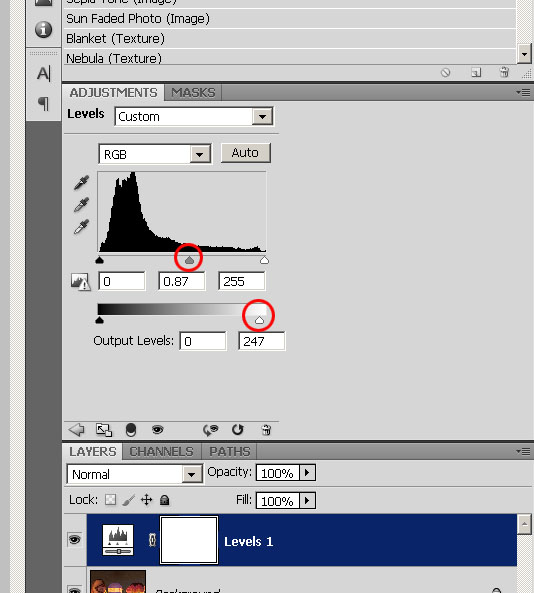
Sorry for the confusion everyone. The Adjustment layer should have been a " LEVELS" adjustment. Again, sorry. Let me know if you have any other questions.
Dec 5, 2011 18:52:11 #
Dec 5, 2011 19:27:50 #
mookieandme wrote:
The far right slider still lightens the photo when moved to the left
When you create a curves adjustment layer you will see
at the bottom of the curves area an area that only has two sliders, a black one on the left and a WHITE one on the right. Use this WHITE slider and move it in towards the left to darken down the photo. THEN move the MIDDLE slider in the top window to the right to darken down the midtones.
Dec 5, 2011 19:36:30 #
Dec 9, 2011 19:15:01 #
Dec 9, 2011 19:25:08 #
Laura'sImages wrote:
quote=Fstop12 I learned this technique from a Ger... (show quote)
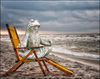
Your most welcome. Love you old truck shot. Maybe you could try this technique on that shot and see what you think.
Dec 10, 2011 16:20:11 #

Great post....works like a charm. Changing the brush softness makes it look natural. I made an action out of it. Thanks :thumbup:
Dec 10, 2011 20:56:03 #
robert-photos wrote:
Great post....works like a charm. Changing the brush softness makes it look natural. I made an action out of it. Thanks :thumbup:
Your Welcome, glad you liked it.
If you want to reply, then register here. Registration is free and your account is created instantly, so you can post right away.