Part 2 beginner's tutorial to using enlarger lenses for macro
Jun 30, 2013 09:18:22 #
The Part Two beginner's video is up. Part three will show the use of the lenses and extension rings/bellows, how many extensions rings do what, and, of course, the promised taking of pictures for stacking and how to do the stacking, etc. Might extend to a part 4 about how to get the best stacks and how to minimize artifacts, etc.
http://www.youtube.com/watch?v=Q3WxpkaOoec
http://www.youtube.com/watch?v=Q3WxpkaOoec
Jun 30, 2013 10:33:12 #

Jun 30, 2013 10:47:11 #

Nice tutorial on using lenses and Macro Photography. The use of extension tubes and bellows is very interesting It should be noted that the choice of an extension tube by its length is dependent on the subjects physical size, and the distance between subject and camera film plane. The use of a bellows allows infinite range of lens extension without the need of changing tubes.
One thing I found puzzling was your statement about selecting extension tubes for total manual connections, no electrical contacts. While this will make the purchase a little less expensive, it will cause the Canon EOS body and lens interoperable for Aperture settings.
I used to have an Olympus OM-4T (film) camera with a bellows, and the lenses for macro used a mechanical lever to set the Aperture between the camera body and lens. I also had the Aperture, and DOF scales on the Aperture adjustment tab on the lens barrel. My Canon EOS 1000D has no manual Aperture setting on the lens barrel, and no DOF scales, it relies totally on the electrical connections between body and lens.
I think a word or two should be added to suggest turning off Auto Focus, and Image Stabilization on the lens body to enable accurate focusing, and Image Stacking multiple exposures. By enabling the electrical connections for the Aperture adjustment you will have more accurate exposure control, and some degree of Depth of Field for focus control. Disabling the electrical connections for the Aperture will automatically reset the Aperture to wide open (f/1.9).
Michael G
Jun 30, 2013 11:17:55 #
Thanks for the comments. I do suggest avoiding using autofocus. As a beginner's video, discussing too many concepts have to be avoided in a tutorial, but I hear what you are saying. I will have a video about macro using changes of focus without using change of position of the camera or the object. Enlarging lenses don't have a focusing mechanism, they have to be moved or they can only have a focus on one plane per position/extension. That's the reason the camera will be moved as will be shown in the third video. I'm thinking that I may end up doing at least 8 videos when all is said and done. As they say "baby steps".
Jun 30, 2013 13:18:15 #
You are very welcome.
The reason I bring this up is for all the newer digital photographers who have never set foot in a chemical darkroom, and rely only on a computer and software.
Something you might want to touch upon in future chapters is moving the subject in reference to the film plane, and how this will affect image size on the sensor. It will have a major effect of focus, but with some lens it will allow the increase or decrease of the magnification effect on the subject. What I have found with extension tubes is by positioning the subject for proper composition, then manually setting the focus ring I can obtain very good, accurate focus on any part of the subject.
The above seems to work well for Focus Stacking exposures for a wide degree of acceptable sharp focus in macro compositions. You might also study the effect of Manual Aperture control and the effect of Depth of Field and Hyper Focal Range.
Today's medium priced Extension Tubes come in a set of 3 tubes, each one a different length, and marked appropriately. You might set up a standard capture using standard measurements and camera equipment to demonstrate how each extension tube will affect the capture.
Then moderately priced bellows have a printed scale on one of the rails to use as a reference for future work. Teach the new photographers how to develop and create their own reference chart for Macro work.
The important thing to keep in mind is to enjoy what you are doing, teaching is always a learning task for the teacher.
Michael G
Jun 30, 2013 14:40:49 #
Again, thanks. As a scientific presenter, I am also aware of detail overload. Yes, focusing by focusing ring on the lens keeps perspective while moving the camera appears to foreshorten the object. The first goal is to get the beginner/intermediate photographer to the point where rules of thumb work and then pictures can be taken. The details for perfection can come as aspirations increase. 8-)
Jun 30, 2013 15:37:23 #
newryqs wrote:
Again, thanks. As a scientific presenter, I am also aware of detail overload. Yes, focusing by focusing ring on the lens keeps perspective while moving the camera appears to foreshorten the object. The first goal is to get the beginner/intermediate photographer to the point where rules of thumb work and then pictures can be taken. The details for perfection can come as aspirations increase. 8-)
You are correct about detail overload, that drives more people away from an interesting subject than anything else. So, we grab their attention like a fish on a hook, and salt lightly with details so they can get some useful results. Good approach.
Michael G
Jun 30, 2013 17:12:53 #
wingclui44
Loc: CT USA
newryqs wrote:
The Part Two beginner's video is up. Part three will show the use of the lenses and extension rings/bellows, how many extensions rings do what, and, of course, the promised taking of pictures for stacking and how to do the stacking, etc. Might extend to a part 4 about how to get the best stacks and how to minimize artifacts, etc.
http://www.youtube.com/watch?v=Q3WxpkaOoec
http://www.youtube.com/watch?v=Q3WxpkaOoec
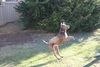
Thanks again for this wonderful tutorial! After the first one, I had tried it with my enlarger lenses, (Schneider Kreuznach 50mm Componar f4.5,and Beselar 50mm f3.5.) they came out pretty good. here are some images.
Once again, thank you so much! Now I have learned something interesting and improved my knowledge!


Jun 30, 2013 17:16:15 #
wingclui44
Loc: CT USA
newryqs wrote:
The Part Two beginner's video is up. Part three will show the use of the lenses and extension rings/bellows, how many extensions rings do what, and, of course, the promised taking of pictures for stacking and how to do the stacking, etc. Might extend to a part 4 about how to get the best stacks and how to minimize artifacts, etc.
http://www.youtube.com/watch?v=Q3WxpkaOoec
http://www.youtube.com/watch?v=Q3WxpkaOoec
The second and third images were taken at the lap-top screen.
Jun 30, 2013 19:35:28 #
Nice shots and great for first try. You lens has a field of view of about 2 cm so you're getting real close!
Jul 1, 2013 06:30:51 #
Jul 1, 2013 07:22:36 #
Radioman
Loc: Ontario Canada
newryqs wrote:
The Part Two beginner's video is up. Part three................
Hi, A good video. This kind of video lecture takes a lot of planning and effort. The comment on a stable floor is a very important one that I may have missed as I have always been on a concrete floor. It is a long time since I have done any serious macro work. One of the problems was lighting. Quartz lightbulbs with a heat filter was one method. ( today Quartz lights are called Halogen :-) I am presently getting set up to do some macro again - and taking a look at the high-power LED flashlights that have a single large LED (1 to 5 Watts). They are only a few mm square and if they are taken out of the flashlight and put on a small holder (that gives a heat sink) one or more could provide a nice mini lighting setup.
Jul 1, 2013 07:43:24 #
newryqs wrote:
The Part Two beginner's video is up. Part three will show the use of the lenses and extension rings/bellows, how many extensions rings do what, and, of course, the promised taking of pictures for stacking and how to do the stacking, etc. Might extend to a part 4 about how to get the best stacks and how to minimize artifacts, etc.
http://www.youtube.com/watch?v=Q3WxpkaOoec
http://www.youtube.com/watch?v=Q3WxpkaOoec
Very nice! Thanks again. :thumbup:
Jul 1, 2013 08:07:14 #
We will also have a lighting video both for studio and macro. We use the 1100 lumen full-spectrum daylight-balanced LED lights available at big box stores. Check online reviews for the brands you can get. (They do cost a fortune though: ~ $35 each.)
Jul 1, 2013 08:14:05 #

Been there, done that...I have a couple of bellows units & used to use them with a Nikon D70s, totally manual... Had to attach a thin (12mm) extension tube to the bellows to allow it to be mounted to the camera (in order to clear the onboard flash protrusion)...Besides enlarger lenses (the longer lengths will allow infinity focus) I also used an old "Spiratone" 75mm flat field macro lens...Bottom line, true macro lenses are a lot more convenient...Oh, the better enlarger lenses are symmetrical & as such, there is no gain by reversing them.
If you want to reply, then register here. Registration is free and your account is created instantly, so you can post right away.