help with layers in PSE7
May 16, 2013 11:14:31 #
Is there a way to save a text layer in PSE7 so it can be used on multiple photos without recreating it each time?
Thanks
Thanks
May 16, 2013 11:24:45 #
I no longer have PSE7 on my computer, and my memory isn't as agile as it once was.... but here goes:
Have the image with the layer you want to re-use open, as well as the images you want to copy the layer to.
Highlight the layer in the layers-panel you want to use on other photos, the right-click that layer.
From the pop-up, select 'Duplicate layer'.
Click on the down-arrow beside 'Destination' and select the image you want the copy to go to.
You'll have to do this for each image.
If you copy that layer to a new document, then save with a new name, you can always open it again to use later.
EstherP
May 16, 2013 11:27:57 #
May 16, 2013 11:43:25 #
JAW
Loc: LA
EstherP wrote:
I no longer have PSE7 on my computer, and my memor... (show quote)
EsterP, if he make a text layer and saved that layer as a brush to use on all pictures, wouldn't that solve the problem?
May 16, 2013 11:55:52 #
JAW wrote:
EsterP, if he make a text layer and saved that layer as a brush to use on all pictures, wouldn't that solve the problem?
I never thought about that, yes, you're right.
Open new document, put your text on and Edit -> Define Brush.
You may have to make the background transparent before defining the brush.
As a brush, it also is very easy to make it larger or smaller without losing quality.
EstherP
May 16, 2013 11:59:26 #
May 16, 2013 14:17:46 #
I would like to add more information about creating a brush for the benefit of those who may not have done this yet.
When you do Edit>Define Brush, the size of the area you use to create your brush makes a difference. This area (the whole canvas, a selection within the canvas, etc.) cannot be larger than 2500 pixels in any direction. If this area is larger than 2500 pixels in any direction, the Edit>Define Brush will be grayed out
Here are detailed instructions how to create a brush from text (and save it too).
http://everydayelementsonline.com/2011/02/create-a-watermark-brush-in-photoshop-element/
Also, if you are planning to apply the same text to multiple images, you may want to check the batch-processing feature in PSE (File>Process Multiple Files).
http://photoshopelementsbyadobe.blogspot.com/2010/02/batch-processing-in-adobe-photoshop.html
May 17, 2013 03:45:08 #
Jim 100 wrote:
Is there a way to save a text layer in PSE7 so it can be used on multiple photos without recreating it each time?
Thanks
Thanks
Save it as a brush.
May 17, 2013 06:22:55 #
EstherP wrote:
I never thought about that, yes, you're right.
Open new document, put your text on and Edit -> Define Brush.
You may have to make the background transparent before defining the brush.
As a brush, it also is very easy to make it larger or smaller without losing quality.
EstherP
Open new document, put your text on and Edit -> Define Brush.
You may have to make the background transparent before defining the brush.
As a brush, it also is very easy to make it larger or smaller without losing quality.
EstherP
When you say open a new document is that a new blank file with a white background or a transparent one?
May 17, 2013 06:40:15 #
Shine11 wrote:
When you say open a new document is that a new blank file with a white background or a transparent one?
It is a new blank file with a transparent background. So, when you create your brush, only your text will be visible. See the tut in my previous post.
May 17, 2013 18:00:57 #
JAW
Loc: LA
EstherP wrote:
I never thought about that, yes, you're right.
Open new document, put your text on and Edit -> Define Brush.
You may have to make the background transparent before defining the brush.
As a brush, it also is very easy to make it larger or smaller without losing quality.
EstherP
Open new document, put your text on and Edit -> Define Brush.
You may have to make the background transparent before defining the brush.
As a brush, it also is very easy to make it larger or smaller without losing quality.
EstherP
EsterP
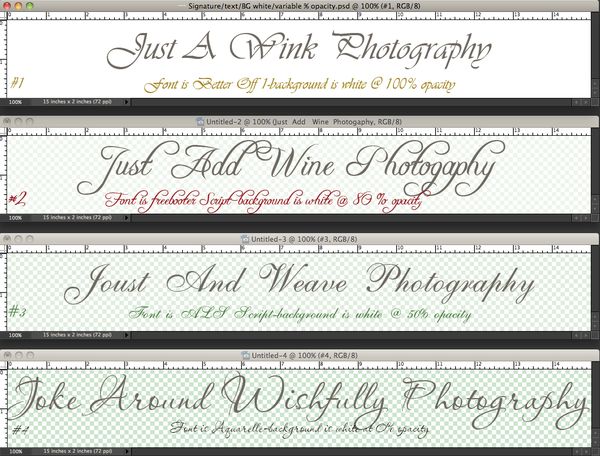
I've seen some photographers use a signature brush with a non transparent background - usually a white background layer instead of transparent; they chose their font and set the font on this white layer; then adjusted the opacity of the white layer to a specific value (varying the opacity) for effect.
The first signature brush is set at 100% opacity (base), second at 80%, third at 50%, and forth at 0% opacity, using different fonts for variety (just trying new things). The lower the % of opacity for the white background layer reduces it's opaqueness (easier to see the original photo) and more of the type in the layer is shown without the white around the type.
May 17, 2013 18:29:28 #
JAW wrote:
EsterP br I've seen some photographers use a signa... (show quote)
I like the font in the first example!!!
OK, just went "through the motions" of making a brush, this was in PSE11:
1. Open new document, white colour, any size (but may be best to stay within 2500 pixels both ways, as that's the imposed limit).
2. Typed my name in black.
3. Selected: Edit -> Define Brush
4. Opened brush palette and found my new brush near the bottom, opened it and could place it anywhere on an open image. No background in the brush. You can change colours to your liking. Apply styles to the brush. Whatever you like.
So from this little experiment it isn't necessary to make the background (partially) transparent, Define brush doesn't seem to pick it up.
If you'd want to have a background for the brush, it would be easy enough to place that in the image first, then place the brush on top of that.
EstherP
May 17, 2013 18:33:22 #
http://www.google.com/#hl=en&sclient=psy-ab&q=signature+brushes+for+pse+7&oq=signature+brush+for+pse+7&gs_l=serp.1.0.33i29i30l3.21234.27603.0.31966.7.7.0.0.0.0.1395.2156.0j6j7-1.7.0...0.0...1c.1.14.psy-ab.TOzd5TbBj4U&pbx=1&bav=on.2,or.r_qf.&fp=70e1e5403300e485&biw=1366&bih=681
text
http://www.youtube.com/results?search_query=+text+layer+in+PSE7&oq=+text+layer+in+PSE7&gs_l=youtube.12...52263.52263.0.53967.1.1.0.0.0.0.106.106.0j1.1.0...0.0...1ac.1.11.youtube.e1-Zkxvdff8
text
http://www.youtube.com/results?search_query=+text+layer+in+PSE7&oq=+text+layer+in+PSE7&gs_l=youtube.12...52263.52263.0.53967.1.1.0.0.0.0.106.106.0j1.1.0...0.0...1ac.1.11.youtube.e1-Zkxvdff8
May 17, 2013 18:47:25 #
JAW wrote:
EsterP br I've seen some photographers use a signa... (show quote)
First, this statement is incorrect.
Quote:
The lower the % of opacity for the white background layer reduces it's opaqueness (easier to see the original photo) and more of the type in the layer is shown without the white around the type.
You can do a lot to a Background layer but there are quite a few things you cannot do and reducing its opacity is one of them. If you want to reduce its opacity, you need to convert the Background layer into a regular layer first by double-clicking on it in the Layers palette/panel or by going to Layer>New>Layer From Background.
Second, I am surprised photographers (in the real sense of the word) would want their signature/copyright/watermark with a solid background (or a regular layer with reduced opacity) stamped on their images. Photographers usually try to be as discrete as possible with their signatures. They want it to serve a purpose and this purpose doesnt include taking the viewers attention away from their work.
Third, tutorials on creating signatures/copyright/watermark are plenty. They all have one thing in common; they begin with a new blank transparent Background layer. Here are a few examples.
http://everydayelementsonline.com/2011/02/create-a-watermark-brush-in-photoshop-element/
http://kb2.adobe.com/community/publishing/851/cpsid_85114.html
http://www.photokaboom.com/photography/learn/Photoshop_Elements/copyright/3_copyright.htm
May 17, 2013 19:40:49 #
EstherP wrote:
I like the font in the first example!!! br br OK,... (show quote)
Brushes are Grayscale, i.e., they contain only black, white, or shades of gray in between. That's why the tutorials to create a signature brush always say to type your text in black. Or, if you are creating a brush from, for example, a color image, you are told to convert it to Grayscale (Image>Mode>Grayscale).
Because brushes are Grayscale, this happens:
- Areas filled with black will be 100% visible.
- Areas filled with white will become transparent; you cannot see them when you are painting with the brush.
- Areas filled with various shades of gray will be partially visible. It all depends on how close the gray areas are to the black or white areas. This means that darker shades of gray will be more visible; lighter shades of gray will be less visible.
The above explains the results of your little experiment. You used a white background and typed your name in black. When you applied your brush, the result was "no background in the brush". Why? Because any area filled with white will become transparent.
The above also explains why this happened: "So from this little experiment it isn't necessary to make the background (partially) transparent, Define brush doesn't seem to pick it up."
Therefore, the statement below is in total contradiction with the mechanics of creating a brush.
JAW wrote:
EsterP
I've seen some photographers use a signature brush with a non transparent background - usually a white background layer instead of transparent; they chose their font and set the font on this white layer; then adjusted the opacity of the white layer to a specific value (varying the opacity) for effect.
I've seen some photographers use a signature brush with a non transparent background - usually a white background layer instead of transparent; they chose their font and set the font on this white layer; then adjusted the opacity of the white layer to a specific value (varying the opacity) for effect.
If you want to reply, then register here. Registration is free and your account is created instantly, so you can post right away.