portrait package creation
Apr 28, 2013 21:01:28 #
I am currently using Lightroom 2 and trying out Lightroom 5. I have photoshop cs5. I am trying to create photo packages that fit a 12x18 inch format. Something like 1 8x10, 1 5x7 and 9 wallets as an example. I have seen and tried some programs such as ACD Photoslate but doesnt' give me the ease that Lightroom versions does. Lightroom works well but doesn't seem to handle 12x18 paper or anything much bigger that 8x10. Or at least I can 't find it. Package printing in Photoshop seems to have a similar problem. I have seen a tutorial on the web about creating your own packages in photoshop using masks, layers, etc but now when I need it, I can't find the info. Anyone have any suggestions on either a good, quick, easy program for making photo packages? Or a tutorial for making my own in photoshop? Or even an action? Thanks. Steve
Apr 28, 2013 21:19:32 #
I have PSE11, but it should work the same in CS5.
A template will probably fit the bill:
Create a new document, 12 x 18 inches. Leave it blank.
Create your 8 x 10, 5 x 7, and wallet size (2 x 3 ?) documents and give them a different colour from the first one.
Drag and drop each of the coloured documents onto the 12 x 18 inch one, arrange them in the way you want. (They are now called clipping masks).
Save the template.
Have it open and open the image you want to print.
Drag and drop the image on each of the layers of the template. Highlight an image in the layers bin, press Ctrl+G, adjust the size of the image. Do this for each of the clippingmasks. Save-As your work with a different name than the template, then Save As to make your jpg file for printing.
That ought to do it.
EstherP
Apr 28, 2013 22:06:24 #
EstherP wrote:
I have PSE11, but it should work the same in CS5. ... (show quote)
Thanks Esther! That was the info I was looking for. I had forgot all about clipping masks. I appreciate it.
Apr 29, 2013 17:45:23 #
EstherP wrote:
I have PSE11, but it should work the same in CS5. ... (show quote)
Esther, just out of curiosity, what dose all this mean? I follow your instructions, but what is he trying to create? One image that contains the other images like a collage? I don't get it! Not that important, just curious. Thanks, Boone
Apr 29, 2013 18:08:38 #
Boone wrote:
Esther, just out of curiosity, what dose all this mean? I follow your instructions, but what is he trying to create? One image that contains the other images like a collage? I don't get it! Not that important, just curious. Thanks, Boone
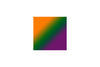
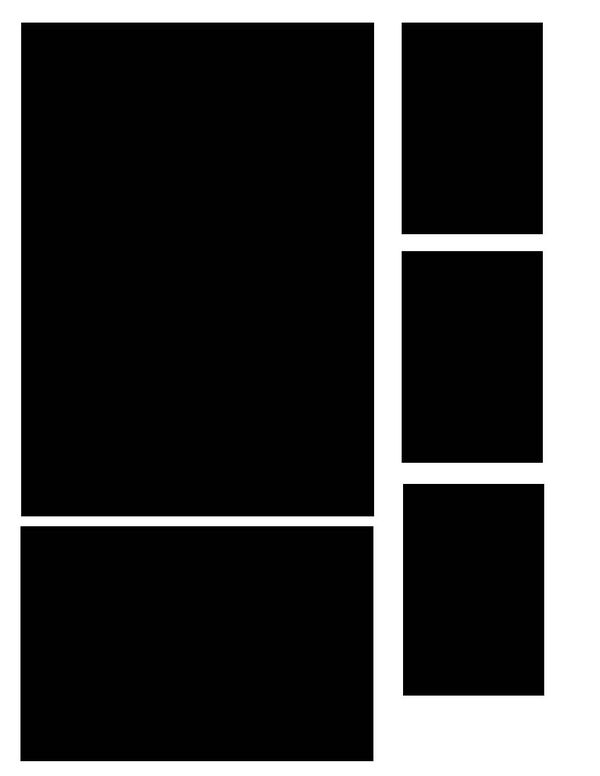
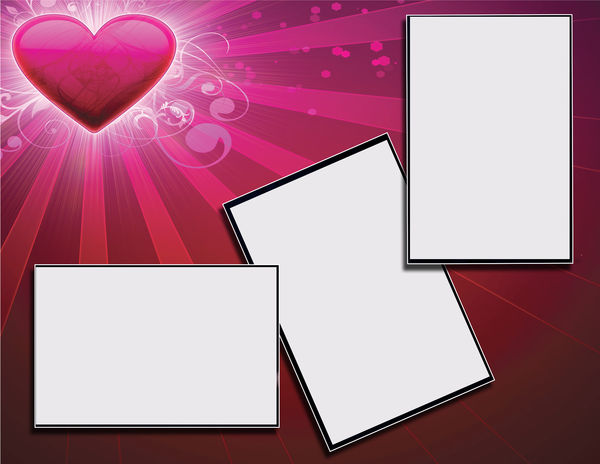
fidophotog wanted to create a large sheet with printed on it photos of different sizes. I'm attaching an image of what a template could look like. The background and each of the black shapes is on it's own layer (not in the sample as I flattened it).
You could either drag and drop the same image or a different image to each shape. Then, with Ctrl+G you "clip" the image to the shape and adjust the image's (not the shape's) size. Finally flatten and print the whole thing, and you can print the different sizes onto one sheet of paper.
In a way it is like a collage, except in a collage I would expect to see not only different photos, but also photos of different sizes and even of different shapes.
Hope I explained that properly...
EstherP
What the template could look like
Apr 29, 2013 18:10:45 #

In LR in the print module, look on the bottom left just above the film strip is page set up. Click here, a new dialog box opens click paper size drop down arrow. Here is where you will see all the paper sizes, if your size is not there go to manage custom sizes and set the size you need. After the paper size is set you can set up your picture packages. If this is a package you use often you can save it at a user template in the left panel.
This is for LR4. Not sure if this was available in LR2. As for LR5, it is still in Beta so everything may not be working.
This is for LR4. Not sure if this was available in LR2. As for LR5, it is still in Beta so everything may not be working.
Apr 29, 2013 18:26:33 #
normsImages wrote:
In LR in the print module, look on the bottom left just above the film strip is page set up. Click here, a new dialog box opens click paper size drop down arrow. ....
I don't use LR, but there is a similar setup in PSE11. I prefer the templates I make, because besides adding the photos to the clipping masks, I can also add a patterned background, or some journaling, or.... well, anything I like.
As well, there are many, many clipping masks available for free on the internet, and I have quite a collection of them.
But we're leaving the area of photography with this and entering the area of scrapbooking, so I'll stop with this.
EstherP
Apr 29, 2013 18:39:49 #
I also use PS for similar setups. I do Boudoir albums that are spiral bound. The pages are set up as a smart object, this way I can change the pictures and background and everything snaps in place to the set frames.
Apr 29, 2013 18:56:49 #
James Eslinger
Loc: Kentucky
EstherP wrote:
I have PSE11, but it should work the same in CS5. ... (show quote)
You crafty Canadians! Thanks - that helps me too.
Apr 29, 2013 21:12:09 #
fidophotog wrote:
Thanks Esther! That was the info I was looking for. I had forgot all about clipping masks. I appreciate it.
Lightroom won't do any of that because it's not a layer-based editor like Photoshop or Paintshop Pro or Elements. Her method is correct. You could also create white boxes with dotted black outlines and position those in your template instead. That's what I do in Paintshop Pro when I need to compile a number of shots onto one sheet.
Apr 30, 2013 02:14:02 #
EstherP wrote:
fidophotog wanted to create a large sheet with pri... (show quote)
Esther, thank you! I didn't mean for you to go to all that trouble, but your lesson was read, filed, and appreciated! I like your explanations, they're always good. Thanks again, Boone
Apr 30, 2013 09:28:23 #
Boone wrote:
Esther, thank you! I didn't mean for you to go to all that trouble, but your lesson was read, filed, and appreciated! I like your explanations, they're always good. Thanks again, Boone
Thank you for the compliment, Boone.
As to it being trouble: I would rather put a bit more time in and have my explanations understood, than have people reading the explanations and asking "What the Dickens is she talking about...?"
EstherP
If you want to reply, then register here. Registration is free and your account is created instantly, so you can post right away.