Posts for: xs650greg2
Feb 9, 2016 11:51:56 #
MtnMan wrote:
For processing you might have better luck with the... (show quote)
Thanks for thoughts on HDR. Works great on still stuff. My Fuji has it and it takes I think 3 bracketed shots. The problem is that I work with Animals and moveing subject shots a lot and you have to use a pretty fast shutter speed to "freeze" them and the HDR is not always sharp at 100% for enlargements. I really appreciate the thought out response. Greg.
Feb 9, 2016 11:43:47 #
Bill_de wrote:
The problem you are having now is the same we had ... (show quote)
Hooray!,,, Thank you so much. This gives me a course of action to try and experiment with. Very specific and detailed. I really do appreciate the step by step in PS. I have not tried the method with the "History Brush". Very Cool! ,, And I was starting to think that maybe I was going to have to take out some of my larger stand Flash to do the background, this just makes me think it might be a viable solution to get a better result on the raw file initially. Thanks again. Greg.
Feb 9, 2016 11:36:48 #
rmalarz wrote:
Greg, br Admittedly, some of the answers were of l... (show quote)
Thanks Bob for the straight up and specific answer. That's all I'm after. To me you never quit learning in Photography. Thanks again, Greg.
Feb 9, 2016 11:12:13 #
Hello, I'm a "newbie" to the site. I recently posted a photo and a question about getting a better result on Raw files. I was having a problem with photo'ing a white dog against a darker background outside. The white dog would have spots or highlights that were burned out or close to it and had no detail. I read the rules for posting on the "PhotoAnalysis" section and Sent all the Exif data and tried to explain the problem I was having in detail. I posted a photo with the dog exposed about right, since he was the focus of the photo, and the background underexposed. I wanted help with getting the background better while preserving as much detail of the dog as possible. I ask several specific questions. Tried to keep the post lite hearted and humble. Well, I received several replies. None of them answered my questions I asked directly. Most said simply "The photo is Underexposed". One person reposted my photo after he exposed it more and the same problem was there. The back area in the middle of the dog was overexposed and had very little if any detail. It showed exactly the problem that I'm having. I'm an old guy that started out in photography with a hand me down Press Camera shooting 4x5 black and white and developing my own. Moved on to 120 & 35mm for years. I've moved into digital probably 10~15 yrs. ago. I'm no pro but I have spent quite a bit of time working with photo's. Also I use several software programs. I also have the new Photoshop 2015. And it will automatically load a raw file for adjustment. I also use Fuji's raw software since I use a Fuji camera. I really wanted some specific help. For anyone interested, the best results I've had at trying to get detail for really white subjects that have "hot spots" is to expose the raw file for the backgrouns and use PS and use the Burn tool on the specific areas of the focus subject and any other "hot spots" and that leaves the other areas exposed correctly. It works OK until you go to larger enlargements, but still I think there can be a more "natural" way. Anyway if you've taken the time to read this, "Thanks". "No Harm - No Foul" ,,,,, Just wanted to post my experience to maybe help the next Newbie.
Feb 9, 2016 07:30:59 #
Rongnongno wrote:
When you open a raw file PS CC will start ACR. br ... (show quote)
Thanks for the reply, I still don't know what ACR is? And to me in your pic the dogs middle back is overexposed and has no detail. I'm sure it's all very simple to you guys, but to a guy that's just learning it's kinda complex. That's why I posted here was to learn something. All I've learned here is that there are a lot of "buzz" words and abbreviations that I'm not familiar with. I do appreciate the help, it just didn't really address the "burnout problem" that I'm having. I'll go to a more "basic" photo site.
Feb 8, 2016 23:59:51 #
Rongnongno wrote:
ACR Two clicks. Auto exposure then auto WB.
Since you have a raw file you will be able to get a much better result than that.
Your image is underexposed more than anything else. With raw it should be over exposed (ETTR).. Err over exposed as per the JPG histogram.
Since you have a raw file you will be able to get a much better result than that.
Your image is underexposed more than anything else. With raw it should be over exposed (ETTR).. Err over exposed as per the JPG histogram.
Hi, OK, What is ACR? then autoexposure and autoWB in PS or the raw software? Should I maybe use the raw software in PS? I have the camera basicaly "zeroed out" as far as settings. and I do use AutoWB on the camera. And I didn't really understand "with raw it should be over exposed(ETTR)..Err over exposed as per the JPG histogram". I understand the histogram some, probably not enough. Are you saying to error on the side of a more exposed raw file? Making a Stronger "lite" side on the historgram? Should I Set the compensation on the camera itself to +1/3rd to lighten it instead of the raw or PS software? Sorry for probably being so dense. I know some things but I need to learn a lot more. Thanks for the help.
Feb 8, 2016 23:33:30 #
chase4 wrote:
You have a good lookin' white dog. Kinda remindes me of our white Akita, Lucy. Just try messin' with your white balance, exposure compensation and the backgrounds and you'll find out what works best. I don't take great, perfect images just snapshots like this one. chase
Hi, and I bet he likes to "chase" things. yea they do kinda look alike. Dogs are great friends and buddys'. Yea I'm gonna start bracketing some and see what's the best mixture I guess. A lot of it's probably that it's just "digital", the nature of the beast type thing. Film gives you more range to work with but it's so much trouble. I think your right, I need to set down and take a series of shots with different setting and pic the one thats best. Thanks for the shout, Greg.
Feb 8, 2016 22:58:57 #
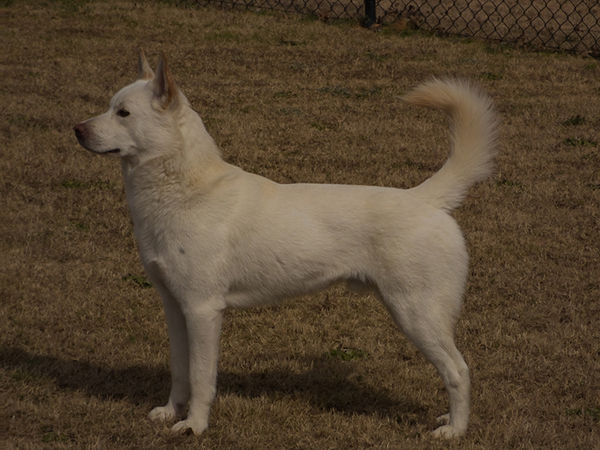
Hi, I have a white dog that is giving me fits trying to get the correct exposure/white balance on the RAW (Fujifilm-RAF) files. If I get the exposure for the dog then the background is really dark. If I get the background lighter then I have "burned out" areas of the dog. On a sunny day it's really hard to deal with. I have -- hs50exr camera,ISO100,F8,37mm,Spot metering, Cloudy, 3:30pm. I processed the raw file in Fuji's software (everything set to "normal") and conconverted to Jpg. I can go to PP and adjust it and get it better but I wish I could get the "negative" raw file better. I've seen some really good shots of white foreground/dark background on the site. So what am I missing? Should I just dye my dog a darker color? Is it just a limitation of the camera? Have I got "the stupid" button pressed on my camera? I'm retired now and have plenty of time and really enjoy photography now and it's fun trying to get "the harder" shots.
Any Ideas,,, thanks all,, the sites great!
Any Ideas,,, thanks all,, the sites great!
Raw(RAF) File
Feb 8, 2016 19:25:36 #
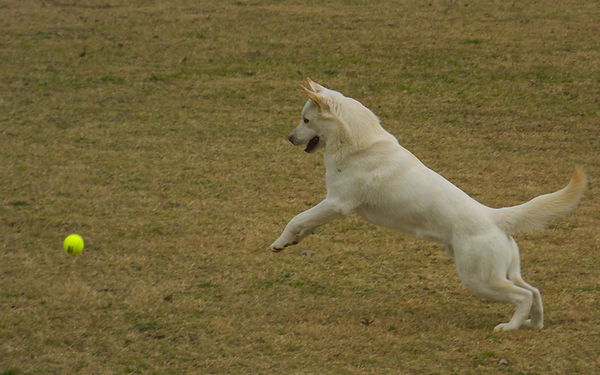
An afternoon at the park. Cloudy day, ISO100,1/400,F5.0,35.2mm,,,,, took a lot of shots, got lucky catching him with all 4 in the air.. It's winter and there is so much brown. Be glad when things "green up" again.
Happy Flying Dog
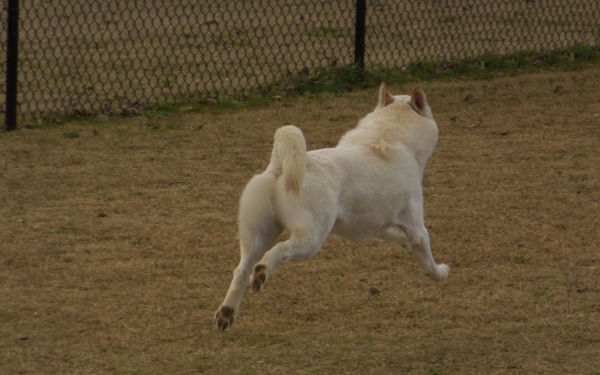
I Got It ! I Got It !!
Feb 7, 2016 16:38:27 #
creativ simon wrote:
Just to help you out if when replying click on 'Quote reply' it will link your comment to the work in question :thumbup:
Thanks!!,,,,
Feb 7, 2016 15:56:13 #
Very good angle, and the tree adds to the "spookiness"
(if that's a word),,, great shot!
(if that's a word),,, great shot!
Feb 6, 2016 01:00:38 #
Was it a Led Zeppelin song that said,, "I don't know what it is,, But I like it a lot" ,,, Really cool work.
Feb 6, 2016 00:36:53 #
Ha Ha!,,, Yea more like 35, Now I know that we are both really old.
Feb 6, 2016 00:32:39 #
Wow! Really unique. How in the world do you calculate exposure with something like that. Really nice shots.
Feb 6, 2016 00:26:33 #
Hard to believe so much has changed in 15 or so years. This things like an old friend, just can't get rid of it.
Nice to remember, but no going back