Posts for: ZingersMom
Jul 2, 2020 11:12:18 #
Scruples wrote:
These are excellent captures. Way back when I had a film camera I tried my hand with a roll of Infrared Film. It was somewhat expensive to buy and process. I might try it again if someone is good at suggestions. Hint!!
Happy Shooting!
Happy Shooting!
If you have an older camera just hanging around hoping for a new life, you might want to have it converted to infrared. Info on Lifepixel.com or kolarivision.com I converted my D300 with Lifepixel and haven't looked back. There is lots of info on either website about the options and prospects. They also sell converted bodies. Hope this helps!
Jun 19, 2020 14:47:09 #
Traveller_Jeff wrote:
I'm currently using 3 external HDs and Backblaze to protect my files. If disaster were to strike and all my EHD's be lost or destroyed, to recover my files, Backblaze would load them all up on a brand new 8TB EHD for which they would charge me the cost of the Hard Drive, and send it to me. They do not provide download of individual files. Is Carbonite any better than that? Can one download individual files/folders from Carbonite with ease? Thank you.
Carbonite is not a "fan" of external hard drive back up. I have been using them for years to back up three computers and one external hard drive. That EHD has to be hooked up to the laptop designated in our plan for backup. I don't think they even offer that plan anymore. Believe my set up has been grandfathered. I haven't used Backblaze but plan to shop around. I can't recommend Carbonite.
Jan 20, 2019 03:28:37 #
Bill_de wrote:
I've heard about this event and know how to use Google.
I have not been able to find anything about what setting I should use on my SB28 flash. I do have a Better Beamer.
---
I have not been able to find anything about what setting I should use on my SB28 flash. I do have a Better Beamer.
---
Bill, flash is not helpful or required for a moon photo. You need to put your camera on a sturdy tripod; turn on image stabilization, use your camera's timer for a 2" delay after pushing the button and follow guidance in this article. https://photographylife.com/news/super-wolf-blood-moon-eclipse?utm_source=Photography+Life+Newsletter&utm_campaign=aa59940fee-newsletter&utm_medium=email&utm_term=0_74d1711c3d-aa59940fee-183946989#utm_source=rss&utm_medium=rss&utm_campaign=super-wolf-blood-moon-eclipse
Jan 28, 2017 21:57:46 #
ZingersMom wrote:
Thank you; Spyder Pro 5 does provide luminous management; I had set it to 120 (their recommendation) when I last calibrated. I just re-calibrated at a lower illumination; it doesn't appear to be enough, but I'm now understanding the impact of this on a printed photo. The sharpening tip is helpful, as well. 
Once again, thanks to all for your advice. I managed to get the brightness on my lap top to 85, and I used more sharpening. I just received a new set of test photos, and, bingo. I'm getting the color, brightness and detail that I was expecting.
I'm humbled by the wisdom in this forum!

Jan 22, 2017 22:43:39 #
AlMac wrote:
Here is a good tutorial from Picture Correct entitled How to Prepare Your Photos for Printing.
Hope it helps you.
http://www.picturecorrect.com/tips/how-to-prepare-your-photos-for-printing/
Alan.
Hope it helps you.
http://www.picturecorrect.com/tips/how-to-prepare-your-photos-for-printing/
Alan.
AlMac, that's a really helpful video. I've been working through Lightroom (I learned on Photoshop, so I'm OK with going there). It appears that using PS might be signficiantly helpful.
So appreciative!
Jan 22, 2017 22:40:02 #
romanticf16 wrote:
Almost all Color Managment sets a standard color t... (show quote)
Thanks, romanticf16, for the clarification, and my apologies for the X-rite "attack." It was late, and I was out of line. The viewing station sounds a little intimidating...and expensive? I think that my test prints are reasonably accurate for color, but they are way darker than what has been showing up on my screen. That's my primary concern. Your post, as well as others, is leading me to think I need to play with the screen brightness. This has been helpful!
Jan 22, 2017 22:34:48 #
jeep_daddy wrote:
Turn the brightness down on your screen. When cal... (show quote)
Thank you; Spyder Pro 5 does provide luminous management; I had set it to 120 (their recommendation) when I last calibrated. I just re-calibrated at a lower illumination; it doesn't appear to be enough, but I'm now understanding the impact of this on a printed photo. The sharpening tip is helpful, as well.
Jan 22, 2017 00:52:30 #
romanticf16 wrote:
Once your monitor is calibrated you need to establish a viewing illumination balanced to your calibrated monitor. You also have to make sure your monitor and the people printing the image use the same Colorspace, usually sRGB. Look up Color Management on the X Rite website for more information.
I'm sorry, but I don't understand what you mean by establishing a viewing illumination or how to do that. As to looking up color management, I have done that, and I am getting the impression that you, and others, are selling X Rite. I have Spyder 5 Pro and am looking for support with that tool.
Jan 21, 2017 23:22:43 #
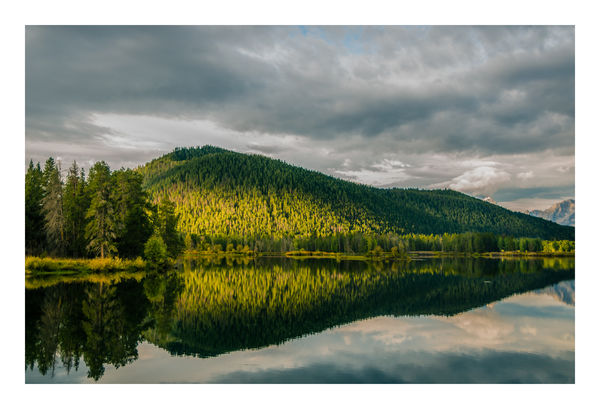
I have had several tell me that I should print and sell my photos. I am not looking to make money, but, if someone wants a print, I want it to be a good one. After calibrating both my monitor and my laptop with Spyder 5 Pro, I sent a photo to mPix to be printed. My customer wanted a 30 X 20 print. When the printed photo arrived, a lot of the color and detail were lost. So, I signed up with mPixpro, sent them 5 photos for 8x10 prints, including a portion of the photo that I was printing for my customer. They all came back with the level of detail that I wanted, but they are much darker than they are appearing on my screen... I'm perplexed. Suggestions? Thoughts? Photo to be printed is included with the post. So, I think I have 2 questions. Could the size of the print be the problem with the level of detail in the print? The other is what I need to do to make sure that what I'm seeing on my screen shows up in prints?
Dec 8, 2014 20:25:48 #
JOEADDOTTA wrote:
check out www.sergeramelli.com........You will learn all about the photography stuff you need to know....He has almost 200 free tutorials on light room and ps....j.
Wow. Looks like a terrific site! This has been one useful thread!
Dec 7, 2014 22:31:02 #
Bret wrote:
I use one I got from a sporting goods store...a hunting blind for Turkey shooting. Works really well but you should set it up.....and leave it up so the birds can get acclimated to it near the feeder or feeding area. Heavy duty tent steaks work best.
I responded to this earlier but not with your quote. Still figuring out the forum protocol. You took a great shot. Does the blind have an opening for the camera lens?
Dec 7, 2014 22:30:42 #
Bret wrote:
I use one I got from a sporting goods store...a hunting blind for Turkey shooting. Works really well but you should set it up.....and leave it up so the birds can get acclimated to it near the feeder or feeding area. Heavy duty tent steaks work best.
I responded to this earlier but not with your quote. Still figuring out the forum protocol. You took a great shot. Does the blind have an opening for the camera lens?
Dec 7, 2014 22:23:12 #
Dec 6, 2014 21:47:37 #
I also agree with those who compare ACR (in Photoshop) with Lightroom. ACR is powerful. There is, IMHO, no right answer.
Dec 6, 2014 21:43:24 #
Thanks dirtpusher. I certainly know how to google for blinds and have done so. It's not clear to me that hunting blinds work well as photography blinds. I'm hoping to hear from those who are using blinds for photography and their thoughts.