Posts for: Garyminor
Sep 20, 2020 22:18:16 #
Sep 20, 2020 12:08:06 #
Can anyone tell me how, or point me to a resource, that tells me how to setup my camera for use with Zoom as a second camera?
Jul 6, 2019 17:04:57 #
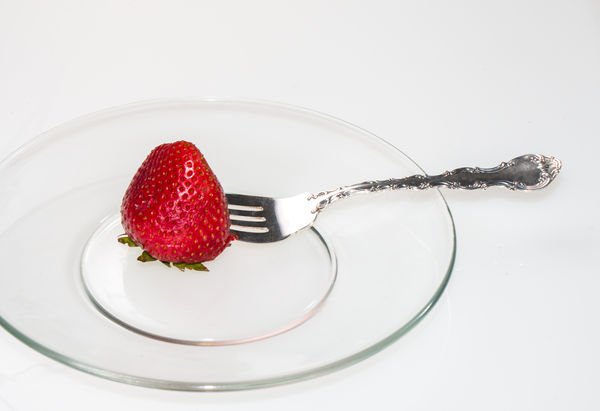
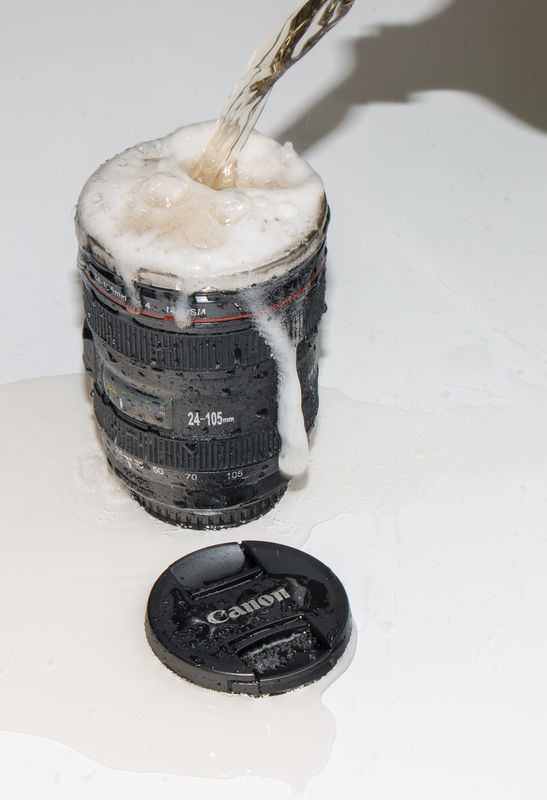
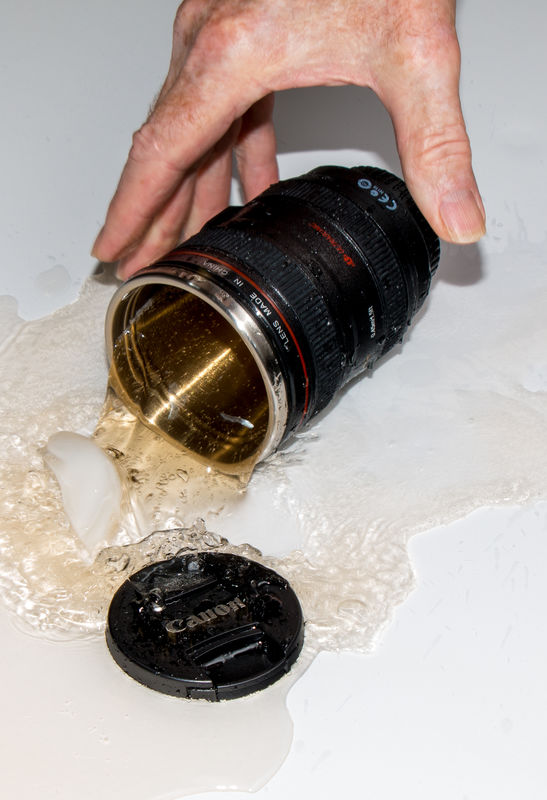
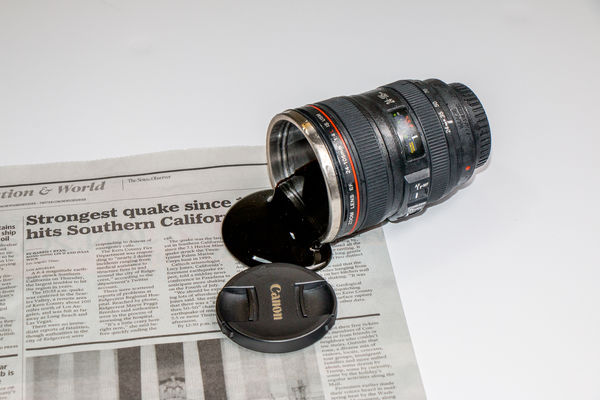
Here are some pictures that I'm considering entering in a local club's contest.
The theme is "Food and Drink" and only two entries per contestant is allowed.
Help me pick the two entries.
The theme is "Food and Drink" and only two entries per contestant is allowed.
Help me pick the two entries.
Apr 12, 2018 11:04:26 #
lmTrying wrote:
Thanks to several members, I have been reading sev... (show quote)
A pixel is a picture element! That is, a spot of color that makes up a picture. It has three values. One each for red, green, and blue. This is picture data.
A single data value (datum) from the sensor represents the intensity of a single color, either red, green, or blue. This is not a pixel! This is raw data.
Notice the use of the expression raw or picture data as opposed to a raw or picture file.
Raw data is contained in many different file formats such as CR2, NEF, DNG, etc.
Picture data is contained in other file formats such as JPEG, TIFF, etc.
There is a process that produces an array of pixels (a picture) from an array of sensor elements (raw data).
You might think that that data from four sensor elements (red, green, blue, green) would be used to create a single pixel (red, green, blue).
However, it's much more elaborate than that. Generally, a large number of sensor elements are used to produce a single pixel.
The neighboring pixels could reuse a lot of these sensor values so that there could be more, less, or the same number of pixels as there are sensor elements. It's generally assumed that the process creates the same number of pixels as there are sensor elements, although that is not required.
Do you need to know this to take good pictures? No, but I enjoy the mental exercise.
Apr 11, 2018 11:37:57 #
davidp wrote:
Over the years I've done a horrible job of storing my pictures. I have so many duplicates saved in various folders. I read about "Duplicate Photo Fixer" that claims it can help with this problem by deleting duplicates. Of which I have many. Has anyone ever used this program? Or does anyone have any suggestions of how to deal with a ridiculous #of duplicate pictures in many different files. It isn't necessary to tell me how dumb I was to get to this point I know that already!
Thanks
Thanks
Duplicate photo Finder is good. If you have a "Date Taken" value for your photos, I suggest PhotoMove.
(1) Copy all of your photos with a valid Date Taken into a working folder.
(2) Run Photomove.This will build a new set of folders (you have several choices) and move each photo into the proper folder.
(3) Run Doublekiller
(4) Run Duplicate Photo Finder on the new folders and remove (with care) duplicates.
(5) Rename each of the new folders to your chosing
(6) Run my program (Rename to Directory). This will rename each photo in the new folders to the same name as the directory, with 001, 002, 003 added.
www.jbaker.info/photomove_ver_test/PhotoMoveSetup.exe
http://www.bigbangenterprises.de/en/doublekiller/
https://www.dropbox.com/s/guej5jc39bl530f/Rename_to_Directory.exe?dl=0
Mar 26, 2018 16:54:24 #
Thanks to all of you that responded. Obviously this was a springboard for discussion rather that a question. My original assertion was that metering of the lightest area, and adding only one stop was too conservative, and would sacrifice detail in the very dark areas.
Then Gene51 counters with an excellent photo of a Peregrine Falcon where he metered the bird’s breast and then added only one stop. The histogram shows that some of the brightest pixels were near the right edge. This does show that he knows what he’s talking about. However, he did mention that that with a different camera, he could have gone two or more stops over without blowing the highlights.
Thanks to rmalarz for sharing his test. What I take away from this experiment is the 5th and 6th shot in the second set.
• 5th shot, 3/10 sec, 3 stops overexposed. There is a difference between the medium grey card and the white card.
• 6th shot, 7/10 sec, 4 stops overexposed. There is not any difference.
It seems fairly easy to determine the limits of your camera.
1) Meter off of a grey card and take a shot at 1, 2, 3, and 4 stops over exposure.
2) Use Rawdigger to look for blown highlights on each shot.
3) If 2 over doesn’t blow the highlights but 3 does, then take more shots at 2-1/3 over and 2-2/3 over.
4) Again, look for blown highlights on each shot.
5) Now you know exactly how many stops to add to the metering of the brightest areas, in order to prevent blowing the highlights.
Is this exposing to the right or is it exposing to the left? It depends!
Let’s assume that you determine that your camera can expose three stops over middle grey without blowing the highlights.
If the scene has highlights that are three stops brighter than middle grey, then this technique will have the same results as metering off middle grey with no adjustments.
If the scene has highlights that are only one stop brighter than middle grey, then this technique will cause the scene to be overexposed (but no blown highlights) and is called ETTR (expose to the right). This will give the darkest of the darks a little more quality. Some would argue that this is insignificant.
If the scene has highlights that are four or five stops brighter than middle grey, then this technique will cause the scene to be underexposed (but no blown highlights) and is called ETTL (expose to the left). This will give the darkest of the darks a little less quality, but prevent blown highlights. This is generally agreed to be a good tradeoff.
Mar 23, 2018 20:11:39 #
I've seen this advice given by Gene51 in several of his post and I wondered if he really meant what he said.
If the brightest area is only one stop brighter than middle grey, then middle grey will be properly exposed. All is good!
However, this doesn't seem to be a good idea. Most cameras (with 14 bit sensors) have middle grey fall in the range of 1000 to 2000. This allows the brightest areas to be 3 stops brighter in the range of 8000 to 16000.
If the brightest areas are three stops brighter than middle grey, and you expose it as one stop brighter, then middle grey will be underexposed by two stops, and the darkest areas will be underexposed two stops more than necessary.
To say the same thing in a different way:
If the brightest areas are exposed one stop brighter than middle grey, then the largest values from the sensor will be in the range of 2000 to 4000, and two stops of dynamic range will be wasted. This may not be significant in a low contrast scene, but if there are some very dark areas, then they will have more noise.
Mar 8, 2018 21:41:03 #
Floyd R Turbo wrote:
Hello, this is my first post on the forum. I was visiting an historic graveyard in Galveston, TX and took a couple distant photos of a man who was visiting a gravesite. He appeared to be homeless and possibly was just hanging out there. When I realized I had captured something special, the man was gone and I have no idea who he is. I would like to share the photos on the forum but I'm not sure it's legal or the proper thing to do. Comments please, and thank you.
If you have a picture of a model holding your product in her hands, and it is used for commercial purposes, then there must be a model release, even if no one can identify the model from the photo. The model was probably selected because of her beautiful hands, and is due compensation. This is different from your case, but the agency is super cautious.
Feb 3, 2018 15:46:14 #
amfoto1 wrote:
I'd stick with the Canon OEM print cartridges for ... (show quote)
Pro 100 carts are full size, or even slightly more for initial priming.
Jan 29, 2018 19:41:48 #
JohnFrim wrote:
Gary, you are completely missing the point. The wh... (show quote)
John, You are right on all counts. If the whole argument centers around the crop factor, then I've missed the point. If it is not about object size, but rather about print size, then I've missed the point.
My point is exactly what you've said in your last paragraph. You've summed up 13 pages of disscussion (at least on the topic of equal DoF) in one neat paragraph. Well done!
Gary
Jan 29, 2018 15:41:17 #
Rongnongno wrote:
First the myths...
DoF is different
That is false. Since the lens has the same DoF given the same distance/aperture values the field of view does not change, period. Once again, some may think the DoF is 'longer'. It is not.
DoF is different
That is false. Since the lens has the same DoF given the same distance/aperture values the field of view does not change, period. Once again, some may think the DoF is 'longer'. It is not.
Ron,
You are correct! The DoF doesn’t depend on the size of the sensor.
I see that there are 13 pages of claims and counterclaims. Since this is a technical discussion, there should be only one correct set of facts. I’ve been reading this thread, and trying to understand the logic from both claims. Both are valid, each in their own way.
First, let’s be sure that we understand, that in photography, CoC describes the largest blur circle that is indistinguishable from a point, not the size of the of the blur circle.
If you are going to compare DoF between two photographs, then the lens needs to have the same focal length, aperture, and plane of focus.
Also, the print needs to be the same size, be viewed from the same distance, and the objects in the photo must be the same size. How does that happen?
a) The size of the blur circles on the sensor doesn’t depend on anything but the lens settings and the distance from the plane of focus. There is a different size blur circle for each point, depending on the distance from the plane of focus. That is, when you take a photo of an object, both the size of the object and the size of the blur circles on the sensor will be the same, regardless of the sensor size.
b) Therefore, a FX lens used at 10 meters with the same f11 aperture (example) has the same size blur circles on the sensor, regardless if the sensor is on a FX or DX body.
c) When the image is transformed from the sensor to a viewable image, whether it is a print, projection on a screen, or displayed on a monitor, there is a magnification factor. In the case of using a 4x5 negative to produce an 8x10 print, it is 2:1. This will magnify the size of the object and the blur circles by the same amount.
d) If you produce a print (of the same size) from each of two different size sensors, such that the object is the same size on both prints, then the magnification factor and the size of the blur circles will be the same size on both prints. When viewed from the same distance, the CoC and the DoF will be the same.
Congratulations Ron, you are correct. Does that mean that all of the DoF calculator apps are wrong? Not at all!
The DoF calculators expect that you will make a print that includes the entire image from the sensor. If you produce a full image print (of the same size) from each of two different size sensors, then the print from the larger sensor will have a wider field of view. The objects will be smaller, and the blur circles will be smaller. When viewed from the same distance, the CoC and the DoF will be the different. The DoF calculator doesn’t know that you want to compare two photos that need to have the same object size.
I hope that this helps everyone involved.
Gary Minor
Jan 28, 2018 21:22:34 #
blackest wrote:
5 lines per mm means 1mm / 5 = 0.2mm width for each line.
5 lines per mm means 1mm / 5 = 0.2mm width for each line.
That should be 5 lp/mm (line pairs per millimeter).
This gives 0.1mm width for each line, and 0.1mm width for each corresponding space.
Dec 10, 2017 19:56:19 #
Here is an article about professional photographers causing problems.
http://www.houstonchronicle.com/life/article/Homeowners-in-scenic-Broadacres-prohibit-photos-12418903.php
http://www.houstonchronicle.com/life/article/Homeowners-in-scenic-Broadacres-prohibit-photos-12418903.php
Aug 28, 2017 11:59:22 #
Longshadow wrote:
I organize my images by subject, I can [i[never[/i] remember the date I shot something. I use sub-directories for different dates on that subject (YYYY-MM). I don't make the day part of the directory as that is in the file info. If I want to find something, it's usually by subject.
Just the opposite! I file each shoot by date. Each photo has a sequence number. I use Lightroom to make collection groups and collections to organize by subject. One photo may be put in several different collections. If I print a photo, I write the date and sequence number on the back. If I export it to jpg, I keep the date and sequence number as part of the filename.
I generally don't look for a particular photo just from remembering what the photo looked like. If I know the subject, I go to my collections. If I have a print or a jpg, I use the date and sequence number. The date and sequence number is in essence a meaningless reference number. I don't remember the date a photo was taken either.
Jul 26, 2017 14:58:43 #
dsmeltz wrote:
I was looking at another thread http://www.uglyhedgehog.com/t-474574-1.html#7965904 and got to thinking about file names.
The default file names are usually not helpful. Do any of you automatically rename files on download? If you do, what is your process?
Thanks
The default file names are usually not helpful. Do any of you automatically rename files on download? If you do, what is your process?
Thanks
I want each shoot to be in its own folder, named with the date and shoot description.
Additionally, I want each photo (file) named the same as the folder with a sequence number added.
I organize these folders by major topic, then by date. I use Lightroom collections and keywords to organize them by category or subject.
There are several programs that will rename the files, using a custom name and a sequence number. For my needs I would use the the directory name for the custom name. However, before I started using LR or Bridge, and before I joined this forum, I didn't know about these programs.
So.... being the kind of guy that I am.... I wrote my own program. It's a simple, stand alone program. That is, it doesn't need to be installed.
The program (an executable file) can be put on your desktop. It could be put anywhere in your computer, and a shortcut put on your desktop instead. The end result is an icon on your desktop. Usage is super simple. This is why I like it better than the more powerful and complex programs.
To use it, simply drag and drop a folder onto the desktop icon. It will rename all of the files in that folder with the folder name and a sequence number. WARNING... It will rename all the files contained within folders contained within the dropped folder as well.
PM me if you are interested in this program.