Check out Printers and Color Printing Forum section of our forum.
Posts for: elee950021
Jul 3, 2023 12:50:47 #
gvarner wrote:
Using PS Elements, I can crop and correct for tilt in the RAW file in ACR or use the JPEG when it’s in the Editor. Which one is the better choice? With the JPEG, I always crop and correct for tilt before I do any edits. When doing these corrections in RAW, I don’t have any control over the resulting photo ratio like I do on the JPEG, i.e. original, 5x7, square, etcetera. Your comments would be appreciated.
gvarner!
Correcting tilt and then cropping is easier in ACR but the resulting image might eliminate a detail near the image's edge that you would like to keep or want to keep the image's original dimensions and/or original format, 3x2, 645, etc without cropping too much from the image. You might also want to see and refer to the original image and crop it in the PSE program. There have been cases where I do crop and this would eliminate some of the image and thusly less work!
Here's a method I've used for years with PS Elements to tilt and keep the original image in all its glory! Adobe's new PS AI Generative Fill might be an alternative.
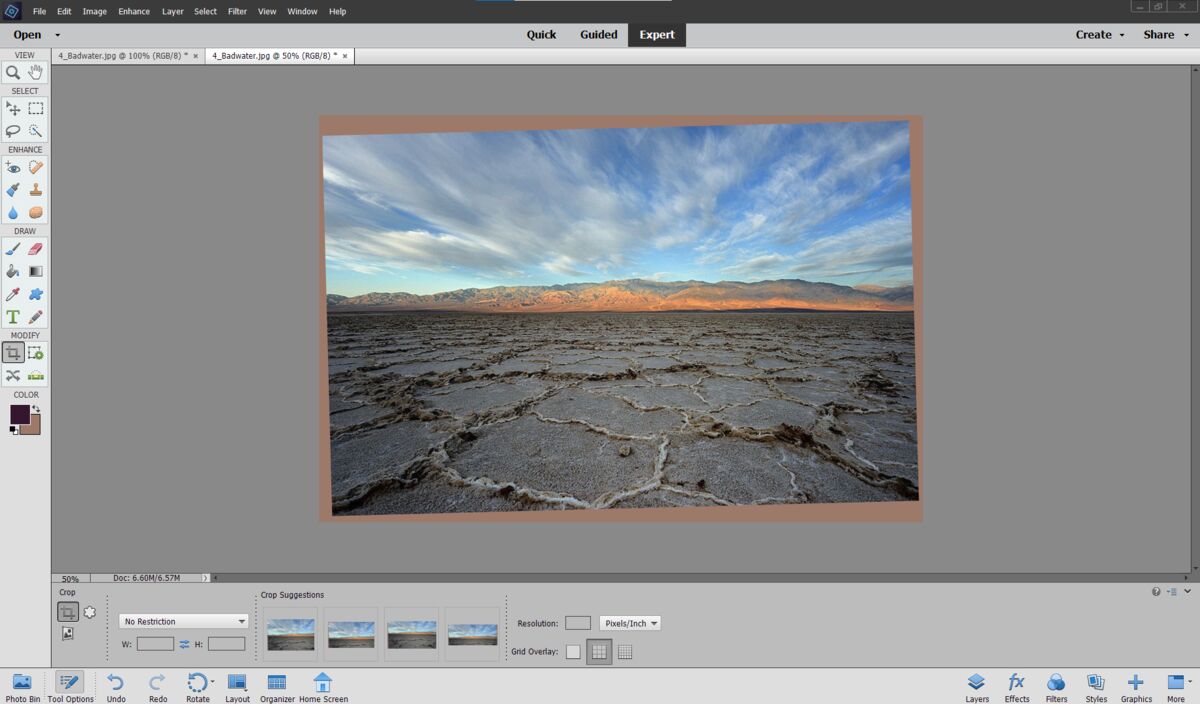
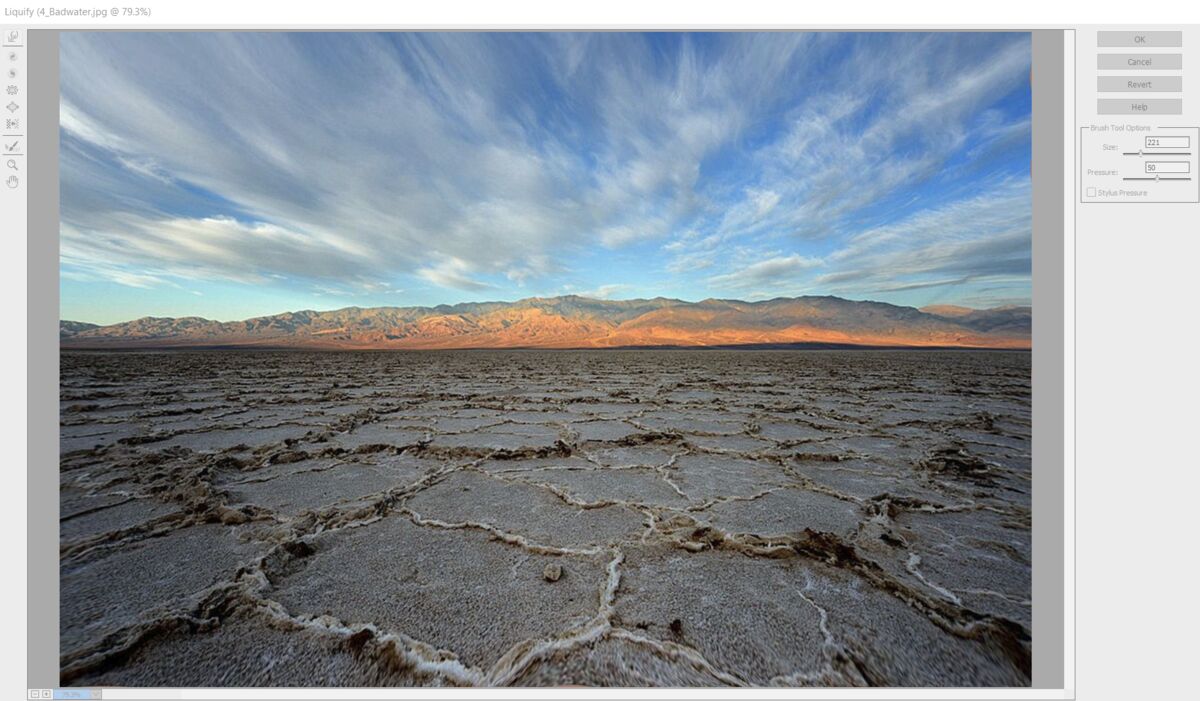
1. Original landscape of Badwater Basin in Death Valley is obviously not level!
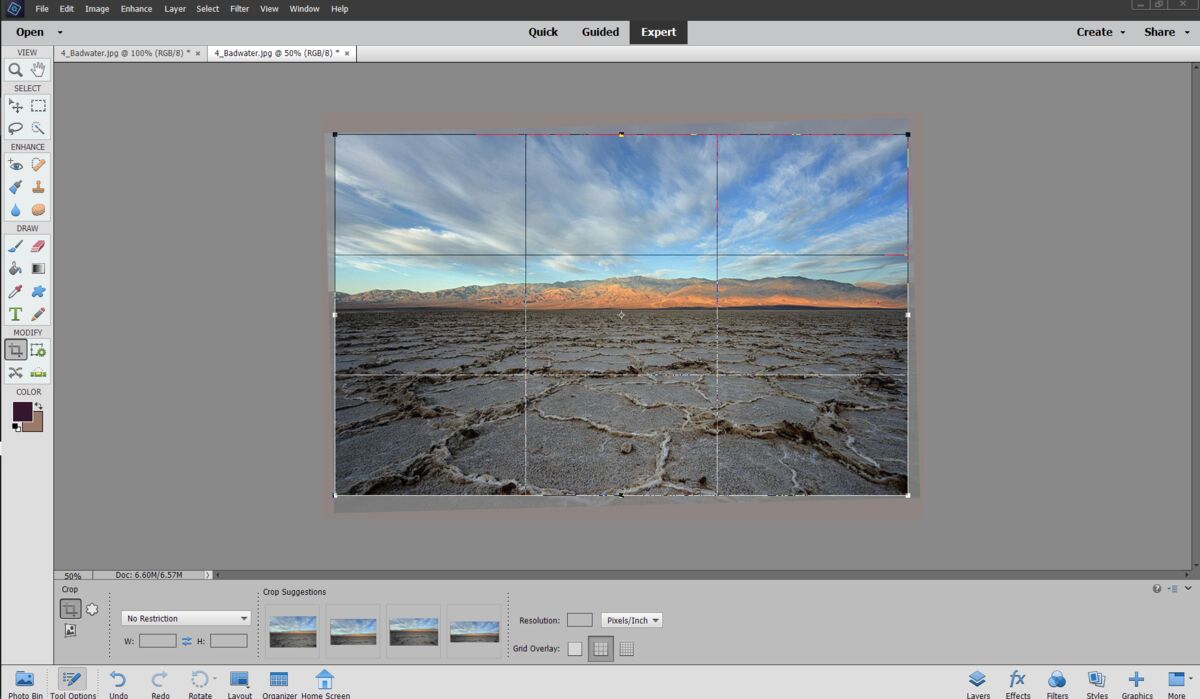
2. Using PSE 2021, I corrected the tilt by 1.5 degrees, Screen capture A.
3. Screen capture B shows the cropping tool which in this image eliminates relatively little and some folks could live with that! If the tilt were extreme and needed much more correction, much more image area might have to be cropped away.
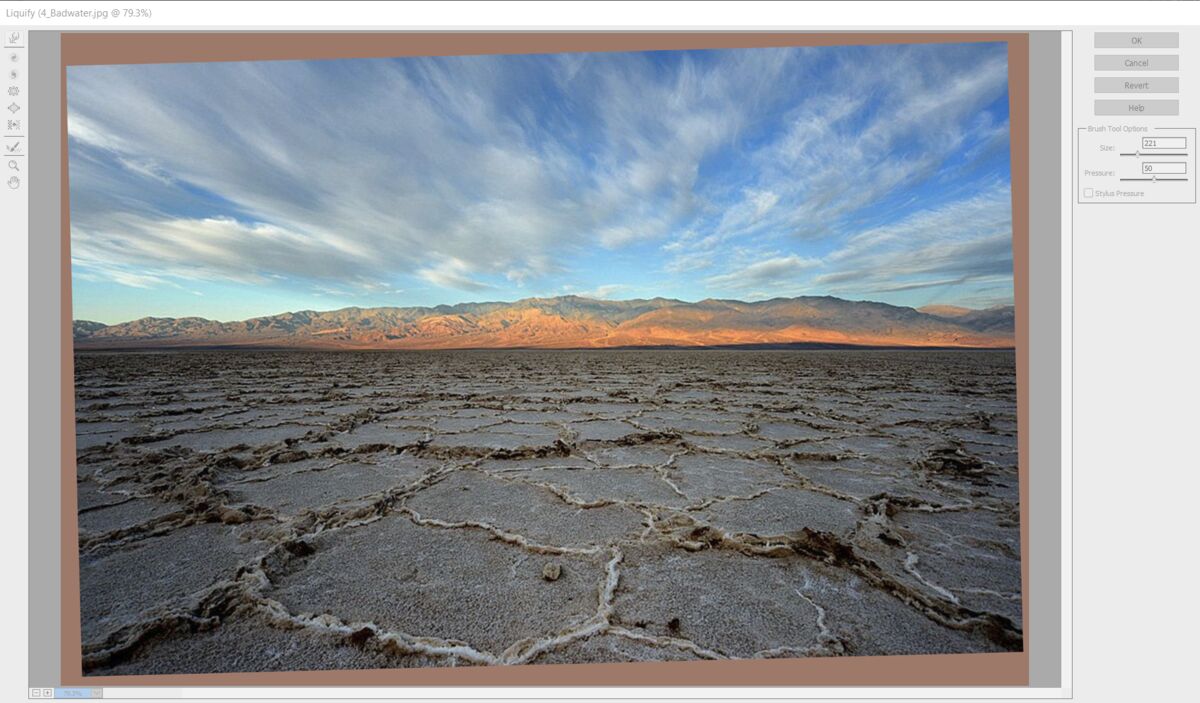
4. Screen capture C shows the "Liquify" tool (in the sub-menu under "Distort" which is in the "Filter" command along the top Menu bar.)
5. Using the "Liquify" brush, slowly push the portions of the original image towards the gap between it and the new border. Basically, you are pushing pixels and using them to fill in the gaps. Works best when small gaps need to be covered. The "Liquify" brush could not be screen captured. You can adjust the circular brush to cover the areas to be "pushed."
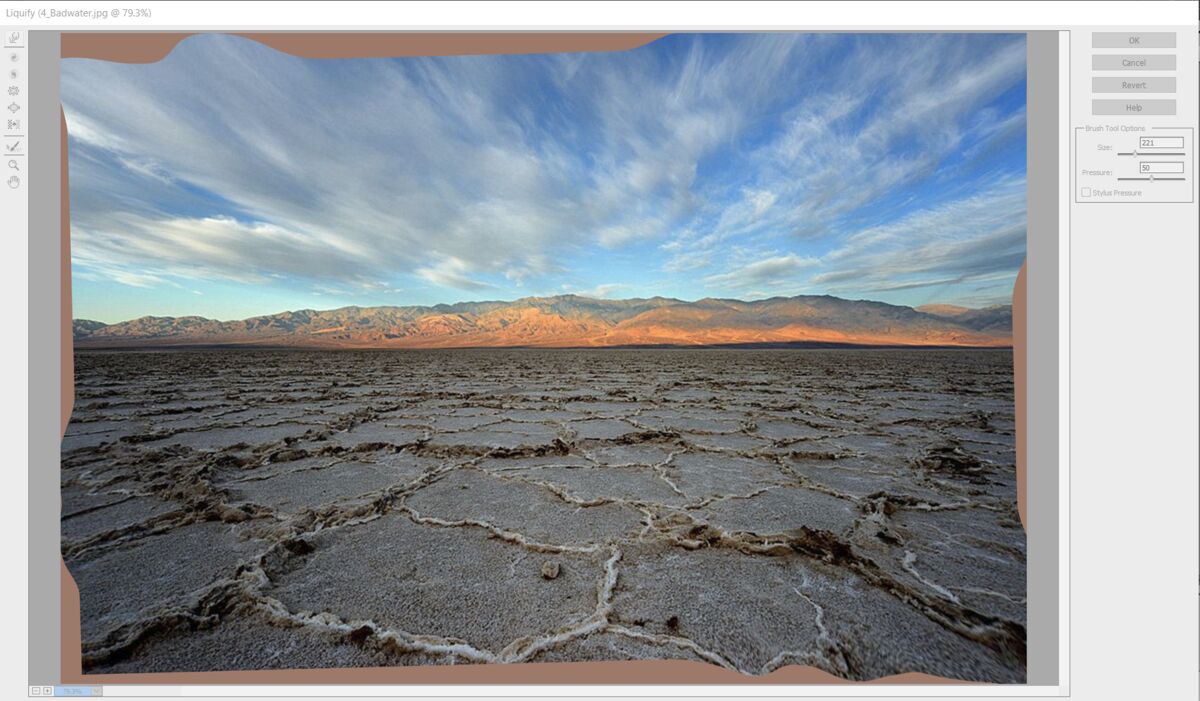
6. Screen capture D show quite a bit of the original image filling in the gaps between the original image and the new borders of the new image.
7. Screen capture E shows 90% of the original image being expanded to fill in the gap between the tilted image and the "new" image borders.
8. The final results are shown in the last image, Screen capture F.
It takes more time to show and tell than to do this correction. Likewise, very often, some extraneous detail near the image's edge such as a portion of a limb or sign or pole or flower or garbage is distracting, then the liquifying tool is very helpful and can push the offending object out of the image.
Be well! Have a great Fourth of July! Ed

Jul 2, 2023 12:57:21 #
gwilliams6 wrote:
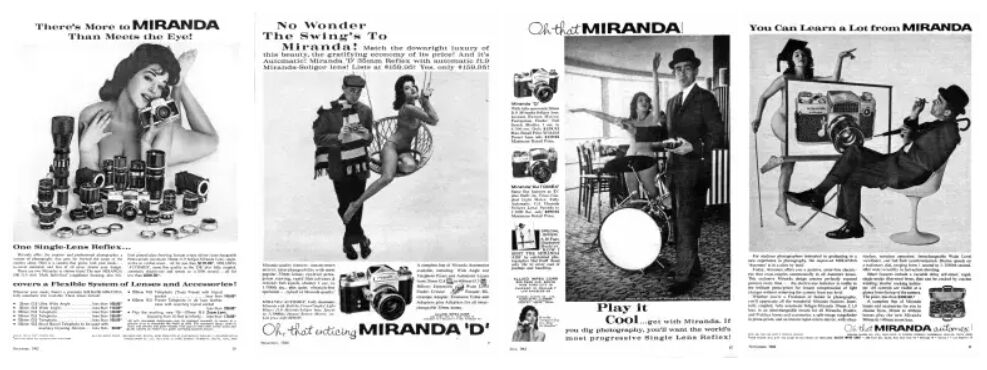
Look familiar Jerry and Bob? Cheers
Miranda sure had great photo magazine ads of a lovely lady! I saved many of the ads!
Be well! Ed
Jul 2, 2023 12:45:17 #
jerryc41 wrote:
I know what you mean. I think part of the problem is that there are too many "things." You need specialty stores to find exactly what you want these days. So many things need adapters.
Gone are the days of Radio Shack and Layfayette!
Be well! Ed
Check out True Macro-Photography Forum section of our forum.
Jul 1, 2023 18:21:24 #
My current working cameras are a Nikon D810 and a Z5 with 2 FTZ adaptors. The other cameras that I use occasionally are a Nikon D800 and D800e, 2 Nikon D750s, a Fuji X Pro-1, 2 XE-1s, Canon 1Ds Mk2 and 1Ds Mk3.
Film cameras include Nikon F Photomic N, Nikon F3, Nikkormat EL2 and a Hasselblad 500c. Love them all!
Be well! Ed
Film cameras include Nikon F Photomic N, Nikon F3, Nikkormat EL2 and a Hasselblad 500c. Love them all!
Be well! Ed
Jun 30, 2023 15:14:30 #
UTMike wrote:
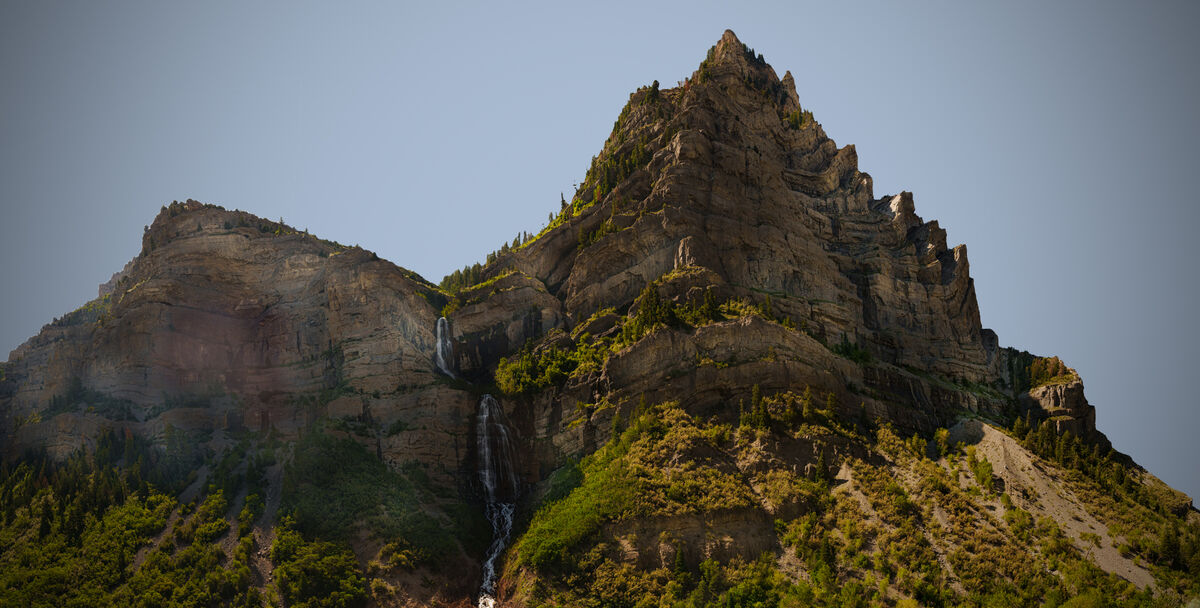
In taking a pano set of Bridal Veil Falls with a 24mm setting, I created a pano with my hand shading the lens in the left of the photo. Traditional sky replacement in PhotoShop left a line.
Any ideas who to get an even sky? Thanks in advance.
Any ideas who to get an even sky? Thanks in advance.
UTMike!
Easy Peasy! I did it the old fashion way using Photoshop Elements 21 on this laptop. Other versions on desktop and other laptops!
1. Do a "Quick Selection" from the upper frame edges to the top of the mountains. If only portions are selected, extend the pointer to cover the whole sky. The "marching ants" should cover the whole sky.
2. Click on the "Select" menu and choose "Feather" in the resultant dropdown menu. I arbitrarily chose "10."
3. Use the "Eye Dropper" tool to pick a sky density which will change the main color from the previous one.
4. Use the "Paint Bucket" tool to fill the sky selection with color.
5. Click on "Select" in the menu bar at top and choose "Deselect" in the resultant dropdown menu.
6. Click on "Filter" in the menu bar at top and choose "Correct Camera Distortion" in the resultant dropdown menu and in the new dropdown menu, choose "Vignette" and use the sliders to get the effect you like in the sky.
It's easier to do than explain and you probably can do with other methods in PS (I hate "Layers!")
Among many of the other current pieces of software is one I use from 2010 called Picture Publisher and do a "Cut and Paste" and created one of my favorite images, combining a nude study from 2012, shot in Death Valley with a sky from my library of skies and cloud formations. Can be done in PS but I'm used to doing it more quickly in Publisher.
Be well! Ed
Note from one of the section managers:
I had to remove the nude image as required by UHH rules:
https://www.uglyhedgehog.com/t-426-1.html
Linda Shorey
Jun 28, 2023 12:35:16 #
mort wrote:
has anyone used this scanner ? it seems to be on sale for $30 , and seems very simple to use .
also , any tips on it's use .
also , any tips on it's use .
Mort!
BE CAREFULL! There are two Kodak scanners: KODAK Slide N SCAN Film and Slide Scanner with Large 5” LCD Screen which costs under $200 and is currently still for sale in new condition!
<https://www.amazon.com/KODAK-Scanner-Convert-Negatives-Resolution/dp/B084NVRHYQ/ref=asc_df_B084NVRHYQ/?tag=hyprod-20&linkCode=df0&hvadid=416690850145&hvpos=&hvnetw=g&hvrand=21711828536882884&hvpone=&hvptwo=&hvqmt=&hvdev=c&hvdvcmdl=&hvlocint=&hvlocphy=9060351&hvtargid=pla-897697435429&psc=1&tag=&ref=&adgrpid=93602482733&hvpone=&hvptwo=&hvadid=416690850145&hvpos=&hvnetw=g&hvrand=21711828536882884&hvqmt=&hvdev=c&hvdvcmdl=&hvlocint=&hvlocphy=9060351&hvtargid=pla-897697435429>
And: Kodak Mobil Scanner: A Rube Goldberg device that uses your cell phone camera and costs about $30!
<https://www.amazon.com/KODAK-Mobile-Film-Scanner-Built/dp/B07MTKNTPK/ref=asc_df_B07MTKNTPK/?tag=hyprod-20&linkCode=df0&hvadid=312191520183&hvpos=&hvnetw=g&hvrand=21711828536882884&hvpone=&hvptwo=&hvqmt=&hvdev=c&hvdvcmdl=&hvlocint=&hvlocphy=9060351&hvtargid=pla-822005298712&psc=1>
My pal's wife bought the more costly scanner when it first came out and loves it. The scanner also received very good reviews!
Be well! Ed
Jun 28, 2023 12:18:02 #
Pat F!
Having a website such as Fine Art America is just one component for selling your images!
My buddy, Chris Lord, an expat from UK and a former chef has seen success but he spends a bit of time promoting himself:
He has his own websites: <https://www.pixielatedpixels.com> and <https://chrislord.nyc/>
He has A Fine Art America site: <https://fineartamerica.com/profiles/chris-lord>
He's on Saatchi Art: <https://www.saatchiart.com/chrislord>
He's on Linked In: <https://www.linkedin.com/in/pixielatedpixels/>
He posts on Facebook, Instagram, Pinterest, Flickr, Behance, Besttopphotographer, Imagekind, Amazon, Displate,
iCanvas, Twitter, eBay, etc, etc.
He co-hosts a photography Meetup group in NYC, attends other Meetups such as mine, and travels to Iceland, Thailand, and numerous other locations. He has been interviewed for YouTube. On and on, he keeps promoting himself.
There are billions of websites. If you build it, will people come? Maybe by accident! Check him out on Google and other search engines. As others have said, it will take a while to build a clientele.
Are you prolific and do you have a variety of subjects and a style that's saleable?
And Chris Lord is a great guy and photographer! Be well! Ed
Check out Drone Video and Photography Forum section of our forum.
Jun 28, 2023 11:36:12 #
Karin!
Lovely animal portraits especially the eagle, orangutang and the red panda! I noticed you used a Canon "bridge" camera. Nice camera, I have the model before yours. :-)
Be well! Ed
Lovely animal portraits especially the eagle, orangutang and the red panda! I noticed you used a Canon "bridge" camera. Nice camera, I have the model before yours. :-)
Be well! Ed
Jun 28, 2023 11:20:37 #
Bill 45 wrote:
The time has come to say good by to film and film cameras...
Bill45!
Very often I have a hankering for film photography and want to try out or test some of my stored, frozen b/w
and/or color transparency film. I just drop it off at my favorite lab, get the film processed only and a medium-resolution CD.
Granted, there are still at least half a dozen labs around NYC that still have a wet lab and can also scan the images.
Later, for a better scan of decent images, I can use my 4000 dpi Nikon scanner. Some flatbed scanners can do a whole roll of film in strips of 5 or 6 frames across for a "proofsheet" and quick viewing.
Best of both worlds! Be well!
Ed
Jun 18, 2023 15:21:35 #
JohnFrim wrote:
OK, clearly not MY photo, and not really intended as a photo, but rather as a bit of humour that could not be posted elsewhere on this forum, and that should bring a smile to your face.
And in light of recent posts about AI in images, I suspect this was not generated by AI... but I suspect a few are AE (Artificially Enhanced).
And in light of recent posts about AI in images, I suspect this was not generated by AI... but I suspect a few are AE (Artificially Enhanced).
John!
Looks like an AI image to me. All the women look like "sisters" and the odds of finding so many models with matching breast size, shape and flawless complexions. I've seen quite a few similar images.
Be well! Ed
Jun 18, 2023 14:57:30 #
jlg1000 wrote:
Just because...
Uruguayan slang: "Pintó"
Besides, would you recognize her as AI if I didn't disclose it?
Uruguayan slang: "Pintó"
Besides, would you recognize her as AI if I didn't disclose it?
jlg1000!
Yes! 1. The features of the "model" are too generic as are all the images of AI "models" that I have seen including XXX.
2. The skin is "plastic looking" and smooth, textureless and free of skin variations and musculature.
3. The model always looks like a "wet dream."
4. Perfect pose and not a hair out of place.
Probably, other reasons too!
Just my 2 cents! Be well! Ed
Check out Advice from the Pros section of our forum.
Jun 17, 2023 10:24:46 #
Jonathan!
The Nikon D800 and D800E are great cameras! I have one D800 and one D800E. With my "Holy Trinity" lenses
the camera can be a handful and heavy. I mostly use the 28-300mm F3.5 Nikkor and it too is no small compact lens but with the camera's 36MP count one can reduce the shooting image size or the file size or use the large 36MP file to crop from.
There are many reviews, tutorials and videos out there and learning its features should be no problem!
Plus if the camera is available at a great price and it's not for her, then it could be traded for a smaller D750 or D780 while still using the Nikkor lenses.
Be well! Ed
Jun 16, 2023 17:19:27 #
Jerry!
Amazon Prime has been pushing paid movies for streaming lately but they also point you to "Freevee.com" which is a free ad-supported movie streaming service similar to Tubi.
YouTube also has movies that viewers can pay to stream but if you search "Free movies" youTube has a rotation of many decent movies that you can watch for free.
I also follow Darren VanDamme's youTube channel who periodically highlights free movies on youtube and other services. Here's a video from 2 weeks ago with youTube recommendations:
https://www.youtube.com/watch?v=jQVDhd26amQ&t=393s
Be well! Ed
Jun 16, 2023 16:50:13 #
jerryc41 wrote:
The Harvard Medical School has been selling donated corpses and body parts for hundreds and thousands of dollars. Equally disgusting is the fact that one of the buyers uses the body parts to make creepy creations to sell to the public. One sale was listed as "Head #7."
More evidence of why Klaatu came here to warn humans to start behaving themselves.
More evidence of why Klaatu came here to warn humans to start behaving themselves.
Hi All!
Another disgusting medical issue has been the sale of Henrietta Lacks' cancer cells which were taken without her or her family's knowledge or permission! She died in 1951 of cervical cancer but her cells remain alive in thousands of research projects to this day.
What's more disgusting is that the medical establishment didn't acknowledge the use of her cells until 1973 and has not paid a penny to her estate or family while the original cells have been propagated and sold to others for continuing research. We're talking about millions and millions of $$$!
See: https://www.newscientist.com/people/henrietta-lacks/
https://www.theguardian.com/world/2013/mar/31/henrietta-lacks-cancer-research-genome
Be well! Ed
Jun 15, 2023 10:40:50 #
ladysue wrote:
KEH has offered $288 quote for my fairly new Canon SL3 camera. Was using with 17-55 lens which was fantastic image-wise but not much fun to use and no 24mm field of view...
ladysue!
I would be happy to buy your Canon SL3 for $300 plus pay for shipping! I currently own 2 SL1s (among many other DSLRs) and love them!
Keep me in mind. I have transacted over a dozen purchases here on UGG and over 700 purchases at eBay.
Be well! Ed
Check out Bridge Camera Show Case section of our forum.