Posts for: JimH123
Sep 5, 2023 23:46:31 #
Rocky Beech wrote:
I just discovered, the hard way, that in Live View with Silent Shutter activated, my flash will not fire. I watched a few YouTube videos and found out that, at least, my camera was NOT broken and according to the authors, even Canon has this feature. Can anyone explain why Nikon would implement this logic into the camera. How do people deal with this for close-up focus stacking using the flash and in Live View? Or are we just relegated to using the eyepiece? Just curious.
https://blog.kasson.com/d850/how-fast-is-the-nikon-850-electronic-shutter/#:~:text=When%20running%20silent%2C%20the%20mechanical%20shutter%20is%20open,how%20long%20it%20takes%20to%20make%20its%20journey%29.
Here is a very good explanation of what is going on with the D850 in both mechanical shutter and silent shutter. In mechanical shutter, this explanation shows that the shutter actually takes about 1/250 sec (or 4 ms) for the exposure. And this is as fast as the mechanical shutter can go. So, this is also the fastest you can set the shutter speed and capture an image with a flash, which is a very quick pulse of light. If you were to use an even faster shutter speed, faster than 4ms, the mechanical shutter is still going to take 4 ms to traverse the sensor, so to accomplish this, the exposure is controlled by moving slot that exposes each point along its travel to the desired shutter speed, while it still takes 4 ms to finish its travel. This effectively limits the upward shutter speed to 1/250 sec if you intend to use a flash.
Now let's go into silent shutter mode. If you look carefully at the second part of the study, you will find that it now takes 64 ms for the entire scene to be captured. This is 16 times slower. There is no mechanical shutter operating. But there is also no way of storing the contents of the entire sensor, so instead, a part of it is exposed and transferred, and then it moves on to the next part to be exposed and transferred and this continues until the entire scene has been exposed and transferred. Because of this, Nikon, and all the other manufacturers decided to keep you from shooting yourself in the foot, and made the camera not even operate in silent shutter mode.
Now it was mentioned that the Nikon Z8 and Z9 don't have this restriction. Fact is, the Z8 and Z9 don't even have a mechanical shutter, and thus do not play by the same rules. I do not have a Z8 or Z9, and haven't spent time digging into flash limitations, if any, on these cameras. Perhaps someone else can fill us in.
Ignoring the Z8 and Z9, the slow capture time when in silent shutter mode should be something you keep in mind when taking pictures, even without using a flash. If your subject is moving, then remember that even though you set a fast shutter speed, the time to capture the entire scene is going to still take 64 ms. And handshake can affect things too. The result is that your pictures make not look that sharp even though you used a fast shutter speed. Keep this in mind. I know I have experienced this problem! And I keep it in mind when I'm shooting.
Sep 5, 2023 20:43:24 #
Real Nikon Lover wrote:
Perhaps a Circular Polarizer. Thats about all I use if needed. I guess it depends on whether there will be a white flash! ;)
Need to also mention to the OP that polarizers may not work well with wide angle lenses.
Sep 5, 2023 20:37:53 #
CliffMcKenzie wrote:
Planning a trip to White Sands in NM in early October. Any suggestions regarding use of a filter? If a filter is recommended how many stops? Thank you, Cliff
With the sun elevated from the horizon, a graduated ND filter darkens the bright sky. Many use from 1.5 to 3.0 stops for this. The filter is dark at the top and becomes clear as you drop towards the center.
For sunsets, where the sun is low, a reverse graduated ND filter is useful in that it darkens the bright sun, but is clear above and below where the sun is so bright. Again, 1.5 to 3 stops is useful.
Professionals will likely use the square filters so that they can be slid up and down. Those with shallow pockets just buy round ones and tilt the camera up/down so that the effect is in the right place.
Examples of sunsets using a reverse graduated filter:
https://singh-ray.com/equipment-technique/3-stop-reverse-graduated-nd-filter-essential-tool-shooting-sunsets/#:~:text=A%20reverse%20graduated%20filter%20is%20a%20rectangular%20filter,positioned%20over%20the%20brightest%20area%20of%20the%20image.
Sep 4, 2023 21:05:52 #
profbowman wrote:
While a wide-angle is good for the Milky Way and for meteors and such li9ke. A telephoto is better for planets, the Moon and deep sky objects such as nebulae and star clusters. --Richard
Planets need a long focal length telescope and would not be something to try for on a trip. Nebulae are dim and need a scope with light gathering ability and a mount with tracking. Again, not something to try on a trip.
As for the Milky Way, in September, we are nearing the tail end of the Milky Way season. In the summer months, the earth faces the Milky Way during the night time hours, and in the winter months, during the night time hours, the earth faces away from the Milky Way. Currently in September, the Milky Way is seen moving farther and farther to the west and there will be fewer hours to see it.
Aug 31, 2023 23:29:25 #
rv8striker wrote:
Any ideas why there are white lines on this image? It has happened with others too but not all. Stacked image using Affinity, processed in Lightroom.
I have done a lot of stacking and have never seen a problem like this. Can you look closely at the individual photos that make up the stack? Can you see anything? How many photos in the stack? And you say you have seen this before? Part of the streak is two pixels wide. And there is that funny segment that skips a few pixels.
And hot pixels are usually red, or green or blue since those are the colors of the CFA that covers the sensor.
For this to be a hot sensor, it would mean that you have taken a tremendous number of shots and that the camera or the flower was moving in a very straight line. This doesn't happen.
Can you post a couple of the individual photos that went into this stack?

Aug 31, 2023 23:03:36 #
sippyjug104 wrote:
It appears to be a "hot pixel" on the sensor. The change in DOF of the individual shots cause the pixel to appear in a different position in each of the shots and it produces the white line when they are stacked.
I can see by the ghosting around the flower how much the focus changed as the lens advanced taking shots in the stack which also leads me to believe that it is a hot pixel creating the illusion of a white line.
I can see by the ghosting around the flower how much the focus changed as the lens advanced taking shots in the stack which also leads me to believe that it is a hot pixel creating the illusion of a white line.
This is not a hot pixel. It is too wide. Do you see anything on any of the individual images that make up the stack? How many images in the stack? What SW is used to make the stack? Part of the streak is wider. This doesn't make sense.
Aug 31, 2023 19:45:50 #
Carl1024 wrote:
what models are good for landscape scenery?
I find that no one lens handles everything. For some scenes, a nice wide angle works great. But other times, the scene looks too far away, and have to try a longer lens.
Aug 31, 2023 19:04:26 #
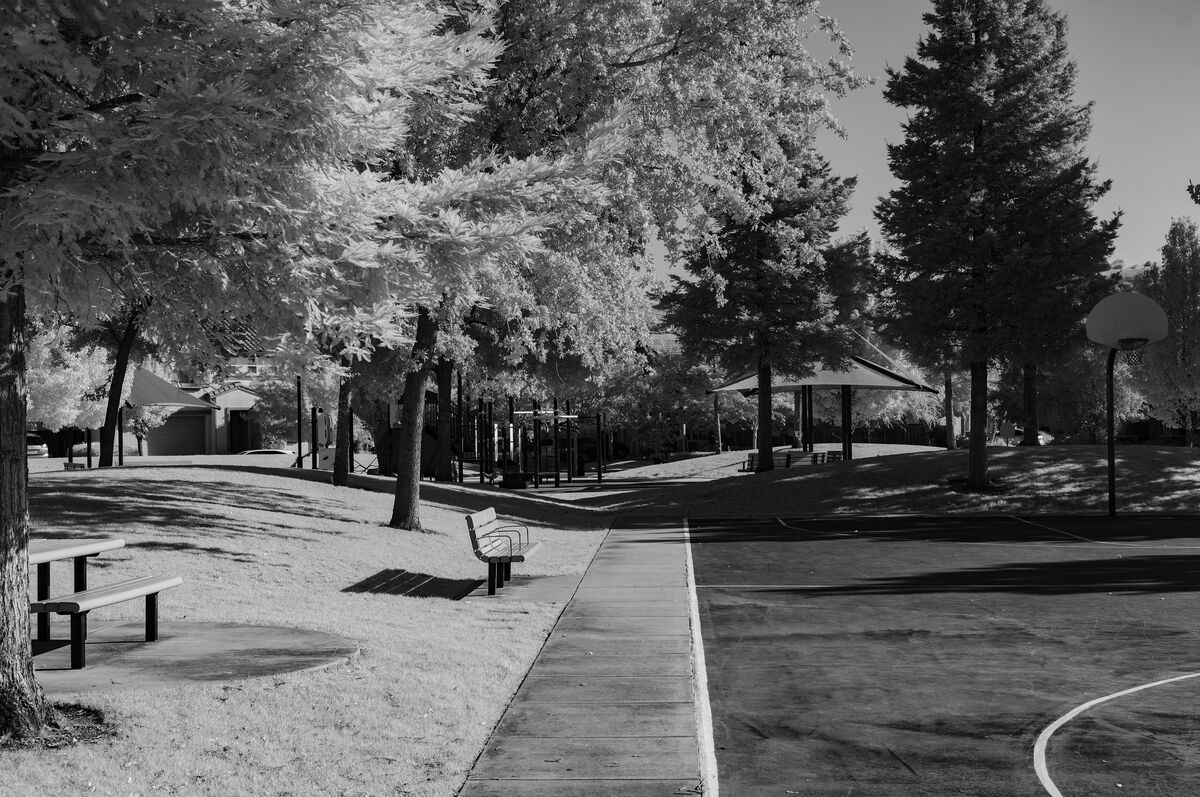
I am going to do a real example now. This was taken yesterday using my Sony 35mm f1.8 lens on the Sony A6300.
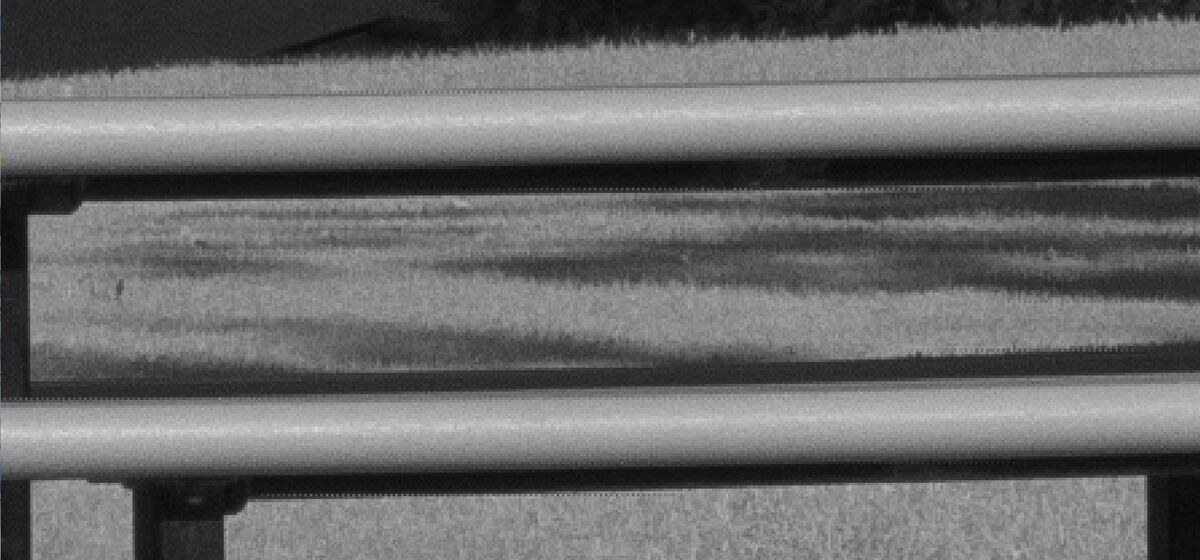
First image is the DNG file taken from the RAW file after running Monochrome2DNG. The Light/Dark alternating pixel problem can be seen on the park bench in the center of the image.
Second image is a closeup showing the problem.
Third image is the PhotoAI screen. The right side is the corrected side. I used default settings but deceased the strength while watching the bad pixels. At some point they came back so I move a slight bit back to the right so that they disappeared again.
Fourth image is the end result of PhotoAI. The bad pixels are gone. I try to be very careful with the Strength slider in PhotoAI since moving farther to the right will destroy detail. Wish I didn't have to even do this. But this is the downside of using the A6300. These steps are not needed for the A7ii.
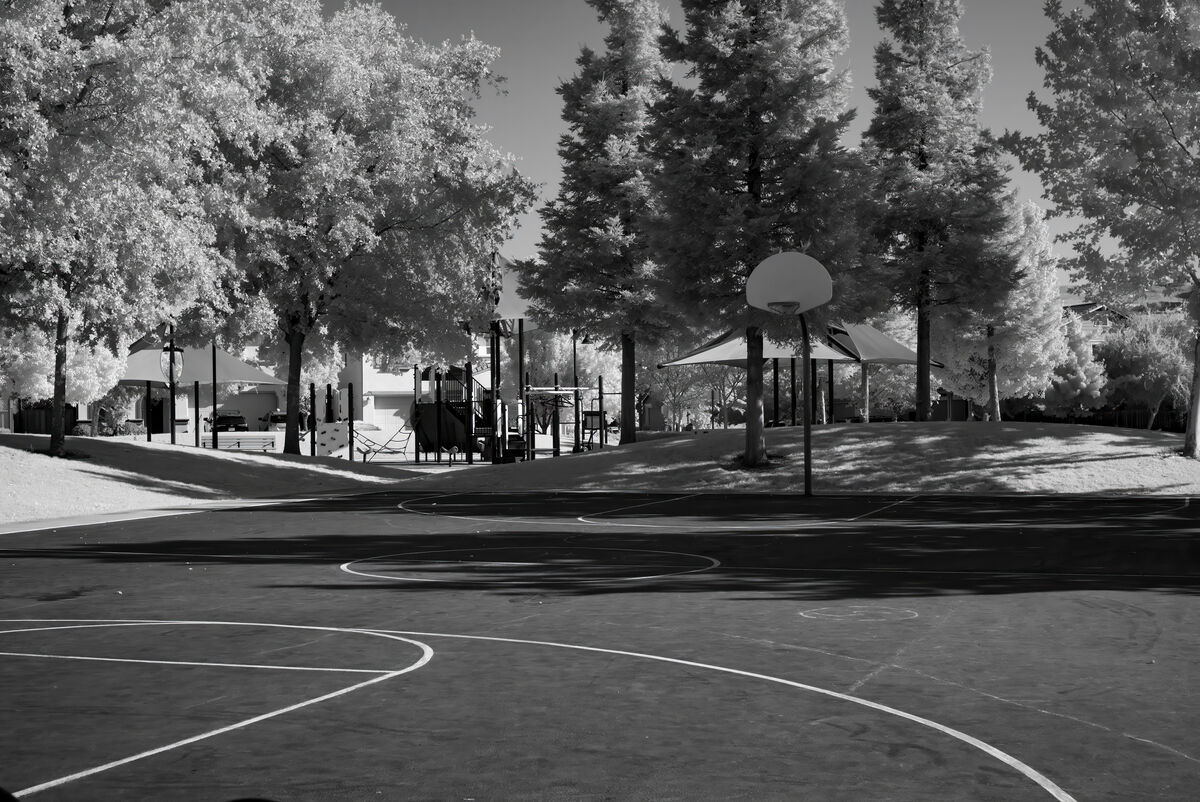
As an alternative, the last image used DxO Photolab on the original RAW. DxO Photolab thinks it is working on a color RAW file so it accepts it. But the file is strictly mono shades of gray, but it is Demosaiced. Not sure how much penalty there is on Demosaicing a RAW file made with only shades of Gray. This method produces no Alternating Light/Dark Pixels, and it appears a bit sharper than the PhotolAI version. My opinion is that it is good enough. Look at the pole for the basketball hoop and see how much detail remains. Sure, I would like converted DNG files without the pixel problem. But this is easy. DxO can operate in batch mode and just process all the RAW files at once. Mostly, in Lightroom, they benefit from adjustment of the Blacks/Whites sliders and possibly Dehaze, Clarity and/or the Tone Curve. Not much else needs to be done to a B&W file. I also make sure to hit the Black & White button in Lightroom as that can be spurious colors if the image doesn't know its supposed to be Black and White.
Additionally, DxO reads the lens being used and provides lens correction. PhotoAI doesn't do that.
First image is the DNG file taken from the RAW file after running Monochrome2DNG. The Light/Dark alternating pixel problem can be seen on the park bench in the center of the image.
Second image is a closeup showing the problem.
Third image is the PhotoAI screen. The right side is the corrected side. I used default settings but deceased the strength while watching the bad pixels. At some point they came back so I move a slight bit back to the right so that they disappeared again.
Fourth image is the end result of PhotoAI. The bad pixels are gone. I try to be very careful with the Strength slider in PhotoAI since moving farther to the right will destroy detail. Wish I didn't have to even do this. But this is the downside of using the A6300. These steps are not needed for the A7ii.
As an alternative, the last image used DxO Photolab on the original RAW. DxO Photolab thinks it is working on a color RAW file so it accepts it. But the file is strictly mono shades of gray, but it is Demosaiced. Not sure how much penalty there is on Demosaicing a RAW file made with only shades of Gray. This method produces no Alternating Light/Dark Pixels, and it appears a bit sharper than the PhotolAI version. My opinion is that it is good enough. Look at the pole for the basketball hoop and see how much detail remains. Sure, I would like converted DNG files without the pixel problem. But this is easy. DxO can operate in batch mode and just process all the RAW files at once. Mostly, in Lightroom, they benefit from adjustment of the Blacks/Whites sliders and possibly Dehaze, Clarity and/or the Tone Curve. Not much else needs to be done to a B&W file. I also make sure to hit the Black & White button in Lightroom as that can be spurious colors if the image doesn't know its supposed to be Black and White.
Additionally, DxO reads the lens being used and provides lens correction. PhotoAI doesn't do that.


Aug 31, 2023 18:19:07 #
Adding this image that I prepared after the time limit expired and I could no longer edit the previous entry.
I opened the original DNG image in Photoshop and then called PhotoAI where I let it deal with the noise, note how it is cleaned up. And I told it to preserve text.
Somehow, PhotoAI is able, sometimes, to remove the offending light/dark pixels. But not always. I have been trying other software such as ON1 Denoise, and also Adobe's offerings, but nothing else is touching those offending pixels. But PhotoAI does. Topaz Denoise AI doesn't do it. Topaz Sharpen AI doesn't do it. DxO won't load the monochrome file. To some extent, Topaz Gigapixel AI does it somewhat if I resize a bit. But PhotoAI is doing it the best, and without resizing. Almost seems as if PhotoAI is using knowledge about how demosaicing works to accomplish this???

Aug 31, 2023 17:10:48 #
selmslie wrote:
I wanted to be sure I hadn't missed something so I... (show quote)
This what I expected see. It matters not for the DNG file whether it comes from compressed RAW or non-compressed RAW. The small you are seeing is the difference in the embedded JPEG hidden in the RAW file. JPEG files will grow or shrink based on what's in the picture. And a little difference in your aim can make that difference.
I did take some images with the Sony 18-200mm lens today. And I did find faint bits of light/dark pixels. But they were difficult to find and to see. The difference really boils down to the sharpness of the lens. The Sony prime that I have are the sharpest lenses I have. It takes a very sharp high contrast edge to trigger the formation of the artifact. That 18-200mm zoom just isn't as sharp as the primes, and does trigger the formation. I am thinking that if I were to have the right target and the camera on a tripod that more these lenses would show the problem.
And to think that non-compressed RAW would completely solve the problem. Well, not going to hold my breath while waiting on Sony for new firmware.
By the way, printed material is a good generator of this problem. Taped up a newspaper and could see the problem above or below many letters that had flat tops or bottoms.
On the image of your lamp, the bottom of the back side where the bright light shade meets the darker wall would have triggered the problem on the A6300. But if the image were to be demosaiced, it would completely go away. I do think in the demosaicing instruction Sony wrote for the SW people who write the demosaicing algorithms for Abobe and others is the cure. I notice how when new cameras are released, that at first, only JPEGs can be used for evaluation. And even then we here about certain problems seen that we are told will go away with the production firmware release as they fine tune demosaicing, and then make the demosaicing rules available to the people who need to use that information.
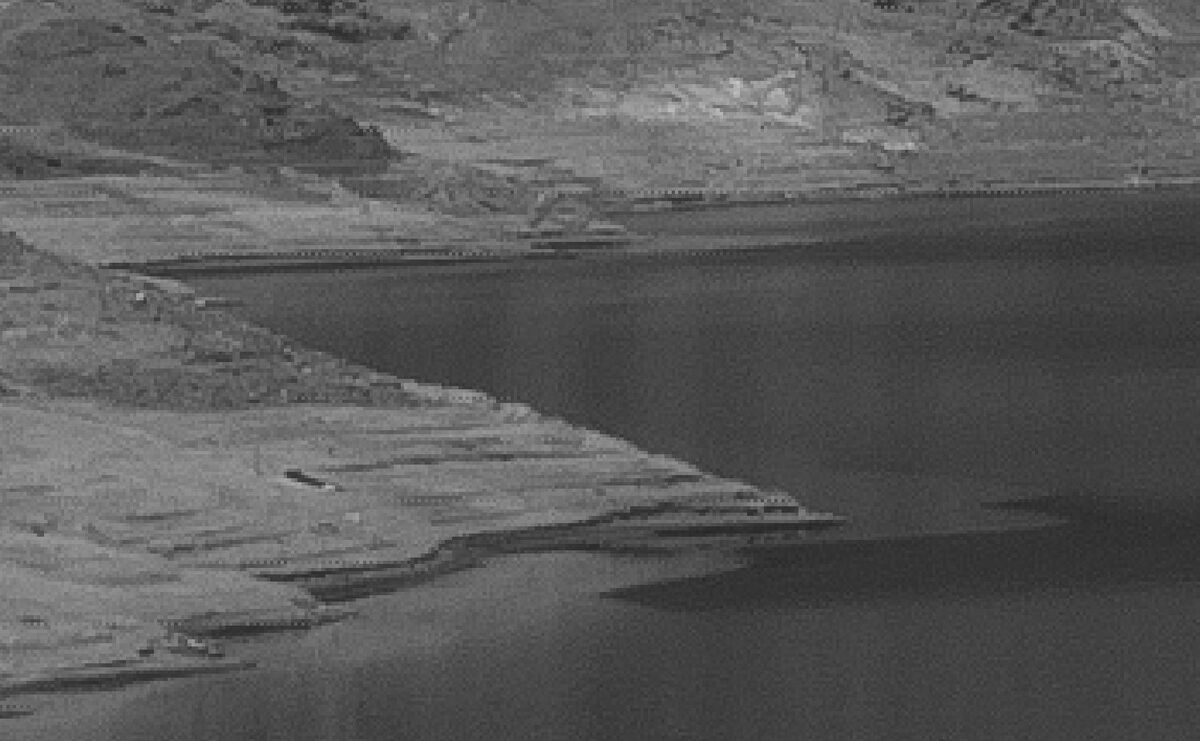
Attached is a picture of some lettering where you can see that the top of the letter 'o' triggered the problem. (600% magnification) There were other letters on the sheet that exhibited this problem, but I zoomed in to show just this.
Image 2 is from the same sheet of paper I took the picture of to show a place it was even worse.
And these images were taken with my Sony 35mm lens which is a very sharp lens.


Aug 31, 2023 12:56:55 #
selmslie wrote:
I'm seeing something different. br br I looked at... (show quote)
Don't forget that the RAW contains a JPEG image embedded within the file. And the size of the embedded file may also change in size depending upon the conditions under which the RAW was created.
In Lightroom, I often see the message "Embedded View" show up on RAW files until LR has the time to load the actual RAW file.
I don't think the DNG file contains an embedded JPEG, but I don't really know for sure.
Aug 31, 2023 10:44:52 #
selmslie wrote:
I checked the difference between the compressed an... (show quote)
Thank you for looking. I do believe that the A7ii uses a different algorithm in compressing the RAW files. But the DNG file that you get should be the same size whether you use a compressed file or an uncompressed file since both are comprised of the same amount of data after the monochrome2DNG conversion. There is no compression in the DNG file.
The A6300 was released in Feb 2016. The A7ii actually was released a year earlier. But there is no indication that the two shared compression algorithms. The A7ii was targeted at full frame users and likely had different priorities during the design phase. And the fact that it could do uncompressed (I seem to recall that this was added later through a firmware update) and that it was not added to the A6300 tells me something was different. The A6300 users wanted that option too, but never got it.
I did some looking at colored results of running files through monochrome2DNG with my A6600 and A7iii, but could see no indication of any problem like the A6300 is having. But it is not clear if using a color RAW file would push the conversion the same way that a mono RAW file would handle it. But both of these cameras were designed later than the A6300 and perhaps the A6300 compression algorithm was no longer being used. I suspect the A6100 and A6500 probably shared the same algorithms as the A6300. And likely the A6000 was more of the same.
But interesting that only the e-mount native lenses show this problem. But not the adapter A-mount lenses that also were communicating with the camera through the LA-EA4/LA-EA3 adapters.
I did look at another native E-mount lens that did not have this problem and that is the 18-200mm lens. I found that I had used it a number of times on the A6300 and found no cases of the alternating light/dark pixels with that lens. It's not my favorite lens since having such a broad range of focal lengths may not yield the same IQ as I get with the more dedicated lenses such as the 35 and 50mm primes. But the 10-18mm zoom was in the same boat. And the Samyang 18mm was a newer lens and subject to Sony sharing the details on making 3rd party lenses.
Aug 31, 2023 01:03:06 #
Adding some details about Sony A6300 files.
When shooting RAW + JPEG, the JPEG quality drops from Extra Fine to just Fine. Extra Fine produces a file size of about 2 times the size of Fine.
The single shot RAW files are 14-bits, but effectively they are only 13 bits due to the lossy compression scheme.
RAW files drop to 12-bits in burst modes, and during Silent Shooting, Bulb Mode, or when Long Exposure NR is turned on.
Also found ref on the internet about a paper that Sony has published about their lossy compression and it deal with what happens when a high contrast situation happens within a space 32 horizontal pixels which can produce artifacts. This appears to be what I am seeing. So, it appears that the bit averaging done by demosaicing removes these artifacts.
Here is a link to an article on Sony's RAW compression.
https://www.dpreview.com/articles/2834066212/the-raw-and-the-cooked-pulling-apart-sony-raw-compression
Aug 30, 2023 23:12:28 #
My Sony A6300 which has been modified to be a monochrome sensor has an issue in which some strange, alternating Light/Dark pixels can appear on high contrast horizontal edges.
Image 1 shows one such problem at about 300%. Notice that there are multiple places that this appears.
For a long time, I found that I had the problem some of the time, but not all of the time. And when it happens, it is in the RAW file as seen by RawDigger. So the problem is happening in camera and not by some incorrect processing. And since it is in the RAW file, it carries over into the mono DNG file that is created by Monochrome2DNG.
At one time, I sent a PM to Selmslie to see if he has ever seen this on his Sony A7ii, and he replied that he hadn't seen the problem. So the A7ii is doing things differently. And I concluded that if I had the ability to generate non-compressed files, which the A6300 does not have, the problem would fix itself.
I took some images yesterday and today, and they were filled with this problem. I couldn't make them go away with any post processing -- except starting with the RAW file processing it with DxO. Or I could shoot in JPEG, and they did not appear in the JPEG file either. Not the solution I wanted to see. But the results could look good. But the additional detail was compromised. Perhaps demosaicing a mono image has less loss of detail than does demosaicing a normal color image? No data to prove it one way or the other.
Tonight, I started to look at the problem in more detail. I had this modification done over 3 years ago, and I have taken many pictures with the camera. And I don't have the problem all the time. But what I am finding is that I get this problem when I use my native e-mount lenses. I see this problem continually with the following lenses: Sony 10-18mm, Sony 35mm, and Sony 50mm. Also autofocus Samyang 18mm.
But I do not see this problem with other lenses: Vivitar (made by Komine) 55mm, 90mm and 135mm. And I don't see this problem with my Minolta Rokkors or Asahi Pentax Takumars. Or even my Minolta AF A-mount lenses, and for that matter, other A-mount lenses by Tamron, Sigma and Tokina all using the Sony LA-EA4 adapter. And not on my SSM A-mount lenses using the LA-EA3 adapter. Nor with my collection of manual focus Samyang/Rokinon lenses.
I am guessing at this point that the problem has to do with Sony's compression of the RAW files, and it appears that demosaicing knows how to fix this issue. And on the other hand, it appears that the non-native lenses do not participate in this compression issue and don't create the problem.
I am disappointed that the native lenses are the ones affected since they are so fast focusing and so accurate in their focusing. And the in-camera lens correction is so good. But they are the ones that this problem rears its ugly head. But I should add that this would not be a problem on a non-modified camera which is intended to use demosaicing.
Perhaps in time, I will buy a Sony A7ii and go through the modification process again. But that could be a ways off. Meawhile, I have to be aware of what lens I pick to use. Some of these manual lenses are really good with this camera.
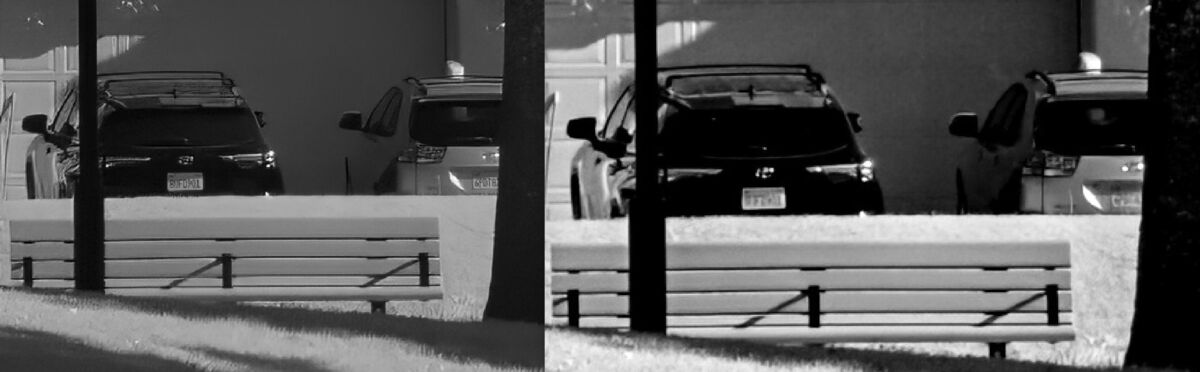
Aug 30, 2023 13:52:27 #
Image 1 was taken with a Mono Sensor in RAW mode with no Demosaicing. It is the entire image.
Image 2 is a Side-by-Side with the RAW on the left and the JPEG that was taken at the same time on the right. This image is at 300% allowing you to see the difference in detail between the two. It's obvious.
Image 2 is a Side-by-Side with the RAW on the left and the JPEG that was taken at the same time on the right. This image is at 300% allowing you to see the difference in detail between the two. It's obvious.