Posts for: lightchime
Jun 18, 2014 12:58:02 #
abc1234 wrote:
Terrible advice. It has no better chance of working than flipping a coin. It was not meant for photographing something with an unusual range of brightness such as in this picture. And it was meant for use before light meters became wide-spread. Better to learn how to use your camera's meter.
It seems like I am the only one who agrees with you. I don't see how sunny 16 would work when nearly the entire image is different than the white bird. I could see adjusting the sunny 16 with a mental adjustment. But if you need to do this, you probably would not have a working meter due to a dead battery - and you couldn't get the image anyway.
I guess that there is a time and place for just about everything- the rule was valid at one time - but has limited use in the digital age.
Jun 17, 2014 12:45:36 #
boberic wrote:
Nice. BTW what kind of flower is a bokeh
It is a different spelling for bouquet; either a fragrance or a small bunch of flowers often tied together.
This must be a single flower bouquet (bokeh) with a lovely aroma.
Jun 16, 2014 22:46:07 #
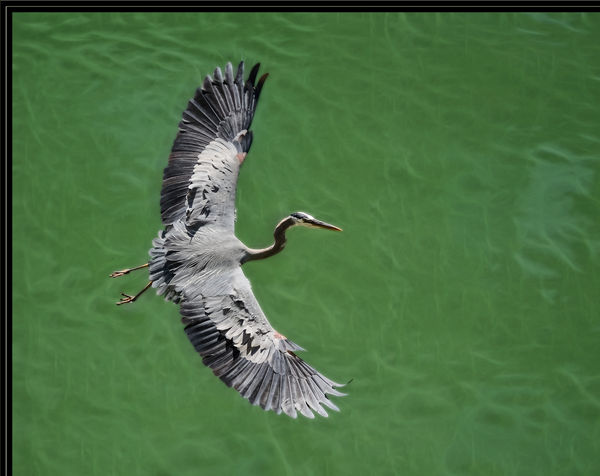
Just another version of the same thing.
Cropped a bit of the area to where the bird was flying. I am not into the rule of thirds, but this crop puts the wing span through the left guideline with a centered head.
Thought that removal of the shadow made for less distraction and a cleaner image.
I am envious, I never even try for a bif.
Your image is a fine example for when Hogs ask for images with negative space.
Jun 15, 2014 22:30:19 #
Erik_H wrote:
If you just want a blank, colored top and bottom border and are using PSE, You can go to Image>Resize>Canvas Size and add two inches to the height. Uncheck the relative box.
The math is not correct.
In canvas resize, add an inch and a half on one side and another inch and a half to the opposite in order to turn the 2 inch dimension into 5 inches with equal bars on each side (or top and bottom). The diagram should be self explanatory.
Adding 2 inches to the height will just produce a 4X5.
Jun 12, 2014 17:40:34 #
Samuraiz wrote:
:thumbup:
I have read reports that Nikon transfer software (NX2) may write incorrect header data thus making the file unrecognizable in ACR.
I have read reports that Nikon transfer software (NX2) may write incorrect header data thus making the file unrecognizable in ACR.
I have not read the reason and I do not have NX2, but I had heard that ACR will not recognize NX2 processing.
Jun 11, 2014 15:53:14 #
Agedwell wrote:
You wouldn't be printing on regular paper, would you?
No sure to whom you are referring. Cheap luster and expensive fine art are both regular papers - just purposed for slightly different uses.
Jun 11, 2014 15:50:33 #
Brucej67 wrote:
I purchased the Sigma 180mm f2.8 macro for my Nikon D7100 and D610. When I put the lens on the camera and adjust it for back focus issue it will focus, but not lock on focus as does the Nikon 105mm or the Tamron 180mm. The Sigma 180mm has OS and I am hand holding it as with the other lenses, however unlike the other lenses the Sigma will not lock on focus so the slightest of movements throws the focus off. Has anyone else experienced the problem with this lens?
The 180 is a long lens for macro and your depth of focus may be very small.
The problem may not be the lens not holding focus, it may be simply that the lens is moving relative to the object more than can be expected for a lock on (even with OS). The problem may be in the holder, not the lens. Consider your technique before blaming the equipment. Lenses do fail, but probably not nearly as often as the operator.
Jun 11, 2014 15:01:45 #
OddJobber wrote:
Thanks, lightchime. Sounds complicated but I think I got the idea.
Only sounds complicated - just takes a little exposure and a few tries.
Jun 11, 2014 13:04:41 #
OddJobber wrote:
You got me on that one. Explain, please?
In LightRoom and PhotoShop, one can soft proof before printing.
If I may borrow from Martin Evening: "When it comes to printing, color management usually can get you fairly close, but it won't be able to interpret every single color or make aesthetic judgements about which colors are important and which are not. Plus some colors you see on the computer display simply cannot be reproduced in print. This is where soft proofing can help. If you use the Custom Proof Condition dialog as described (PhotoShop) you can simulate on the display accurately how how the print will look when printed. Soft proofing shows you which colors are going to be clipped and also allows you to see in advance the difference between selecting a Perceptual or Relative Colormetric rendering intent. All you have to do is to select the correct profile for the printer/paper combination you are about to use, choose the rendering intent and make sure the Black Point Compensation plus the Simulate Color (and by default simulate black in) are checked."
The above quote is from Adobe Photoshop CS6 for Photographers. As a personal note, this feature also works well in LightRoom. I do just about every thing in LightRoom, but I do not use this feature there because I prefer Photoshop for printing.
I hope this gives you enough information - or at least a beginning to look further.
It works well for me because I use fine art paper on an Epson. The soft proofing seems to take into account that the papers are more creamy in color.
Jun 11, 2014 10:40:25 #
Two things that have not been mentioned:
Are you processing in one color space and then trying to print in another?
Are the printers profiled?
Also note that even on a calibrated monitor, colors and tonality are not always correct when shown on UH.
If your software soft proofs, consider using it.
Are you processing in one color space and then trying to print in another?
Are the printers profiled?
Also note that even on a calibrated monitor, colors and tonality are not always correct when shown on UH.
If your software soft proofs, consider using it.
Jun 8, 2014 15:52:36 #
Another consideration is that bringing up the exposure in a low key image will increase noise.
Sharpening will also bring out noise.
An additional consideration is that long exposures bring up noise - not just show blurriness.
Sharpening will also bring out noise.
An additional consideration is that long exposures bring up noise - not just show blurriness.
Jun 8, 2014 09:17:01 #
LindaChaplin wrote:
Does anyone know how I can move pictures from one folder into another one in Lightroom 5? I have a "mix" of photo "classroom" pictures in one folder and somehow my recent vacation photos went into the same folder. The vacation pictures are also in a designated folder, but when I try to simply eliminate the duplicate photos that are in the wrong folder, they are also eliminated from the "correct" folder. Thanks for any help you might have.
If I understand your question, the answer is simple.
In the left panel of the Library module, click on the folder that has the images you want to move.
With the images showing, drag and drop the images that you want to move. Drop them into the folder where you want them.
The images you want to remain in the first folder will still be there and the dropped images will be in the desired folder. This will neither copy or delete images.
May 31, 2014 23:17:00 #
This may answer your question:
http://www.thephoblographer.com/2011/09/26/are-tiffs-and-raws-really-the-same-thing/#.U4qZICignpU
There is much more information if you direct your browser to TIFF vs raw.
http://www.thephoblographer.com/2011/09/26/are-tiffs-and-raws-really-the-same-thing/#.U4qZICignpU
There is much more information if you direct your browser to TIFF vs raw.
May 28, 2014 16:05:20 #
oldtool2 wrote:
What you say about when the adjustments being appl... (show quote)
You seem to be helping make my case. In LR, it does not matter when you sharpen. In fact, because it is one of the things diminished in raw capture, an argument can be made to do it early.
May 27, 2014 17:01:40 #
" Sharpening should always be the last PP thing you do to a photo."
As a general statement, that is correct. In LR, at export, all the adjustments are essentially applied at the same time; it, therefore, does not make any difference when sharpening is applied in the LR Develop Module. It remains a non destructive function.
My comment refers to LR which is a proxy editor; there is no intention of undermining digital photographic concepts.