White egrets problem
Jun 7, 2014 13:58:33 #
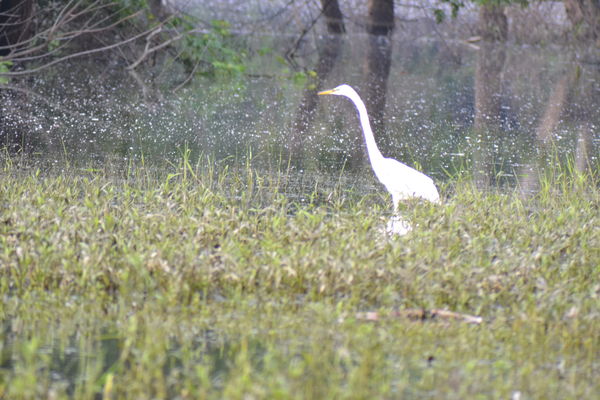
I have had an opportunity to photograph white egrets but the birds are always too white and tend to have a purple 'glow'. No feather definition. I am fairly new at this and not to sure about how to set up the camera.
Weather: Early AM in a backwater so there is not a lot of direct sun, but not hazy.
Camera Nikon3100
Lens: These were taken with a tripod mounted Vivitar 500mm zoom (cheap lens) and remote trigger. Manual focus and no VR.
Metadata from ViewNX2;
Size: jpg normal 8 bit 4608x3072
Focal len: 0mm
AF-Area mode: single
Aperture: f/0
Shutter spd: 1/320s
ISO Sensitivity: ISO3200
Metering: Center weighted
White Balance: Auto,0,0
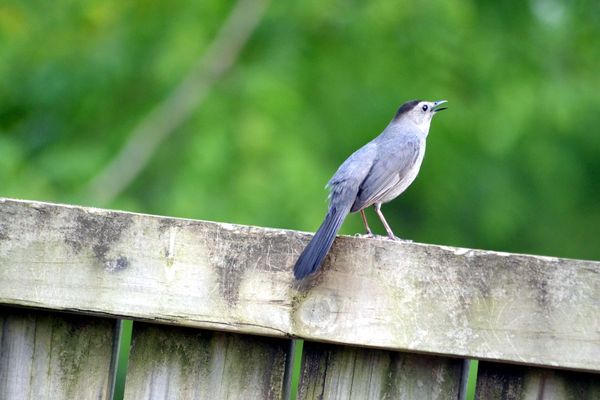
This is not the best lens, but I get similar results with a Sigma 70-300mm which has auto focus and VR. I get pretty good results of birds in the back yard - which are a lot closer and not all white - see 2nd upload
Weather: Early AM in a backwater so there is not a lot of direct sun, but not hazy.
Camera Nikon3100
Lens: These were taken with a tripod mounted Vivitar 500mm zoom (cheap lens) and remote trigger. Manual focus and no VR.
Metadata from ViewNX2;
Size: jpg normal 8 bit 4608x3072
Focal len: 0mm
AF-Area mode: single
Aperture: f/0
Shutter spd: 1/320s
ISO Sensitivity: ISO3200
Metering: Center weighted
White Balance: Auto,0,0
This is not the best lens, but I get similar results with a Sigma 70-300mm which has auto focus and VR. I get pretty good results of birds in the back yard - which are a lot closer and not all white - see 2nd upload

Jun 7, 2014 14:01:00 #

In my opinion, a white bird is the hardest thing there is to expose properly. You must use spot metering and then I would suggest overexposing slightly. By doing this you at least have a chance of getting it right.
Jun 7, 2014 14:17:53 #

Learn about the sunny f/16 rule.
Also:
Google - How to photograph white birds - you will get info, tutorials, opinions - take your pick of what you want to read:
(here are a couple)
http://www.birds.cornell.edu/AllAboutBirds/bp/white_birds/document_view
http://mikeatkinson.net/Tutorial-5-Exposure.htm
Also:
Google - How to photograph white birds - you will get info, tutorials, opinions - take your pick of what you want to read:
(here are a couple)
http://www.birds.cornell.edu/AllAboutBirds/bp/white_birds/document_view
http://mikeatkinson.net/Tutorial-5-Exposure.htm
Jun 7, 2014 14:22:51 #

You are over exposing .......I much rather meter with centerweighted. Set your exposure compensation to +1/3 to + 2/3 stop from your "normal" compensation. If there is bright water behind the bird, go to + 1 stop compensation. This assumes that the white bird takes up a good portion of the frame.( you are fairly close)The idea is for the white bird to be slightly underexposed ( from what an incident reading would yield) to retain feather detail in the highlights - but to look like a WHITE bird and not gray.
Jun 7, 2014 16:05:57 #
Another problem since there was no EXIF file, would be the time of day and position of the sun. If the sun was behind you and on the bird, It drive the whites well into over exposed as it appears it has done on the this bird. If this was shoot in the noon sun it could be a lot of problem.
Jun 7, 2014 16:44:20 #

With dark backgrounds, you want to go to the negative side of exposure compensation, meaning your image will be darker than what your camera thinks it should be, based on overall metering.
I exposed at -2/3 to -1 (-0.66 to -1.0) for these American White Pelicans shot in mid-morning sun in dark water:
http://www.uglyhedgehog.com/t-198839-1.html
I exposed at -2/3 to -1 (-0.66 to -1.0) for these American White Pelicans shot in mid-morning sun in dark water:
http://www.uglyhedgehog.com/t-198839-1.html
Jun 8, 2014 02:44:22 #
Linda From Maine wrote:
With dark backgrounds, you want to go to the negative side of exposure compensation, meaning your image will be darker than what your camera thinks it should be, based on overall metering.
I exposed at -2/3 to -1 (-0.66 to -1.0) for these American White Pelicans shot in mid-morning sun in dark water:
http://www.uglyhedgehog.com/t-198839-1.html
I exposed at -2/3 to -1 (-0.66 to -1.0) for these American White Pelicans shot in mid-morning sun in dark water:
http://www.uglyhedgehog.com/t-198839-1.html
WOW, that is great work, thanks for sharing.
Jun 8, 2014 08:26:03 #
TomV
Loc: Annapolis, Maryland
The purple 'glow' you refer to is purple fringe. That may be reduced a bit by the suggested exposure changes. Post-processing can reduce it further. A better lens can reduce it substantially.
My Sony a65 has built-in lens correction software that almost eliminates the fringe for the Sony lenses I use (JPEG mode).
My Sony a65 has built-in lens correction software that almost eliminates the fringe for the Sony lenses I use (JPEG mode).
Jun 8, 2014 08:29:54 #

Shellback wrote:
Learn about the sunny f/16 rule....
Terrible advice. It has no better chance of working than flipping a coin. It was not meant for photographing something with an unusual range of brightness such as in this picture. And it was meant for use before light meters became wide-spread. Better to learn how to use your camera's meter.
Jun 8, 2014 09:58:38 #
[quote=dieseldave]It is best to click on "store original" when you ask for help. The download is better and all camera data is available for specific advise. Your egret picture is not clear. Please repost here. David No need to discuss contrast with a poor picture. Need to fix the focus problem first.
Jun 8, 2014 11:17:18 #
Shellback wrote:
Learn about the sunny f/16 rule.
Also:
Google - How to photograph white birds - you will get info, tutorials, opinions - take your pick of what you want to read:
(here are a couple)
http://www.birds.cornell.edu/AllAboutBirds/bp/white_birds/document_view
http://mikeatkinson.net/Tutorial-5-Exposure.htm
Also:
Google - How to photograph white birds - you will get info, tutorials, opinions - take your pick of what you want to read:
(here are a couple)
http://www.birds.cornell.edu/AllAboutBirds/bp/white_birds/document_view
http://mikeatkinson.net/Tutorial-5-Exposure.htm
This is GOOD advice ! ( properly applied sunny 16 modified rule ) - as it represents an equivilent incident light metering. You can do the same thing by using your in camera meter and holding an 18% gray card in front of your lens receiving the same light as your subject and transfering that reading ( in the manual exposure mode) to your camera. As long as the lighting does not change you would be OK.
Jun 8, 2014 11:21:31 #

abc1234 wrote:
Terrible advice. It has no better chance of working than flipping a coin. It was not meant for photographing something with an unusual range of brightness such as in this picture. And it was meant for use before light meters became wide-spread. Better to learn how to use your camera's meter.
Sorry to disagree. Been using it for 40 years. Along with a hand-held meter.
I noticed you are shooting with ISO 3200. Try ISO 400 if you want to use a high ISO for daylight. That should give you plenty of speed and aperture.
Jun 8, 2014 11:35:22 #
Bozsik wrote:
Sorry to disagree. Been using it for 40 years. Along with a hand-held meter.
I noticed you are shooting with ISO 3200. Try ISO 400 if you want to use a high ISO for daylight. That should give you plenty of speed and aperture.
I noticed you are shooting with ISO 3200. Try ISO 400 if you want to use a high ISO for daylight. That should give you plenty of speed and aperture.
Great shot Bozik ! ( and comment )
Jun 8, 2014 13:02:12 #

Whenever you post images that you need help on, it's best to click on the "store original" box so that we can see the EXIF info ourselves and we can download a large view of the image to check focus and CA ourselves. It appears that the Egret is out of focus but not sure unless we can see it better. It's also blown out. This means overexposed. Since you are using a lens that doesn't communicate with your camera very well, you should take as many images as you can and use different exposures so you can see what works and what doesn't work.
Someone said that your ISO was 3200? That's way too high for a day time shot of an Egret. Most of the time when shooting wildlife in full sun, your ISO should be no higher than 400. If you are using full auto on your camera and it chose ISO 3200, then I suggest you stop using auto mode, and learn to use your own settings for the best results. I'm sure your camera is confused by the f/0 setting and you are never going to get good results using a lens like this unless maybe you start using a hand held meter to set your camera exposure manually.
Someone said that your ISO was 3200? That's way too high for a day time shot of an Egret. Most of the time when shooting wildlife in full sun, your ISO should be no higher than 400. If you are using full auto on your camera and it chose ISO 3200, then I suggest you stop using auto mode, and learn to use your own settings for the best results. I'm sure your camera is confused by the f/0 setting and you are never going to get good results using a lens like this unless maybe you start using a hand held meter to set your camera exposure manually.
dieseldave wrote:
I have had an opportunity to photograph white egre... (show quote)
Jun 10, 2014 13:34:04 #
amfoto1
Loc: San Jose, Calif. USA
There are two problems with that image... one has to do with the exposure, the other is the lens itself.
The image is overexposed, which likely was due to relying upon the reflective metering system in the camera. It mostly saw a "dark" area, so set the exposure based upon that and overexposed the white egret. It is an inherent problem with all reflective metering systems, that "judge" the subject based upon light reflected off of it, then try to render it as a mid-tone "18% gray". If you shoot a black bear in a coal mine, relying completely upon the camera's metering system, the image will be massively overexposed. If you shoot a bride in a white dress in a snow storm the same way, the image will be massively underexposed.
The background and area around the egret in this image are darker than average, so the image was overexposed.
There are a number of ways to correct for this. (Get the book "Understanding Exposure" by Bryan Peterson.)
Recognizing what was happening, you could compensate for the inherent errors of the reflective metering system by dialing in the correct amount of Exposure Compensation. Most DSLRs offer this feature now. Here you should have dialed in about -1 stop of E.C. Possibly a little more.
You also could have set the camera to M (manual) and set your own exposure using other means. Someone above mentioned using a separate, handheld incidence meter, which is something I do too. The incidence meter measures the light falling onto the subject, rather than what's being reflected off of it. The result, when used properly, is a far more accurate exposure setting. Unfortunately, incidence meters are not practical to build into cameras, so all auto exposure systems and internal metering systems rely upon reflective metering, which can be skewed by subject tonality.
In this case it appears to be full sun or nearly so, so I agree that the "Sunny 16 rule" also might have worked nicely with a manually set exposure, to give a fairly accurate exposure. It is possible to develop a series of exposure cues by eye, so that you can judge a scene and set the camera more accurately. For example, shooting outdoors you might use "Sunny 16", "Overcast 11" or "Early 11", "Shady 8" and "Deep Shade 5.6" rules of your own.
If nothing else, you can use the "Sunny 16" and similar to check if the settings the camera is making automatically are in the ballpark, while still on site and able to reshoot if necessary.
You also could have used spot metering, measuring just the light reflecting off the subject and letting the surrounding area fall where it may. However, because this is a white subject and the camera will try to underexpose it, with spot metering you would have needed to set a lot of E.C., too. Likely +2 stops or more.
More accurate, too, would have been to use a neutral gray target (such as a Lastolite EZ Balance, which also can be used to set custom white balances) and spot meter off that, holding it in the same light as your subject. This would have given you an accurate reading for manual settings.
There are various other methods of metering that can work. But what it really comes down to is learning to use one or two or three or more methods that work well for you... and learning to recognize what to use when and when to further "tweak" the settings.
There will be times when you have to use one or another method... For example auto exposure (and reliance on the camera's built in meter) is often necessary when shooting in variable light such as partially cloudy days or when tracking a subject in and out of shadows. When forced to use AE, you need to know how to use Exposure Compensation, too, to get consistently accurate exposures.
Whenever I can, when lighting is reasonably consistent, I like to use M and lock in my exposure settings. Then I only have myself to blame if it's wrong. Today's digitals really make this easy, since with most you can check your exposure using the histogram of the last image taken right on the spot and make adjustments on the fly. Even after I've got it dialed in, when shooting in M mode over a longer period of time, I'll spot check the histogram of an image every 15 minutes or so, since light strength always changes throughout the course of the day.
Your other problem is the lens itself... You mention it's a "cheap 500mm".... It appears to be low resolution, possibly not have multi-coatings, and to not use elements such as fluorite (expensive) to correct for chromatic aberrations. This is a typical problem with more affordable lenses (though not always). If it's also manual focus and you miss focus slightly, the subject is slightly blurred, that will tend to dramatically increase the appearance of chromatic aberrations (which is what the purple fringing around the high contrast subject). Notice, too, that there is little detail on the subject. Partially that's down to overexposure. However, it's also probably made worse to lower resolution glass in the lens.
Also, using a high ISO like 3200 will reduce resolution at the image sensor. Using a lower ISO such as 400 or 800 would have been much better.
There are some things you try that might help with the lens' shortcomings. First, make sure you are using an effective and good fitting lens hood, to keep oblique light off the lens. Also remove any filter(s) that might be on the front of the lens.
Now experiment with stopping the lens down to see if smaller apertures will give less CA and render a sharper image with more detail. Most lenses have a "sweet spot" aperture (or several apertures), usually not wide open. You can set up a high contrast target for testing. Also try getting closer, filling your viewfinder more with the subject (which also can help with more accurate metering).
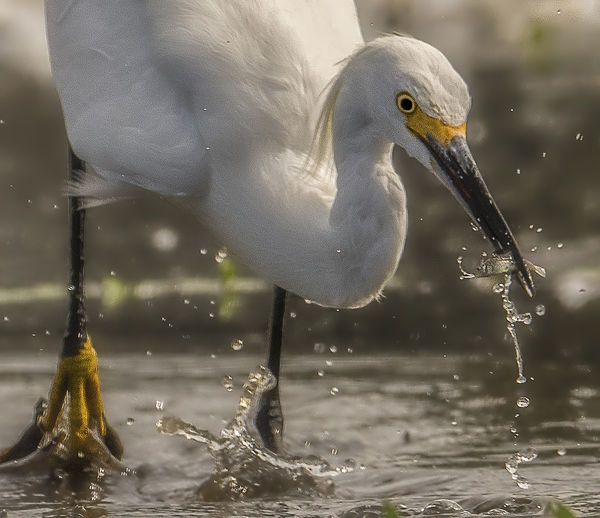
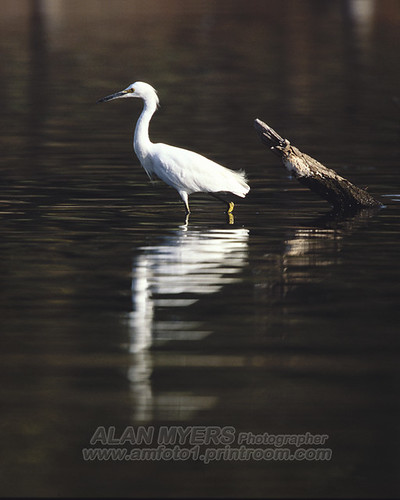
The egret shot below was done with a fairly inexpensive Tamron SP 500mm f8 Adaptall 2 "mirror" lens and a film camera....
 "Bad Hair Day"
Since it was on film, I don't have EXIF data, but since I used ISO 50 and ISO 100 film most often and this lens has a fixed f8 aperture, I'd estimate this was shot at about 1/125 or 1/160 (using a monopod or a tripod). That's an exposure for the shady side of the subject, allowing the sunlit portion to "blow out".
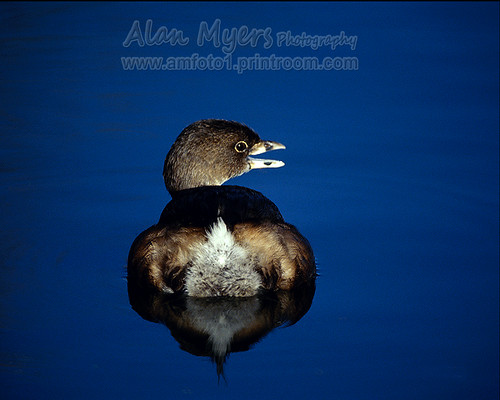
This next shot, of a pied-billed grebe, was done with an older, moderately priced, but good quality telephoto lens in combination with a fairly inexpensive teleconverter (Konica Hexanon 300/4.5 and Soligor/Kiron 1.5X), also on film (Ektachrome 200)....
Below is yet another older shot on film (Ektachrome E100VS)... But this time with a more premium lens, with it's share of fluorite and other exotic glass (in this case a Canon EF 500/4 IS) .
My point is that in this last image the subject is considerably farther away, so even with a premium quality lens there's limited detail possible (scanning film also costs a bit of resolution). Managing to get closer and fill the viewfinder for the first two shots helped make up for cheaper lenses' shortcomings.
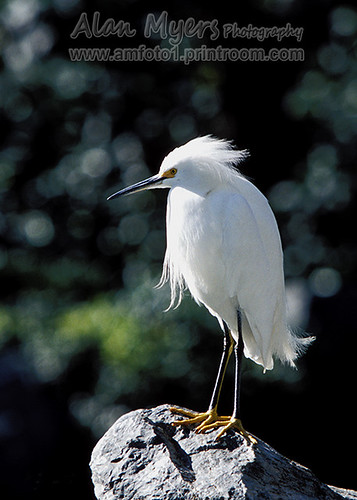
Another "trick" with a bright white bird is to try to catch your subject in shade, where there is less contrast, so that your camera can handle it better. I very much prefer overcast days to shooting in full sun, too.
BTW, a blue heron is much easier to meter correctly!
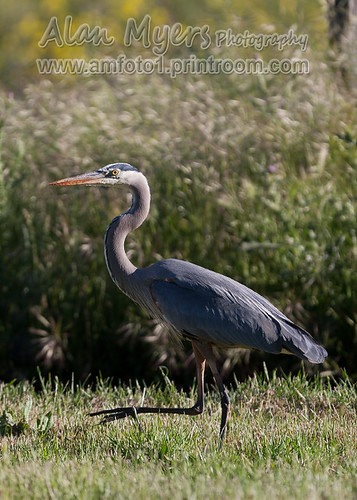 "Five O'clock Charlie" (He shows up the same place every day about 5 pm, to hunt for frogs and lizards.)
I don't have any images from it online, but some years ago was at one of my favorite spots for waterbirds , set up next to a creek (which is near a busy road, so there is traffic noise to cover the "click" of my shutter).... A great egret showed up and started fishing. He was so intent on his business that he took no notice of me and kept getting closer and closer... Finally got so close he was within the lens' minimum focus distance and I had to stop shooting (I had extension tubes with me, but any movement to install them would have startled him). I just sat and watched for a couple minutes until he was about 4 or 5 feet of me, looked up and with what I thot was a pretty shocked look on his face realizing I was there, backed off and took off quickly. It was one of those rare moments out shooting wildlife, not all of which can be caught on film.
The image is overexposed, which likely was due to relying upon the reflective metering system in the camera. It mostly saw a "dark" area, so set the exposure based upon that and overexposed the white egret. It is an inherent problem with all reflective metering systems, that "judge" the subject based upon light reflected off of it, then try to render it as a mid-tone "18% gray". If you shoot a black bear in a coal mine, relying completely upon the camera's metering system, the image will be massively overexposed. If you shoot a bride in a white dress in a snow storm the same way, the image will be massively underexposed.
The background and area around the egret in this image are darker than average, so the image was overexposed.
There are a number of ways to correct for this. (Get the book "Understanding Exposure" by Bryan Peterson.)
Recognizing what was happening, you could compensate for the inherent errors of the reflective metering system by dialing in the correct amount of Exposure Compensation. Most DSLRs offer this feature now. Here you should have dialed in about -1 stop of E.C. Possibly a little more.
You also could have set the camera to M (manual) and set your own exposure using other means. Someone above mentioned using a separate, handheld incidence meter, which is something I do too. The incidence meter measures the light falling onto the subject, rather than what's being reflected off of it. The result, when used properly, is a far more accurate exposure setting. Unfortunately, incidence meters are not practical to build into cameras, so all auto exposure systems and internal metering systems rely upon reflective metering, which can be skewed by subject tonality.
In this case it appears to be full sun or nearly so, so I agree that the "Sunny 16 rule" also might have worked nicely with a manually set exposure, to give a fairly accurate exposure. It is possible to develop a series of exposure cues by eye, so that you can judge a scene and set the camera more accurately. For example, shooting outdoors you might use "Sunny 16", "Overcast 11" or "Early 11", "Shady 8" and "Deep Shade 5.6" rules of your own.
If nothing else, you can use the "Sunny 16" and similar to check if the settings the camera is making automatically are in the ballpark, while still on site and able to reshoot if necessary.
You also could have used spot metering, measuring just the light reflecting off the subject and letting the surrounding area fall where it may. However, because this is a white subject and the camera will try to underexpose it, with spot metering you would have needed to set a lot of E.C., too. Likely +2 stops or more.
More accurate, too, would have been to use a neutral gray target (such as a Lastolite EZ Balance, which also can be used to set custom white balances) and spot meter off that, holding it in the same light as your subject. This would have given you an accurate reading for manual settings.
There are various other methods of metering that can work. But what it really comes down to is learning to use one or two or three or more methods that work well for you... and learning to recognize what to use when and when to further "tweak" the settings.
There will be times when you have to use one or another method... For example auto exposure (and reliance on the camera's built in meter) is often necessary when shooting in variable light such as partially cloudy days or when tracking a subject in and out of shadows. When forced to use AE, you need to know how to use Exposure Compensation, too, to get consistently accurate exposures.
Whenever I can, when lighting is reasonably consistent, I like to use M and lock in my exposure settings. Then I only have myself to blame if it's wrong. Today's digitals really make this easy, since with most you can check your exposure using the histogram of the last image taken right on the spot and make adjustments on the fly. Even after I've got it dialed in, when shooting in M mode over a longer period of time, I'll spot check the histogram of an image every 15 minutes or so, since light strength always changes throughout the course of the day.
Your other problem is the lens itself... You mention it's a "cheap 500mm".... It appears to be low resolution, possibly not have multi-coatings, and to not use elements such as fluorite (expensive) to correct for chromatic aberrations. This is a typical problem with more affordable lenses (though not always). If it's also manual focus and you miss focus slightly, the subject is slightly blurred, that will tend to dramatically increase the appearance of chromatic aberrations (which is what the purple fringing around the high contrast subject). Notice, too, that there is little detail on the subject. Partially that's down to overexposure. However, it's also probably made worse to lower resolution glass in the lens.
Also, using a high ISO like 3200 will reduce resolution at the image sensor. Using a lower ISO such as 400 or 800 would have been much better.
There are some things you try that might help with the lens' shortcomings. First, make sure you are using an effective and good fitting lens hood, to keep oblique light off the lens. Also remove any filter(s) that might be on the front of the lens.
Now experiment with stopping the lens down to see if smaller apertures will give less CA and render a sharper image with more detail. Most lenses have a "sweet spot" aperture (or several apertures), usually not wide open. You can set up a high contrast target for testing. Also try getting closer, filling your viewfinder more with the subject (which also can help with more accurate metering).
The egret shot below was done with a fairly inexpensive Tamron SP 500mm f8 Adaptall 2 "mirror" lens and a film camera....
"Bad Hair Day"Since it was on film, I don't have EXIF data, but since I used ISO 50 and ISO 100 film most often and this lens has a fixed f8 aperture, I'd estimate this was shot at about 1/125 or 1/160 (using a monopod or a tripod). That's an exposure for the shady side of the subject, allowing the sunlit portion to "blow out".
This next shot, of a pied-billed grebe, was done with an older, moderately priced, but good quality telephoto lens in combination with a fairly inexpensive teleconverter (Konica Hexanon 300/4.5 and Soligor/Kiron 1.5X), also on film (Ektachrome 200)....
Below is yet another older shot on film (Ektachrome E100VS)... But this time with a more premium lens, with it's share of fluorite and other exotic glass (in this case a Canon EF 500/4 IS) .
My point is that in this last image the subject is considerably farther away, so even with a premium quality lens there's limited detail possible (scanning film also costs a bit of resolution). Managing to get closer and fill the viewfinder for the first two shots helped make up for cheaper lenses' shortcomings.
Another "trick" with a bright white bird is to try to catch your subject in shade, where there is less contrast, so that your camera can handle it better. I very much prefer overcast days to shooting in full sun, too.
BTW, a blue heron is much easier to meter correctly!
"Five O'clock Charlie" (He shows up the same place every day about 5 pm, to hunt for frogs and lizards.)I don't have any images from it online, but some years ago was at one of my favorite spots for waterbirds , set up next to a creek (which is near a busy road, so there is traffic noise to cover the "click" of my shutter).... A great egret showed up and started fishing. He was so intent on his business that he took no notice of me and kept getting closer and closer... Finally got so close he was within the lens' minimum focus distance and I had to stop shooting (I had extension tubes with me, but any movement to install them would have startled him). I just sat and watched for a couple minutes until he was about 4 or 5 feet of me, looked up and with what I thot was a pretty shocked look on his face realizing I was there, backed off and took off quickly. It was one of those rare moments out shooting wildlife, not all of which can be caught on film.
If you want to reply, then register here. Registration is free and your account is created instantly, so you can post right away.