Posts for: geolaval
Dec 20, 2017 11:19:09 #
dsmeltz wrote:
How do you think this analysis will inform your scanning process?
It won't. Please refer to my post replying to Ron and Ricardo at the beginning of this thread. My premise is that if the digital file is grainy after scanning a loupe hopefully will allow a better analysis for the source print than the naked eye. From there, expectations can be better managed. Thanks for your interest.
Dec 20, 2017 11:03:48 #
rook2c4 wrote:
. 5x, 10x and 20x magnification loupes should do. If you are also planning to view negatives, maybe include a 40x magnification loupe as well.
Thanks for your reply it is exactly what I was looking for . From your experience do you know which loupe would more approach a 100% Photoshop magnification on a 6 mpx 4x6 photo? And, would you use this same loupe on a 5x7 and on an 8x10 or larger print.
On my monitor, a 6 mpx 4x6 photo has no perceptible grain in PSE 15, at 100% there is a little grain but it’s adequate for an 8x10 print. At 200% grain is quite present and not acceptable for a larger print. I have intentionally excluded the application of any noise reduction processes.
Dec 19, 2017 23:31:50 #
Reply to Ron and Ricardo.
I'm collaborating with a friend who has scanned documents and photos on a project. The end user finds that some the scanned photo files are grainy. The purpose of my query is not to be able to numerically quantify the exact value but to determine the visual quality of the original. Magnifying the original should be more revealing than with the naked eye. That is why I am trying to determine what loupe magnification is closest to Photoshop 100%. I am thinking of using this after the fact to see the level of grain on the original photo. I hope this explanation clarifies my objective. The original photos were scanned at 1200 DPI. Thanks for replying. I was hoping that loupe users might give an opinion.
I'm collaborating with a friend who has scanned documents and photos on a project. The end user finds that some the scanned photo files are grainy. The purpose of my query is not to be able to numerically quantify the exact value but to determine the visual quality of the original. Magnifying the original should be more revealing than with the naked eye. That is why I am trying to determine what loupe magnification is closest to Photoshop 100%. I am thinking of using this after the fact to see the level of grain on the original photo. I hope this explanation clarifies my objective. The original photos were scanned at 1200 DPI. Thanks for replying. I was hoping that loupe users might give an opinion.
Dec 19, 2017 20:05:09 #
I want to scan some photos but would like to determine the visual quality insofar as grain and pixelization before scanning. I am considering using a loupe for this and would like to know which magnification ratio loupe would provide the equivalent 100% magnification in Photoshop . Also I would like to know, what incrementally sized loupes would be used to determine the range of the visual quality (i.e. 5x, 10x etc.). I've read much documentation concerning PPI and DPI and still have some reading to do but this post is specifically about magnification loupes. The searches I've done on line were not very revealing.
Thank you for your input, it is greatly appreciated.
George.
Thank you for your input, it is greatly appreciated.
George.
Sep 21, 2017 18:29:43 #
Edit: I was just going through my old bookmarks and replied not keeping in touch with the date of the original. But my comments still stand
Thank you very much for this post. Lots of work ahead. I've downloaded 3 tutorials so far (including the above). They deal with Histograms, Curves and Levels adjustments. I've been playing around with this in the last week without making much headway. I could have searched but didn't want to get too involved. So thanks for getting me to move.
George
Aug 2, 2017 10:28:08 #
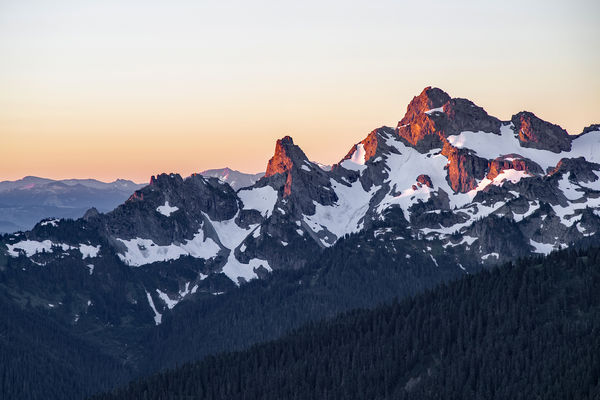
Here is my take by applying Haze reduction with PSE 15.
Jul 8, 2017 14:05:17 #
I once damaged an SD card while inserting it in the computer. Since then, I've always transferred my photos via USB cable to avoid damaging the SD card in the transfer process as well as your type of dilemma. We all know how it is when your expectations go flat, for whatever reason, when you can't go forward with a photo session. Good thing you swallowed your pride and were able to go forth.
Jul 1, 2017 15:55:09 #
Here is a small tool that may help you line up your monitor. It provides consistency of the viewing position.
It's the Acratech 60005S viewing angle gauge
https://www.bhphotovideo.com/c/product/652830-REG/Acratech_6005S_Viewing_Angle_Gauge_Silver.html
It's the Acratech 60005S viewing angle gauge
https://www.bhphotovideo.com/c/product/652830-REG/Acratech_6005S_Viewing_Angle_Gauge_Silver.html
Aug 4, 2016 08:58:50 #
A couple more if you visit Montreal.
The Chalet atop the Mont Royal; great location for downtown cityscape photos. (Plenty of parking, requires a 10 / 15 minute walk). Beaver Lake same location.
Old Montreal and it's port. Old architecture (Photo ops), many restaurants, Caleche ride. Pointe aux Callières museum. Gibby's restaurant (pricey)
Try a local specialty snack... the Poutine (fries, cheese and sauce) if you like this type of food.
Near Québec city; Ile d'Orléans with its many quaint small villages (many photo ops). I posted a few photos in November 2014.
Enjoy your trip
George
Aug 1, 2016 14:07:25 #
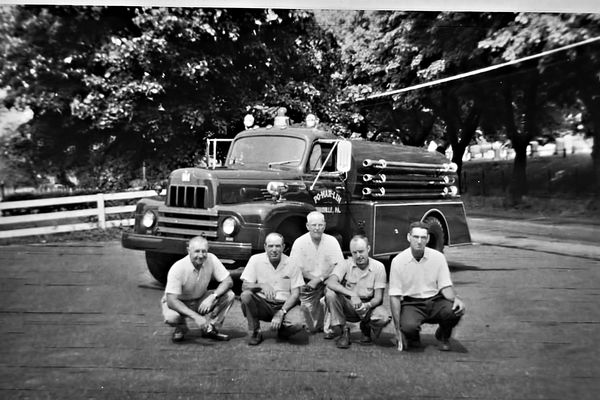
I just modified the first photo for lack of time. Hope you like it.
Adjusted in NIK COLLECTION with NIK SILVER EFEX PRO 2
PSE 14 UNSHARP and SHARPEN
Removed some of the horizontal lines with healing tool and clone stamp.
George
edit 2: It's much better if you view in download
Adjusted in NIK COLLECTION with NIK SILVER EFEX PRO 2
PSE 14 UNSHARP and SHARPEN
Removed some of the horizontal lines with healing tool and clone stamp.
George
edit 2: It's much better if you view in download
Jul 14, 2016 13:00:12 #
Here's my version.
PSE 11 UNSHARP amount: 38% threshold: 0%
SHARPEN (MOTION BLUR) amount: 161 radius: 14.8
These settings can be adjusted to taste
This will not allow for further cropping but the image looks sharper.
I often use this combination when I want to do some recovery on a dud.
PSE 11 UNSHARP amount: 38% threshold: 0%
SHARPEN (MOTION BLUR) amount: 161 radius: 14.8
These settings can be adjusted to taste
This will not allow for further cropping but the image looks sharper.
I often use this combination when I want to do some recovery on a dud.

Apr 4, 2016 11:18:39 #
[quote=paulrph1]
Here's what I have experienced just this week.
My PP routine is as follows:
Make all adjustments in PSE 13 and save. When viewing in the Photo Viewer it's representative of the applied mods.
I often use Picasa for leveling after all processing is done in PSE.
When I look at the Picasa levelled image in my photo viewer, there is degradation in image quality.
To resolve this I load it back into PSE and save. Photo quality is restored.
I haven't found a better solution so far.
Bill_de wrote:
Digital photos files are nothing but numbers, they shouldn't change.
If you have stored them for a while, your monitor could be the culprit. Do you periodically calibrate it?
Are you still using the same software
I am viewing in Picasa. What I do is take the photo and then do some adjustment in photoshop. Only adjusting the brightness and contrast. That's it but when viewed later they seem to have reverted back????
Here's what I have experienced just this week.
My PP routine is as follows:
Make all adjustments in PSE 13 and save. When viewing in the Photo Viewer it's representative of the applied mods.
I often use Picasa for leveling after all processing is done in PSE.
When I look at the Picasa levelled image in my photo viewer, there is degradation in image quality.
To resolve this I load it back into PSE and save. Photo quality is restored.
I haven't found a better solution so far.
Apr 4, 2016 10:18:52 #
You might want to consider using a monopod. It's more portable than a tripod and improves stability.
I use a monopod for 50% of my photos.
My camera (FZ200) is mounted on it as soon as I leave the house. Not quite as steady as a tripod but it does greatly reduce the steadiness problem.
I use a monopod for 50% of my photos.
My camera (FZ200) is mounted on it as soon as I leave the house. Not quite as steady as a tripod but it does greatly reduce the steadiness problem.
Mar 31, 2016 14:57:08 #
Linda From Maine wrote:
I have PS Elements. Someone directed me to information on how to use Nik HDR as stand-alone:
http://photo.net/digital-darkroom-forum/00ZpuX
Note that your image must be jpg or tiff; you can't open a raw or psd file directly into it. But it does work!
http://photo.net/digital-darkroom-forum/00ZpuX
Note that your image must be jpg or tiff; you can't open a raw or psd file directly into it. But it does work!
Thanks for posting this information Linda. I was just about to research if it was possible to use it as a stand alone.
Nov 30, 2015 10:29:51 #
I use the following method for dehazing mountains.
PSE 11 UNSHARP MASK
1 Select unsharp mask
2 set the amount to 80% (for this particular photo)
3 set radius to 87 pixels
4 set threshold level to 0 (result can be attenuated by increasing the level).
In this case I increased Brightness and Contrast slightly.
My usual starting point is: Amount 37%, Radius 87 pixels
Threshold between 5 and 10. The outcome can be modified by adjusting the 3 elements.