Dehazing mountains
Nov 29, 2015 00:05:55 #

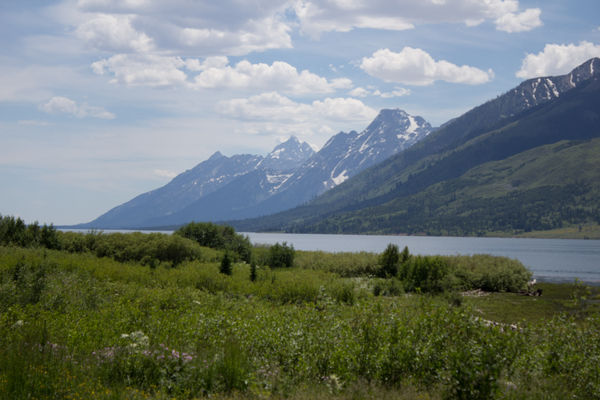
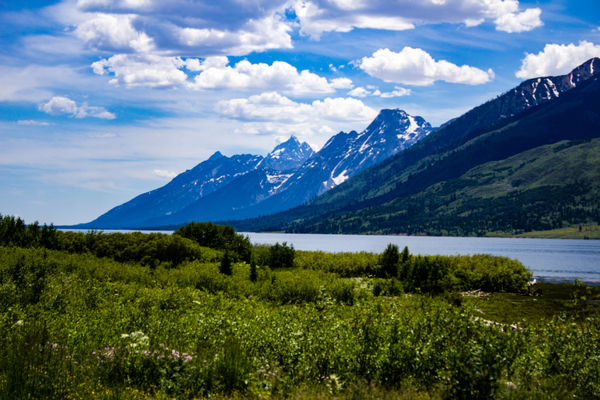
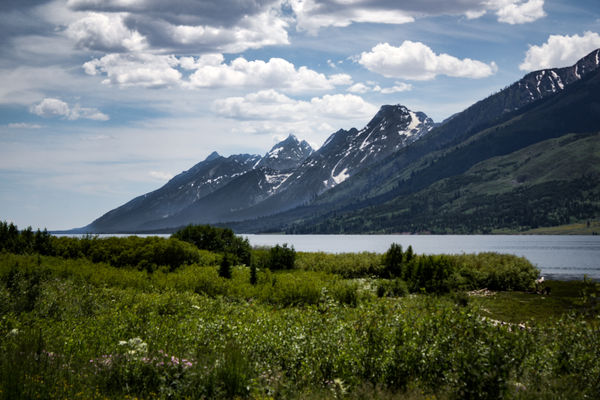
I know that Photoshop and Light Room boast de-hazing features, but I don't have a version that new. I tried my hand at taking the haze out of the Tetons this evening with DXO software. I think I like the change, but would like input.
Is this attempt to dehaze 'overcooked'?
Is this attempt to dehaze 'overcooked'?
Nov 29, 2015 00:28:16 #
Nov 29, 2015 02:48:00 #
Peeb wrote:
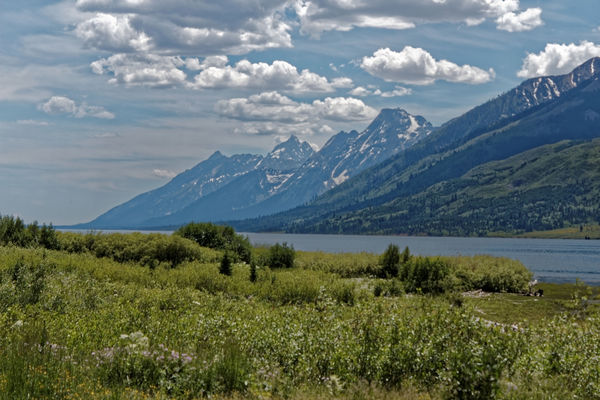
I know that Photoshop and Light Room boast de-hazing features, but I don't have a version that new. I tried my hand at taking the haze out of the Tetons this evening with DXO software. I think I like the change, but would like input.
Is this attempt to dehaze 'overcooked'?
Is this attempt to dehaze 'overcooked'?
I believe it is, to some degree, and it could also use some refining in PS or LR, but that is just for my taste. If you like it then stick with it---it is all about what the shooter or the processor likes. Everyone has their own taste and should be happy with it. I cud post a hundred pix here that I like and no one else does.
In the early years of digital photography I thought I could get by with a point and shoot camera. I took some pix of the Grand Canyon on a hazy day and PP'd them in the software that came with the camera to get rid of the haze. By adjusting the contrast I got basically the same effect that I get now with dehaze in LR.
I'm not saying the P&S shots, PP'd with camera software, were better but they were mighty close to what LR does today with dehaze.
Nov 29, 2015 05:51:32 #
Nov 29, 2015 07:10:16 #

Adjustments to reduce haze include lowering highlights, increasing contrast and clarity and darkening and desaturating blue.
With some of these (e.g. working on blue) you may not be able to do them in a selection so you will be limited to global adjustments, but as far as possible you should work on selections.
In your own edit the sky looks over-contrasted and a touch over-saturated. And the haze has gone from having a very slight magenta tint to having a slight green tint. If you did as suggested above with the blue you'd find that what lies behind the haze is lacking in detail and colour, so adding colour via a selected application of the tint slider (and possibly WB slider) plus saturation is one way to restore lost colour, but doing it before you've got rid of the haze just re-tints the haze.
If you ever find that you have the means to almost completely remove haze, I'd recommend leaving some. The eye expects to see distant objects as more hazy than closer ones, and removing all of the haze can lead to an unnatural look.
Nov 29, 2015 09:18:20 #
Revet wrote:
Here is the photo dehazed in Lightroom CC
Wow- confirms what I was fighting- gets pretty 'blue' when dehazing. Thanks!
Nov 29, 2015 09:18:42 #
Nov 29, 2015 09:19:27 #
fantom wrote:
I believe it is, to some degree, and it could also... (show quote)
Coming back to look again this AM, I totally agree.
Nov 29, 2015 11:26:03 #

Peeb wrote:
I know that Photoshop and Light Room boast de-hazing features, but I don't have a version that new. I tried my hand at taking the haze out of the Tetons this evening with DXO software. I think I like the change, but would like input.
Is this attempt to dehaze 'overcooked'?
Is this attempt to dehaze 'overcooked'?
Yuk. Over-something. Not sure what.
Why remove the haze? It's part of the image, it's what was there at the time?
The first image looks great...and when folks paint a scene like this they paint distant objects with less contrast because it looks natural to us...it's a clue about distance.
If it were me, I'd buck the current trend to fix photos in post processing and think about things like "when can I come back to this spot then the light is really nice? or "This is a nice scene...I should come back when there are a lot of storm clouds..." or something like that.
Nov 29, 2015 12:19:45 #
Revet wrote:
Here is the photo dehazed in Lightroom CC
To me, de-hazing means getting rid of the blue cast which haze creates so this doesn't do it for me. The following gets more to the de-hazing effect I think, at least from my viewpoint...
Nov 29, 2015 13:29:43 #

Neither of the de-hazing offered works. The last one (mrjcall) could have worked better had this not been done on the whole image.
Follow the advice already given and you will have more success (and use masking to avoid denaturing the whole scene).
As well as this one:
Follow the advice already given and you will have more success (and use masking to avoid denaturing the whole scene).
R.G. wrote:
Adjustments to reduce haze include lowering highli... (show quote)
As well as this one:
rpavich wrote:
.../... when folks paint a scene like this they paint distant objects with less contrast because it looks natural to us...it's a clue about distance.
Nov 29, 2015 18:15:13 #
Rongnongno wrote:
Neither of the de-hazing offered works. The last one (mrjcall) could have worked better had this not been done on the whole image.
Just to be clear, that is not what I did and we'll just have to disagree on this one.... Won't be the last time I'm sure...😐
Nov 30, 2015 06:52:26 #
Peeb wrote:
I know that Photoshop and Light Room boast de-hazing features, but I don't have a version that new. I tried my hand at taking the haze out of the Tetons this evening with DXO software. I think I like the change, but would like input.
Is this attempt to dehaze 'overcooked'?
Is this attempt to dehaze 'overcooked'?
Love your DXO edited version the best of all the attempts. Nicely done.
Nov 30, 2015 09:09:11 #
birder585
Loc: Rochester, NY
mrjcall wrote:
To me, de-hazing means getting rid of the blue cast which haze creates so this doesn't do it for me. The following gets more to the de-hazing effect I think, at least from my viewpoint...
So, mrjcall, how did you get this dehazed? I personally like yours the best as I think it is the most realistic version. Yup, I am a realist.
Nov 30, 2015 09:20:13 #
birder585 wrote:
So, mrjcall, how did you get this dehazed? I personally like yours the best as I think it is the most realistic version. Yup, I am a realist.
Most of what was done was with the adjustment brush on the mountains. Reduced saturation, added contrast/clarity and reduced exposure. Did some other minor tweaks to the sky to give it some balance...
I'm an Matt K. fan of ON1 fame and initially always establish a good white point and a good black point so I know I'm getting the broadest dynamic range possible in each image...
I should add that I think I'd brighten my image up just a tad if getting a do-over.... :wink:
If you want to reply, then register here. Registration is free and your account is created instantly, so you can post right away.