Posts for: KennyMac
Jun 19, 2013 18:36:29 #
Select RAW + jpeg on your camera. The camera does significant post processing and compression on jpeg file. This is fine unless you had a pix that you think need more PP. You can't take back the PP done in the camera. There are many situations that you may shoot jpegs instead of RAW (snapshots, street shooting, etc. There are also situations that would benefit shooting RAW with much more flexibility. Eventually you would probably convert to jpeg to sent to a lab. When you convert in your software, it doesn't change the RAW, just compresses the data. Also you should NEVER RE-SAVE a jpeg under the same name, this creates unwanted artifacts visible in pix. Try re-saving a jpeg, and watch how crappy it gets !
Jun 19, 2013 18:06:28 #
greymule wrote:
I use Adobe RGB Color Space. However, the lab that... (show quote)
I just replied to JERYH's reply a little while ago . You take picture with your camera. Either by default or your selection of a color space (sRGB, ADOBE RGB, etc) your camera puts this selection at the beginning of the picture file. These are the mathematical definitions of color gamuts (every pixel has an 8 or 16bit depth to express the color and shades of color. You know it's there because when you look at the metadata, it will be there along with other stuff such "flash on or off, aperture, shutter speed etc. When the picture file is sent to the LightJet printer, it has already been told what paper is being used because the operator has selected "RPLightJetFCARevo7C" in the printer driver. Each paper type (glossy, satin, etc) has a different profile developed by the paper mfgr. Without getting deeper, these color standards allow any device to exchange color data with another device and come up with the same color. For example, if you do not calibrate your monitor to a standard, your picture will probably be noticeably different than what you print or what your camera display shows.
Jun 19, 2013 15:24:55 #
Jun 19, 2013 15:22:14 #
Pixel size indicates it is probobly 3x5. I used LR noise adjustments (luminosity & detail) to clean up most of it. Could have used a brush to the few remaining dots. I then used PERFECT RESIZE (GENUINE FRACTALS) to enlarge to 240 dpi and to keep all of the original canvas, comes to 8 x 12. A4 would not keep all the canvas.
If you like, I could finish it.
If you like, I could finish it.
Jun 19, 2013 13:41:42 #
jeryh wrote:
Why on earth do you change when you send the images for printing ? I use Adobe RGB 1998 all the time- I haven't yet altered this if I send images externally for printing, and there is little or NO variation from what I sent originally.
Ditto !!!! The profile is embedded in the file ! Any program or printer (yours or a lab) reads it and does the math to process the file within its printing limits. If you actually go into a picture file and delete the profile, your lab would call you and tell you they couldn't process it. Also, many low priced printers can't even process info that may fall between the sRGB & Adobe RGB 1998 gamuts.
Jun 19, 2013 13:00:48 #
I'm running LR4, PS and the "new" Google NIK package work just fine. NIK looks at what Adobe pkgs you have and automatically become available if selected in setup. I haven't bought my LR5 update yet, but pretty sure will work just fine.
I assume you're running Windows 7, not something older !
I assume you're running Windows 7, not something older !
Jun 18, 2013 21:17:31 #
Pentony wrote:
Please include some photos. 8-)
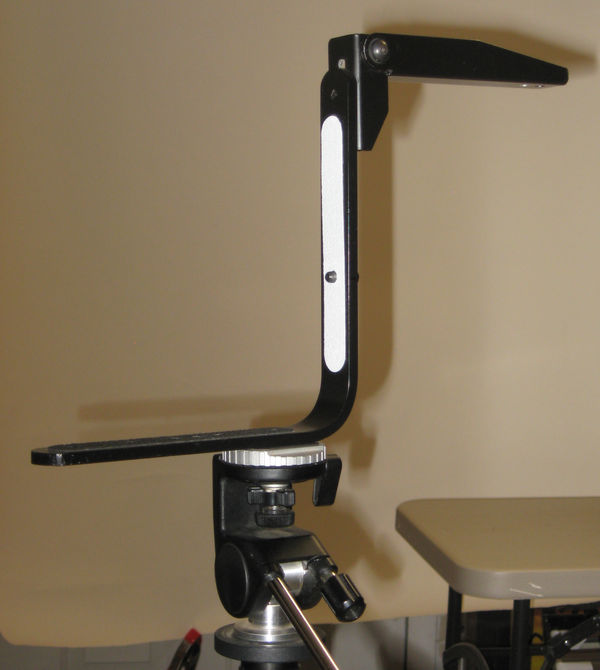
I am using this in-expensive setup for panoramas on a ball-head with degree wheel. I will probably spend some money in the future. For portraits, I just use a ball-head.
Jun 16, 2013 20:50:27 #
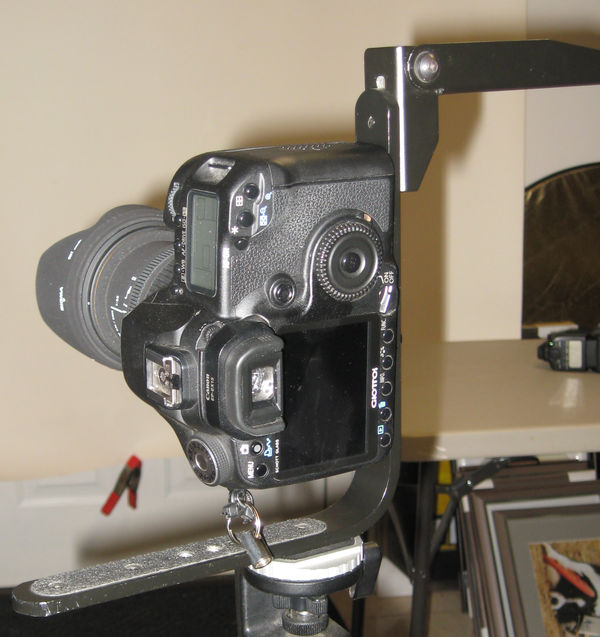
I modified my old STROBOFRAME flash bracket by drilling a new 1/4 inch hole in the vertical portion, then used a 1/4 x 20 bolt to mount the camera. Then you use one of the threaded 1/4 x 20 holes (normally used to mount camera) to attach to tripod head. I actually located a new hole to be able to pivot the camera around the sensor plane for panos .
Jun 14, 2013 20:30:19 #
bioteacher wrote:
Is there a way to export pictures in LR4 to any other format besides JPG?
You ought to consider spending some time on adobe center and study each LR module (LIBRARY. DEVELOPE, ETC..). Grasping LR catalog functionality can be very confusing at first. In LIBRARY module, the left side is WINDOWS EXPLORER in disguise. This is where I do all my IMPORTING, EXPORTING, moving pix's. If you put pix in a folder outside of LR, they won't appear in you catalog until you SYNCHRONIZE folder. When you select EXPORT, you will fill in the menu as to destination, file type (jpg, dng, tiff, etc) , rename, and so on. Also, if you edit in RAW, and attempt to print or whatever outside of LR, you WILL NOT get the edits you did. When I EXPORT to jpg, I select PUT IN SUBFOLDER and ADD TO CATALOG, name the folder JPEGS and select the quality level and then HIT THE go BUTTON. You can convert all your imports to DNG's if that's going to be part of you workflow.
For example in my workflow , I shoot RAW, I IMPORT by removing card from camera, put in card reader, click IMPORT, select card, go over to left side of IMPORT screen and enter a new name for the selected series of selected pix instead of cryptic name given by camera, maybe enter some keywords, then hit IMPORT at lower right.
Also if loaded correctly, you can leave LR via the PHOTO menu in DEVELOP (EDIT IN) and go to PS or other pkgs such as NIK etc and when you're finished, you will come back to LR. Again, some study on Adobe site will clear up a lot of confusion. Also there are many other resources out there.
May 31, 2013 15:40:08 #
saxkiwi wrote:
Whats a free large file sending software out there? good for mac too. Just emailed some images to a canvas printing company and the files are way too small for my liking to be printed to A2. The upload on their website would not allow my 10mb files or smaller to be uploaded. Annoying as
I use WhiteHouseCustomColors (WHCC) for prints and they offer FTP protocol to clients I use SmartFTP to send my orders. I may send 1 file or 20, it doesn't matter. It used to be free years ago, but will cost you a few bucks now. There is lots of FTP software out there. Ask your lab for help with options.
May 30, 2013 17:34:42 #
Eveline wrote:
I deleted all my files from lightroom because I reorganized how I dealt with my photos. Since them I have imported all my files into Lightroom. The side panel shows that I imported about 28,000. However, the my pictures folder says I have over 55,000 files. Why did it not import everything? And, how do I get lightroom to import the rest?
Is "My Pictures" your catalog name ?
Did you delete the files (and/or folders) using LR ? Sounds like you deleted them with windows explorer. Remember, LR doesn't import actual picture to a catalog. When you import pictures, LR just saves where the picture resides on your drive(s) in its catalog (database). If you delete pictures outside of LR, you just corrupted the database. In LR, select the top most folder (my pictures ??) right click and select SYNCHRONIZE FOLDER. Also, if you add files or move files outside of LR, you need to SYNCHRONIZE that folder in LR. If you get message saying it can't find this or that, then probably the easiest thing to do is generate a new catalog in LR and IMPORT from the top most folder with your pictures. If you want to use same catalog name, delete the corrupted LR database file (xxxxxx.lrdata). I'm not sure if it will over-right old file.
May 30, 2013 16:05:48 #
Final file size would be determined by what you are going to do with it. (ALWAYS KEEP ORIGINAL RAW OR JPG). If you are going to view it on a monitor, 72 ppi (pixel per inch) is fine because of monitor resolution. If you are preparing a file for printing, then the recommended range is 240 - 300ppi. Your cameras' raw pixel count determines the max size you could print a "high res" pix without resorting to GenuineFractals . For example my 15mp 50D has a file size of approximately 3170p x 4750p = 15mp. If you divide each by 300ppi, you get 10 inches x 16 inches (max). If you only want a 4x6 print, your printer is going to spend a lot of time integrating gobs of data !
I shoot RAW only (15mp, 7mp, 4mp) and used to use PS and Bridge to manage my pix, and was hesitant to switch to Lightroom. When I want to send a file out to WHCC for printing, I convert to JPEG 10. After re-calibrating my brain(months) to LR functionality, I wouldn't switch back. If I need something outside my standard LR workflow, I will go there (PS or others)
I shoot RAW only (15mp, 7mp, 4mp) and used to use PS and Bridge to manage my pix, and was hesitant to switch to Lightroom. When I want to send a file out to WHCC for printing, I convert to JPEG 10. After re-calibrating my brain(months) to LR functionality, I wouldn't switch back. If I need something outside my standard LR workflow, I will go there (PS or others)
May 30, 2013 14:42:57 #
wowbmw wrote:
You know, I moved from Elements to PS6 and Lightroom because a color class I took demonstrated that when one opened a raw file in ACR and then moved it to Elements, the file went from 16 bits to 8 bits. Does this affect file size? What I do believe now is that for the most part, editing in Elements and then printing, it would be hard for most to see much difference.
"8 bits, 16 bits" refers to the mathematical value used to express a specific color of each pixel. Most modern cameras support 16bits and when you shoot RAW, you get all raw unprocessed pixel data. If you shoot JPEG, it won't matter because the camera does a lot of processing before pix leaves the camera. If you do not calibrate your monitor, don't know what color gamut you use, and not a pro with a knowledgeable client, then you will never be able to tell the difference !
May 27, 2013 16:26:15 #
I have been playing with PS stitching for wide panoramas in the last 9 months or so. Although I haven't had any sent out for printing yet, it's the way to go to get awesome results. I have taped together 2 13x19" sheets and printed one 30" wide x 11" high. I spent considerable time reading many articles and Adobe's learning center. Preparation is the key and will require a tripod and head (with degree marks) , camera level, bracket to set camera to vertical. First you will level the camera through the panning range you want to include. I use a normal (50mm) to moderate focal length, set camera to manual, ISO 100, select lens sweet spot aperture and find speed, manual focus on an area that is approx 1/3 the distance to your subject. This will set DOF from approx 20 ft to infinity. Then you select a degree increment that will give you approx a 30% overlap of each frame. PS stitching and transforming will do the rest with practically no noticeable distortion !