Posts for: kskarma
May 23, 2018 13:36:40 #
Some of your situations seem tailor made for the use of HDR. (OK...I know that many times the HDR photos that get posted are very "Over-Processed" to the point they look garish)...BUT HDR used with some restraint can really save the day in places where the range of light intensity is waaaay beyond the ability of either film or digital sensors to record successfully. The interior of a church is a good example of this...dark pews in poorly lit corners coupled with very bright sun-light streaming through the stained glass windows.... Here is where taking a series of 'bracketed shots' can rescue the photo.
In your forest example, you might try a 3 or 5 shot bracketed sequence with a full stop between the exposures....except for extreme situations, this should give you plenty of exposure information for a PhotoEditor to process. My personal favorite HDR program is Photomatix, but there are many others....this is just the one I've used for a long time and am comfortable with it...shop around if you like... Photoshop has an HDR option, as well..and many current DSLRs have a wide range of bracketing options...mine can do a 9 frame series, so with a full stop between images, that provides all the exposure options I could ever need...
In your forest example, you might try a 3 or 5 shot bracketed sequence with a full stop between the exposures....except for extreme situations, this should give you plenty of exposure information for a PhotoEditor to process. My personal favorite HDR program is Photomatix, but there are many others....this is just the one I've used for a long time and am comfortable with it...shop around if you like... Photoshop has an HDR option, as well..and many current DSLRs have a wide range of bracketing options...mine can do a 9 frame series, so with a full stop between images, that provides all the exposure options I could ever need...
May 23, 2018 12:42:02 #
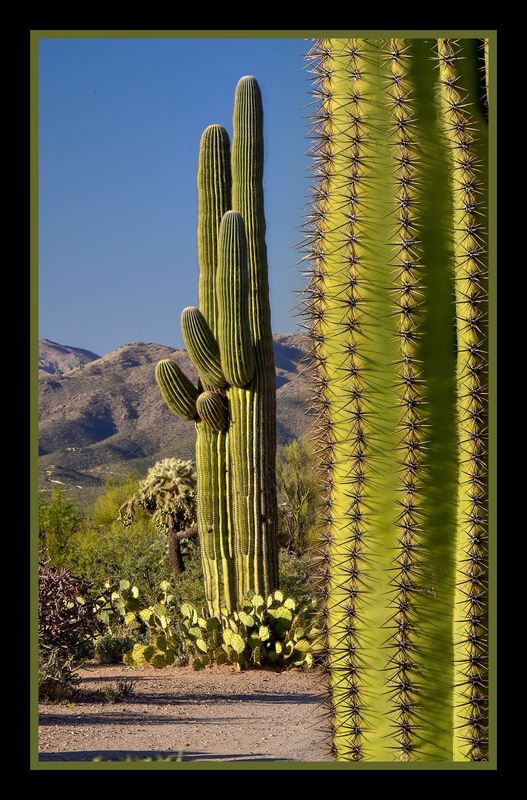
The Saguaro National Park is very unique in that it consists primarily of desert plants...tons of Saguaro..(duh!) as well as a wide variety of other cacti, yucca, ocotillo...on and on... There are 2 sections to the park, one to the west of Tuscon, and this one, the Rincon Park that lies to the east, the total area is nearly 140 square miles. There is a great driving road..(one-way..hurrah..!) that takes the visitor on an 8 mile meandering path over and through a lot of photo-worthy areas.
This photo is actually comprised of two separate, but aligned images..both of them hand-held, FYI. I wanted to show both the immense size of these magnificent plants as well as the detailing of their spiny structure. These shots was taken with my Nikon D750..mounting a 28-300mm lens, f13, 1/300 sec. for those who might like this EXIF data)...both of the images at a 135mm setting, but focused first on the closer plant on the right....then the second shot was taken after refocusing on the distant pair of Saguaros. I was fortunate also, to be there during some of the "Magic Light" of early evening.
This is a 'focus stacked' shot that combines those 2 separate images... CombineZP was used to blend the 'in-focus' portions of the two images together so that there is 'front to back' sharpness...a bit of amazing digital Magic....!! This image had to be downsized to fit in this forum, the original is over 25meg...and is...pardon the pun, 'needle' sharp...!
For those unfamiliar with "focus-stacking", it's a technique that allows multiple images taken at incrementaly focused distances, to be 'blended' together. These incredible bits of software are able to determine the sharpest sections of each separate image and then blend those segments together seamlessly. I have used this technique...and the program "Combine ZP", to 'stack' as many as 44 separate images....
(Disclaimer...I have no connection with CombineZP, but would be open to a small monthly fee....[G]..!)
May 23, 2018 10:43:19 #
courtland43 wrote:
kskarma, Thank you for the excellent explanation. I certainly have some educating to do, self-educating that is. I understand about the problems you faced in that shoot having taken a few hundred film photos in our southwest deserts many years ago. After taking several years away from my photo hobby I'm now trying to jump back in. You've probably just doubled my 'digital' knowledge. Long way to go but it should be fun.
And I still think that is a great shot.
Thanks again,
Court
And I still think that is a great shot.
Thanks again,
Court
Court...thanks for your kind words....I don't know if you are aware that this Forum has a section for HDR info and photos...I'm sure you would find anything HDR-related there that you might be interested in....
May 22, 2018 19:39:39 #
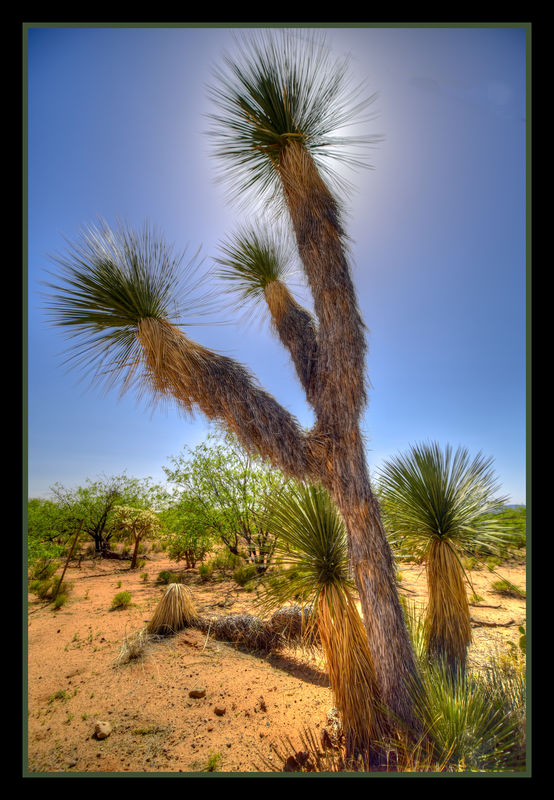
Yes...I agree about the ghosting....and that was a by-product of the VERY strong winds on this day...it was the one day I had to shoot here, so I made the best of it. Since the yucca was in constant motion, some of the fronds moved between the exposures and this shows up in the image.
As to what is HDR...sorry for using an acronym...but it stands for High Dynamic Range. This is a technique that uses a series of bracketed photos, generally from 3 to 5, although some cameras will bracket up to 9...maybe more. With a full stop of exposure between successive shots, the dynamic range can include..and correctly expose both dark shadows on the photo...as well as bright lights. A church interior is a good example of where this might be most helpful. The resulting images are processed with a variety of Photo Editing software...I use Photomatix, but there are many others, all doing about the same thing....which is combining areas of the different images where the exposure is best....into a final composite image. HDR, like some other techniques can be overdone...but when it's used to solve problems, it can be super useful.
And...on the day in question when I took this photo, I really wanted to do something with the blooming Ocotillo, but with its 15-20 foot slender fronds, there was just no way to get a good shot.
May 22, 2018 19:03:06 #
I totally agree with you about the very common practice of having a 'death grip' with the right hand, I also notice that many folks will hold the lens with their thumb on the bottom of the lens and their four fingers on the top and do their focusing in this manner. This always looks very awkward and means they are supporting the weight of the lens mainly with their thumb..
Do I ever try to correct them?? Nope.....!!
Do I ever try to correct them?? Nope.....!!
May 22, 2018 18:56:12 #
btbg wrote:
Your post on shooting technique is fine, for most ... (show quote)
Thanks for your correction and pointing out that my quote was "100 percent false"...I actually had not considered that any of the 'big guns' would be reading my advice and trying to apply it to their situation... I posted that with the idea in mind that most of the photos that readers of this forum would be taking are probably pictures such as landscapes, family photos, vacation shots and not the very active sporting events.... And yes, I did not mean for my advice to apply to ALL situations, there really is no such thing as some sort of "Universal Practice" that should be used all of the time.... I'm not sure how I should put in some sort of 'disclaimer' on my future postings to make sure that professional sports photographers are not led astray by something I have suggested.....!! [Grins]
Currently I am working on a posting that covers panning with the action, burst mode shooting as well as selecting high frame rates and shutter speeds...just in case some professionals such as yourself might take my advice the wrong way....
May 22, 2018 12:47:22 #
This was a bracketed shot of 3 (I think...) images to maintain detail in the shady side of this yucca. Photomatix was used to process the HDR. I aligned the sun behine the upper spines to create the 'halo' effect. Shot with a Nikon D-750 mounting a Sigma 17-35mm lens.
May 22, 2018 11:58:25 #
VERY innovative and original... I was fortunate to have glasses with which to view it....mine are bifocals and it looked great.....[Grins]
May 22, 2018 11:51:12 #
Many times I've had a hankering for one...looks like they would be interesting to play around with, but the $$$$ was always a deterrent. My "work-around" when I need the wider angle and/or perspective control of one of these specialized lenses, is to rely on PhotoShop....either by shooting overlapping images and then 'stitching' them together with PhotoMerge...or using one of the many "Perspective Control" options in PS.
May 22, 2018 10:27:13 #
My cameras are D750s and in order to avoid confusion, I have the Menus of both of them set like this...
First of all, I have my Fn button set to access the "My Menu", this gets me to my Favorite Options with a single button press, no hunting needed. I also have tried to order the items in a "most used" sequence, again to get to my most used settings quickly... I've also tried to organize options that 'fit' together in a grouping...e.g. Remote control mode, duration and self-timer are all consecutive.
1. Virtual Horizon
2. Battery Info
3. Auto ISO sensitivity control
4. ISO sensitivity settings
5. e3 Flash cntrl of built in flash
6. White balance
7. Set Picture Control
8. Monitor brightness
9. Remote control mode (ML-L3)
10. c5 remote on duration ((ML-L3)
11. c3 self Timer
12. Multiple exposure
13. Interval timer shooting
14. Time-lapse photography
15. Wi-Fi
16. Save User settings
17. Save/Load settings
18. Hide image
In addition to these, I have my 'preview' button assigned to "Viewfinder virtual horizon" as this is a most used option. Just FYI..
May 22, 2018 10:02:47 #
The number one cause of blurry and unsharp photos is due to camera shake at the instant of exposure. It's very critical that during the small slice of time when the shutter is open, the camera and the photographer be as stable as possible. Practicing this general technique will go a long ways toward achieving sharper images...especially at the slower shutter speeds.
Years ago (don't ask how many..!!), as a 'Green' Marine and in USMC rifle training, we were taught the B.R.A.S.S. ("BRASS") method of getting a steady shot, and I have used my own version of this technique whenever I am shooting (photographically, of course!) any subjects. The Acronym stands for:
B....Breathe...take a full breath.
R....Relax...let out about half of your air, until you feel comfortable and have a stable stance.
A....Aim... Look through your viewfinder and compose your shot.
S....Slack...take up the 'play' in the shutter release..the "half-press'.
S....Squeeze.. With a smooth motion, press the shutter. The idea with a rifle is to NOT know the exact time the round goes off to avoid flinching. With a camera, the same smooth and steady release idea applies. Too many shooters 'jab' the shutter, (none of the readers of this Forum, I am sure...!!)...this nearly always guarantees camera motion...and a wasted shot.
This is an easy technique to learn, it helps to practice it a few times until you have the timing and 'feel' down right. Depending on your previous habits, this could amount to an extra stop or two of speed. Remember the old saying, "Slow and steady, wins the race...!"