Focussing
May 23, 2012 11:47:00 #
glojo
Loc: South Devon, England
Weddingguy wrote:
Here are a few facts that might help you understan... (show quote)
Thank you very much for the reply and that 'little red box' is only in the computer viewing software and has nothing to do with the camera.
The software is just there to give that extra information we sometimes want when reviewing our images. I understand what you are saying about 'centre spot' focusing and thankfully my camera gives a lot of focusing options as sometimes I might want the whole bird to be as sharp as is practicable, but because I am always desperate to grab the highest shutter speed as possible. If I have a very small centre spot, experience has taught me I loose an awful lot of detail on my subject. If you look at one of the last pictures I have posted you will see the bird is quite sharp but the second leg has gone 'walk abouts' It is definitely a dark art and thank you for those observations, they certainly make sense.
May 23, 2012 13:48:09 #

glojo wrote:
quote=Weddingguy Here are a few facts that might ... (show quote)
Instead of center focus try wide focus.
May 23, 2012 16:38:41 #

Gidgette . . . I am a Canon shooter so have never heard the expression "wide focus". Can you please explain?
May 23, 2012 16:44:58 #
Weddingguy wrote:
Gidgette . . . I am a Canon shooter so have never heard the expression "wide focus". Can you please explain?
Sorry in Nikon D90's there is a center focus or wide focus to choose from.
May 23, 2012 16:46:02 #
Is the "wide focus" more focus points from which to choose?
May 23, 2012 16:52:54 #
Weddingguy wrote:
Is the "wide focus" more focus points from which to choose?
Center focus is for center focusing, wide focusing is for focusing if has movement.
May 23, 2012 17:14:38 #
We are talking about two different sets of choices. There is also a setting in both Canon and Nikon that lets you choose one center spot on which to focus, or multiple spots in different areas of the screen. You can set a single spot on any of the available spots on the screen, or let the camera decide which to use. When you let the camera decide, it will default at focusing on the closest subject with detail and contrast. "Wide focus", or on Canon "AI Servo", which is the same thing, is designed for moving subjects and is not the best choice for a still subject. On Canon, and I would assume also on Nikon, there is a third choice of modes called "AI Focus" which let's the camera decide whether the subject is moving or not and chooses between single shot and AI Servo. Again not the best choice for keeping control. For my money on the squirrel image I would have chosen to focus manually, as the area of desirable focus is such a small percentage of the total frame. The camera just cannot know what it is we wish to have in sharp focus.
Just my 2 cents.
Just my 2 cents.
May 23, 2012 17:20:57 #
glojo
Loc: South Devon, England
I think we will find that as time goes by our DSLR cameras are getting all different types of focussing options. I have had this camera for approximately five years and it has the following focusing options.
module with 51 sensors in normal mode
Single Servo and Continuous Servo focus modes
Advanced focus tracking modes
Selectable Single Area AF
Dynamic area AF
Group Dynamic AF
Closest Subject Priority Dynamic AF
The last one is something I have avoided but I have used a number of the other permutations for different 'snaps'.
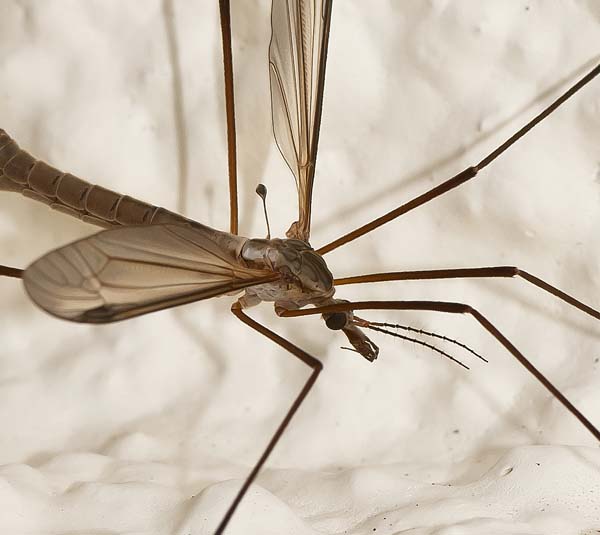
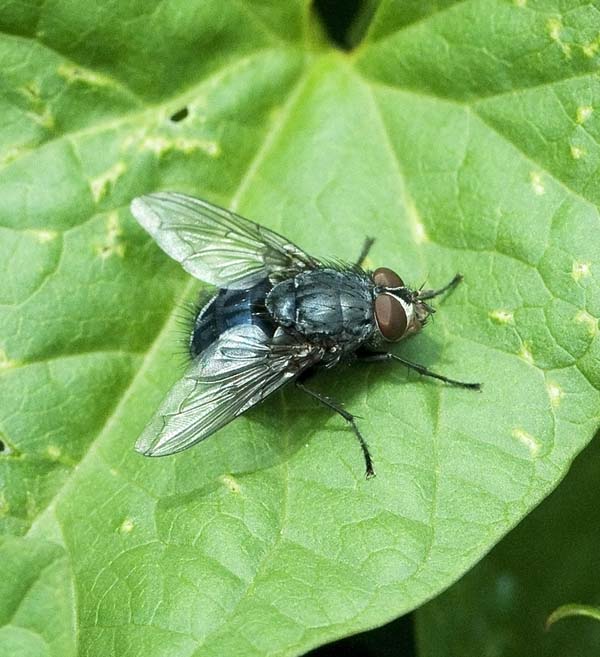
I think Macro photography challenges me to get a decent depth of field because the usual tendency is to go for spot focussing and then quite a bit of the subject is a blurred mass of fussiness.
I do not think there is an issue with the camera and as we can see these hand held images are sharp enough for my needs
module with 51 sensors in normal mode
Single Servo and Continuous Servo focus modes
Advanced focus tracking modes
Selectable Single Area AF
Dynamic area AF
Group Dynamic AF
Closest Subject Priority Dynamic AF
The last one is something I have avoided but I have used a number of the other permutations for different 'snaps'.
I think Macro photography challenges me to get a decent depth of field because the usual tendency is to go for spot focussing and then quite a bit of the subject is a blurred mass of fussiness.
I do not think there is an issue with the camera and as we can see these hand held images are sharp enough for my needs
May 23, 2012 17:51:08 #

May 23, 2012 18:49:36 #
glojo
Loc: South Devon, England
Jer wrote:
We are talking about fast moving objects that are free to run, walk and fly whenever and wherever they want plus........Have you tried manual focus.
When I am standing up outside in my garden to take these images, I have to have my crutches wedged under my armpits and then I can balance against a wall, tree or anything else that is convenient. I then whip up the 500mm lens to snap my 'target'
In the summer the macro lens is slightly easier to handle and I can get my reclined wheelchair closer to any foliage and then snap away. Once the warm weather is here I do sometimes lay outside on my wheelchair to snap moving targets but doing this and working all the controls is beyond my pay grade.
I tend to decide what mode I want for focussing, set my camera speed and then let the aperture sort itself out! These pesky wild crittas flatly refuse to stand still and pose for me. I usually make sure I snap off a quick shot to ensure I have at least one picture and then I might try to check my work to see what I have shot, but then my 'model' has usually taken off for pastures new.
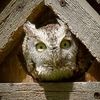
Regarding the bird images, most are taken from my bed where I hand hold the 500 lens and just aim it through the double glazed door that overlooks my back garden but again I set things up before lifting the camera.
How would you recommend I manually operate the focussing when taking these types of moving images?
Thanks for the question
John
May 23, 2012 18:54:01 #

glojo wrote:
I did not put that box where it is.... I believe the Nikon software detects the point of focus from the downloaded camera file and then it highlights it by the use of that box??
It's been my observation (emphasis on "observation" ) that in Autofocus, the red box is located at the point I've designated as center focus in the camera. If I then move the camera while maintaining the focus, the red box will be drawn at a point corresponding to the point I used for focus. If I have recomposed the shot, my subject may be in focus, and the box may point to a soft, fuzzy background. In other words, it's not identifying the sharpest point in the photo, but where the lens was told was the focal point. That explanation was probably as clear as mud. If so, complain and I'll try to do better.
May 23, 2012 19:45:44 #
Even automatic focusing system may not be able to keep up. There are a lot of things that can confuse an automatic system. I use them but also try to understand the limits. Manual is far, far slower. So you can focus at hyperfocal distance so the a certain point to infinity will be in focus. Or focus for a specific are and make sure you have a good dept of field. f/2.8 will produce a shallow dept of filed but a f/16 or f/22 will give you a lot of room to work with. Nothing is fool proof. It's a tricky combination of depth of field and shutter speed to stop the action.
glojo wrote:
quote=Jer Have you tried manual focus. /quote We ... (show quote)
May 23, 2012 19:46:41 #
May 23, 2012 22:42:59 #
I have attached part of an answer I gave to someone having problems focusing on a bird. This is no different than what you are trying to do with the squirrel. First off, focusing through two panes of glass is always a problem.
Factors that contribute to getting sharp pictures. A primer for backyard bird photographers.
There are two major factors that need to be considered in getting sharp photographs: accurate focus and camera or subject movement. Here are a number of things that we can do to assist us in getting accurate focus and things that we can do to minimize the effects of camera or subject movement.
Accurate Focus:
1. We need to learn to control what the camera will focus on. We do this by using single point Auto Focus. That is when we use only one of the many AF points available with our camera. When we take the photograph we need to be certain that this AF point is placed on the subject in the area of most critical focus. With birds, we usually use the eye or head as that location. With birds that are not moving or are only moving parallel to our position we can use One Shot AF. To do this we place the focus point on the critical area, half press the shutter button to lock the focus, recompose the photo if necessary, then fully press the shutter button to take the picture. We can also use AI Servo-AF if we have a subject that is moving closer to or farther away from us. With this mode, the camera will continue to adjust focus when the subject moves BUT we need to keep the AF point on the area of critical focus.
2. We need to control our aperture in order to achieve appropriate depth of field. Especially with longer focal length lenses, depth of field will be very shallow when we use the widest apertures our lens is capable of. In addition, most lenses are not as sharp when used at either extreme of our f/stop range. We therefore use the middle range of f/stops like f/8 or f/11 which will give us the best compromise between depth of field and sharpness.
Minimizing the effects of camera and subject movement:
1. Shutter speed is the single most important factor in mitigating both camera shake and subject movement. With long lenses, the rule of thumb is that you can hand hold a lens if you are using a shutter speed at least 1 over the focal length. So for a 300mm lens that means shooting at 1/300th sec. That is fine if your bird is perfectly still but birds move, feeders and tree branches can move with a breeze and if your 1/300th shutter speed is not enough to stop that motion your subject will be blurry. For birds, I suggest you double the minimum requirement. In our example of the 300mm lens, we would then need at least 1/600th sec. This rule applies even if we have Image Stabilization in our lens because IS does not help subject motion blur! In fact, I apply this rule even if my camera is on a tripod because, again, the tripod only addresses camera movement not subject movement.
2. Learn to release the shutter gently by rolling your finger across it to first get the half press to initiate focus and then to fully depress it to take the picture. Fire your camera just like you fire a rifle. Take a breath and slowly breathe out as you roll your finger over the shutter button and take the picture. This help minimize camera movement at the instant we take the picture.
3. I advocate using a tripod only for longer, heavier lenses in which case we do not lock the tripod down as we need to be able to move our camera to keep the focus point where we want it on the bird. Because of this need to move the camera the use of mirror lock up or a remote shutter release becomes impractical. When handholding the camera, brace it against something, if possible. A tree, fence post, railing, the arm of a chair, whatever is handy will help. Keep the viewfinder tight to your face, left arm bent with the hand cradling the lens from below, left foot comfortably forward, right foot back, feet at a 90 degree angle, then use your breathing technique along with the rolling motion of the shutter finger to take your shot.
Your basic settings, using a 300mm lens would look like this: 1/600th sec at f/8 at whatever ISO is needed to achieve good exposure. In bright sunlight your ISO will be around 150. If you need to adjust for lighting conditions my preference is to adjust ISO first. Only you know how high your camera will allow you to go before you get too much noise. After ISO adjust aperture and finally f/stop.
These tips are just a basic primer on getting good focus and are geared towards folks trying to take pictures of backyard birds whether they are at a feeder or perched in a tree or bush. More advanced techniques are needed for birds in flight, longer telephoto lenses and extreme distances. Since I own Canon equipment I have used Canons terminology. You may have to translate some of that. These are my personal thoughts based on long experience but I dont claim any special knowledge. I welcome all additions and comments.
May 23, 2012 23:00:15 #
If you want to reply, then register here. Registration is free and your account is created instantly, so you can post right away.