Macro Equipment Set-Ups
Jul 17, 2014 14:33:00 #
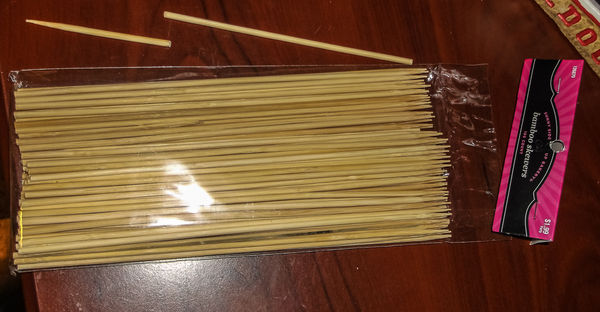
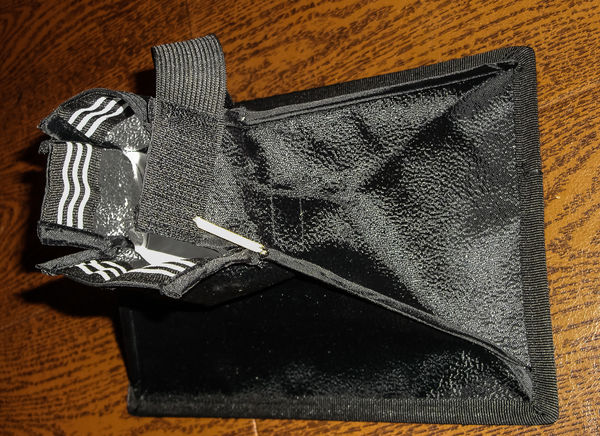
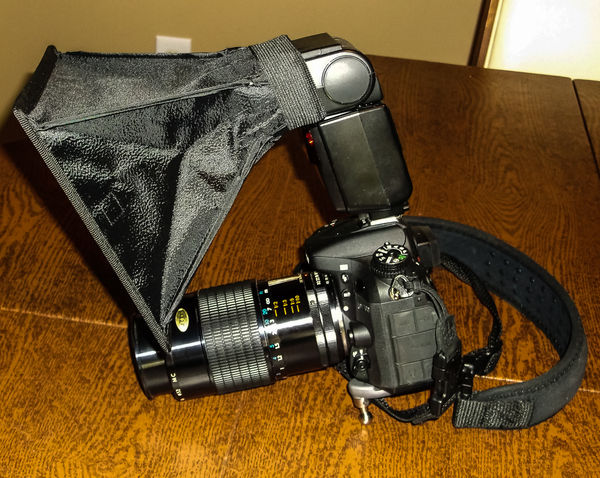
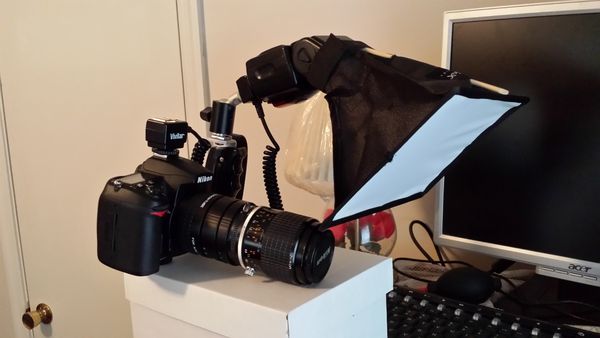
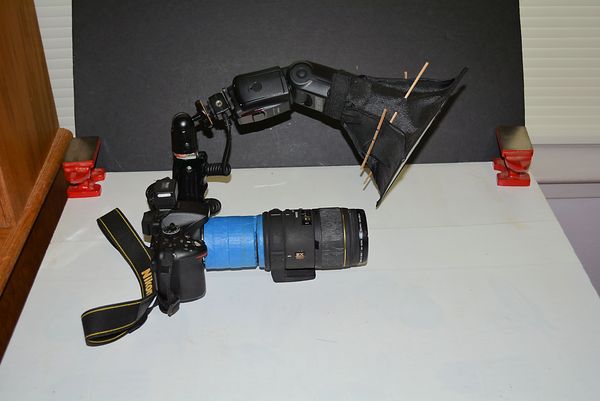
Here is my latest illumination modification. I have a 6x8-inch softbox. It kept wanting to fold-up when on the speedlight. Other photographers have used carbon-fiber rods to alleviate this issue. They were a bit pricey IMHO, so I went to the Hobby Lobby store that just opened around here & got a pack of 100-each 8-inch bamboo skewers for $2. I cut then down to fit & then on the softbox, where the seams were stitched, I made a small cut, just big enough to allow me to insert the skewer. In the pictures, you see the pack of skewers with one cut to size, the softbox with one of the cut down skewers partially removed from where I placed them & the camera set up with the softbox attached to the speedlight. Note, the camera isn't sitting flat as I have a "Spider" holster plate attached to it.
bag of skewers
(Download)
skewer partially inserted in softbox
(Download)
complteted softbox setup on speedlight/camera
(Download)
Aug 15, 2014 10:35:23 #
This is the lighting setup that I used to photograph small pieces of clear broken glass. To see the results type the following 2 words into the search box Broken Glass.
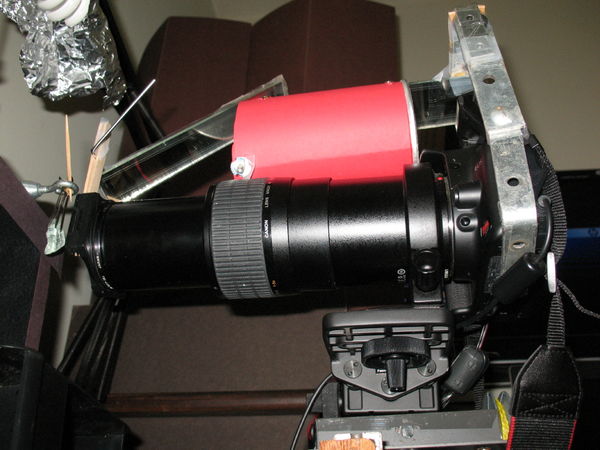
MPE-65 set at 5x and Canon Rebel (450). Light from the camera's built-in flash has no diffuser. One mirror parallel to the lens and one mirror angled down at the end of the lens to direct the light to the color paper behind the broken glass (backlit). Red tube has silver foil interior intended to help guide the light toward the end of the lens.
Small vice to hold the broken glass allows for manual rotation of glass.
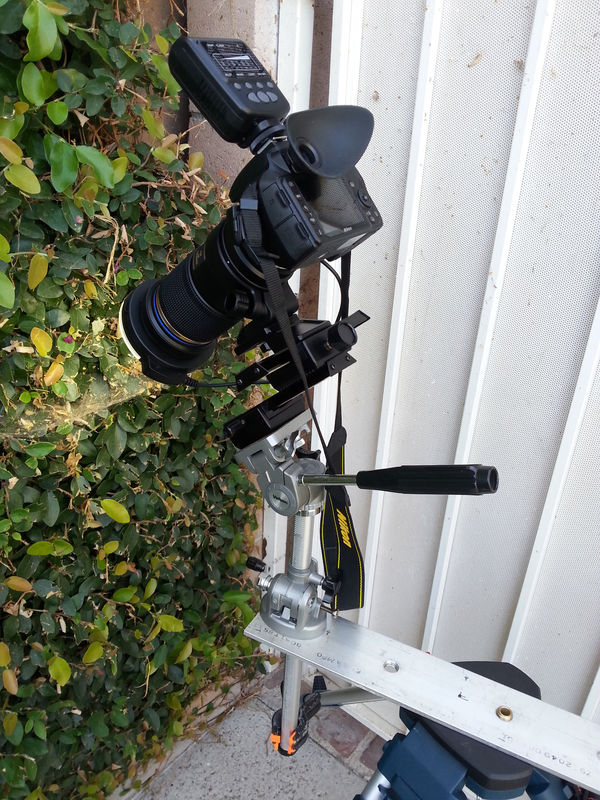
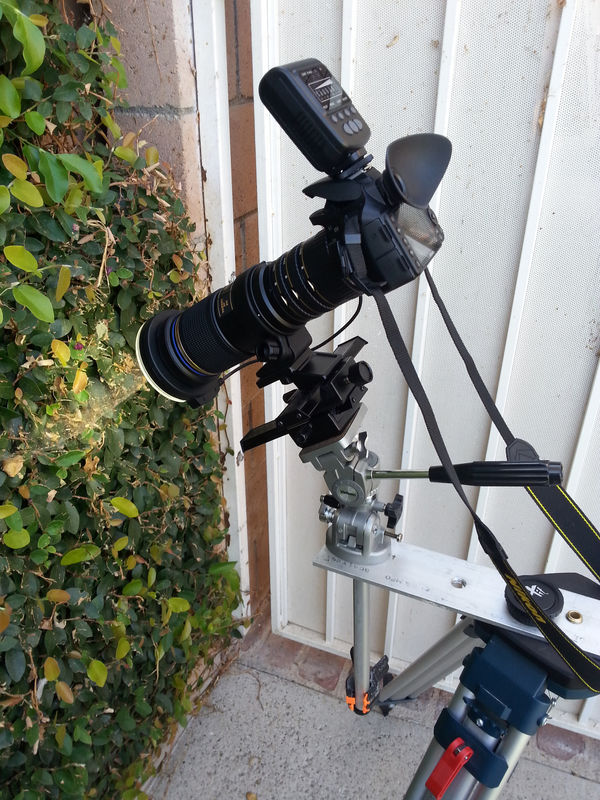
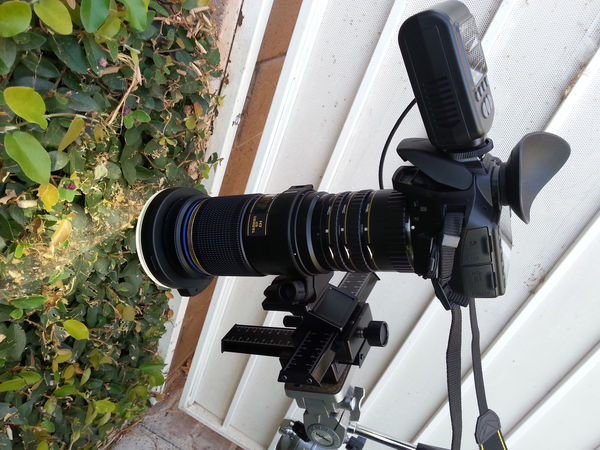
Sep 29, 2014 14:48:13 #
Here is my project in progress...
As a "Do-it-myself-er", I tend to try and put together my own pieces to get where I want to go.
My antique tripod wasn't up to the task for the heavy glass and stability I thought I'd like to have.
So I thought I would take a different route and do some fabrication of my own with a few pieces I already had, or could add.
I try to think in multidimensional for my tools, sure it can do this, but what else can I do with it?
Enter my version of a more versatile tripod. And although it might be a little crude, and a little Hodge-podgy, and maybe even Rube Goldberg-ish, it works. ;)
And my current model, "Fred", was today's victim and emerged to see who was tapping at it's chamber door. Fred has a sign, Will pose for bugs!
Anyway, my rig (Ta-Da), and what it does.
This is fun! All comments appreciated.
Tamron SP AF 180mm F/3.5 Di Macro 1:1 Lens
MeiKe FC100 LED ring flash (and light)
4-way Macro focusing rail slider.
Full Auto-focusing Macro Extension Tube set.
The lens does not auto-focus on my camera, but no big deal.
I mostly use the ring flash as a light so far, but it also works as a reasonable flash for macro photography. I haven't tried it for any other shots.
The slider rail is Da Bomb! I can do my focusing (manual) and even adjust the frame side-to-side very minutely. And have had no problems with any slipping.
When I discovered the short comings of cheap extension tubes, I bit the bullet and clicked on some good ones that will communicate with my DX lenses.
Oddly enough the short one (12mm) did not want to let the camera work. (No lens attached, shutter would not release) But by putting the 36mm on first all works fine. ;)
Now.. I think "Fred" earned a fly for his modeling. (Hey, the 2 year old Grandson named the spider. Might be a "Freida" for all I know.
Nikonian, can you help, Please?
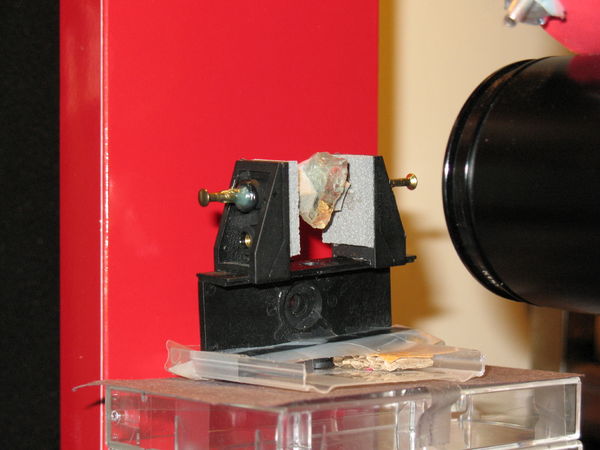
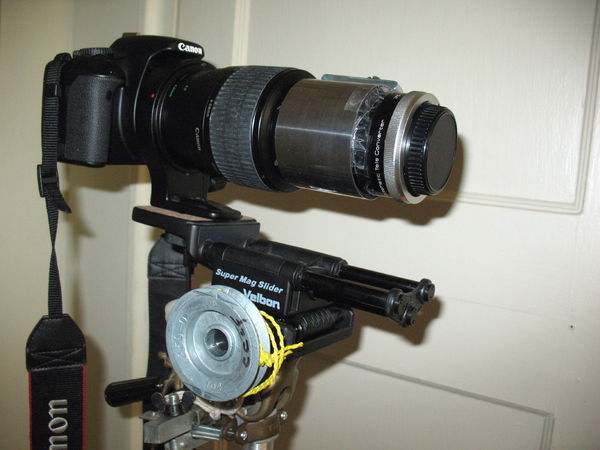
Whole Rig, Bosch contractor tripod. 1/4" X 3" aluminum plate, w/3 holes for the tripod to attach at.
(Download)
Closer of "The Works". A salvaged top from a broken tripod base from a friend. Allows a great deal more adjustment.
(Download)
Lens LED Ring Light-Flash. So far I have no complaints about this LED Light/Flash.
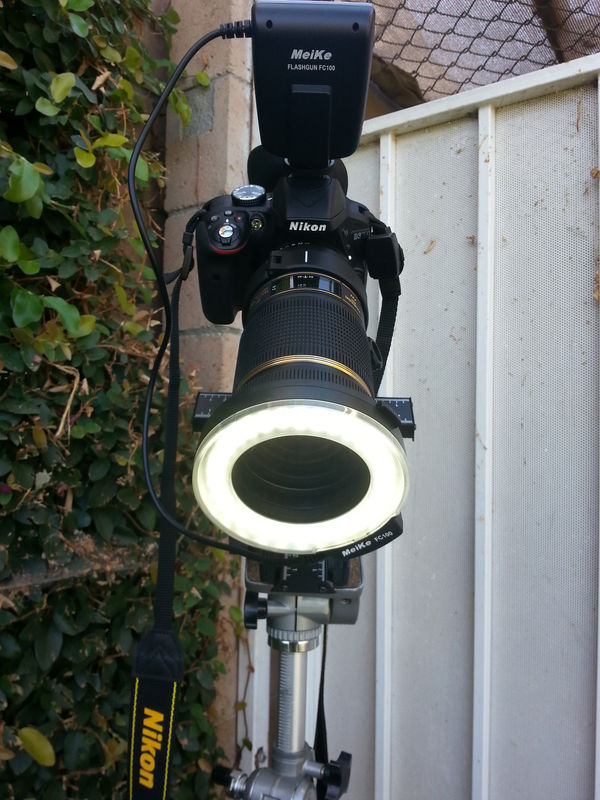
(Download)
Added Extention Tubes. Mo Macro, Mack.
(Download)
And a better shot of the camera.
(Download)
And of course, Fred, my patient model.
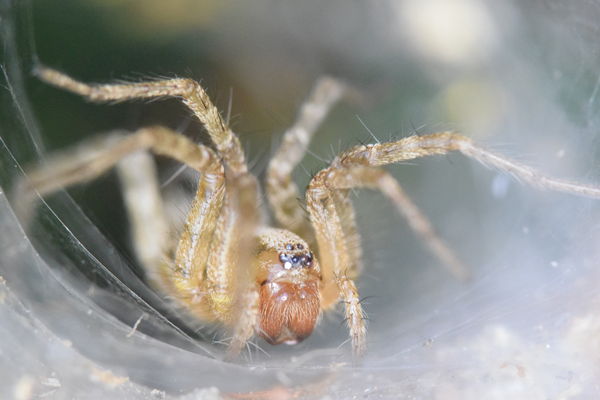
(Download)
Oct 24, 2014 14:00:46 #
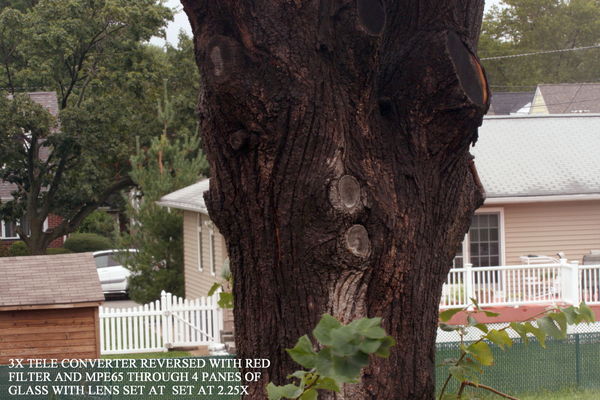
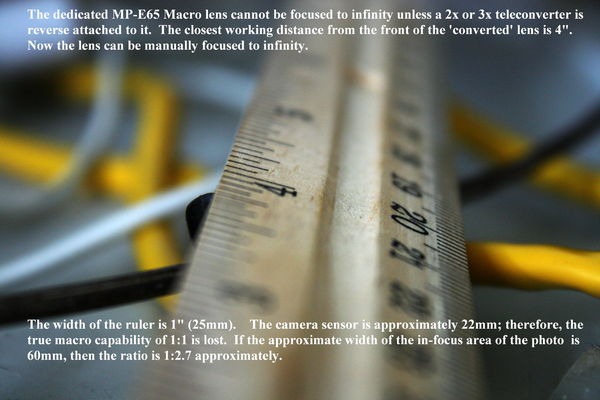
The following information may be of interest to those who own the macro-dedicated Canon MP-E 65mm lens. The MP-E 65 lens with a reversed 3x teleconverter attached.
Nov 20, 2014 22:46:56 #
I use enlarging or duplicating lenses on bellows, mounted on modified microscope stands, for my full-coin photography. Here is what the setup looks like:
http://i943.photobucket.com/albums/ad273/rparkhurst/th_MacroSetup005_01.jpg
And here is an example image:
http://i943.photobucket.com/albums/ad273/rparkhurst/th_IMG_0138_01.jpg
More images here: http://s943.photobucket.com/user/rparkhurst/media/MacroSetup005_01.jpg.html
http://i943.photobucket.com/albums/ad273/rparkhurst/th_MacroSetup005_01.jpg
And here is an example image:
http://i943.photobucket.com/albums/ad273/rparkhurst/th_IMG_0138_01.jpg
More images here: http://s943.photobucket.com/user/rparkhurst/media/MacroSetup005_01.jpg.html
Dec 1, 2014 20:59:15 #
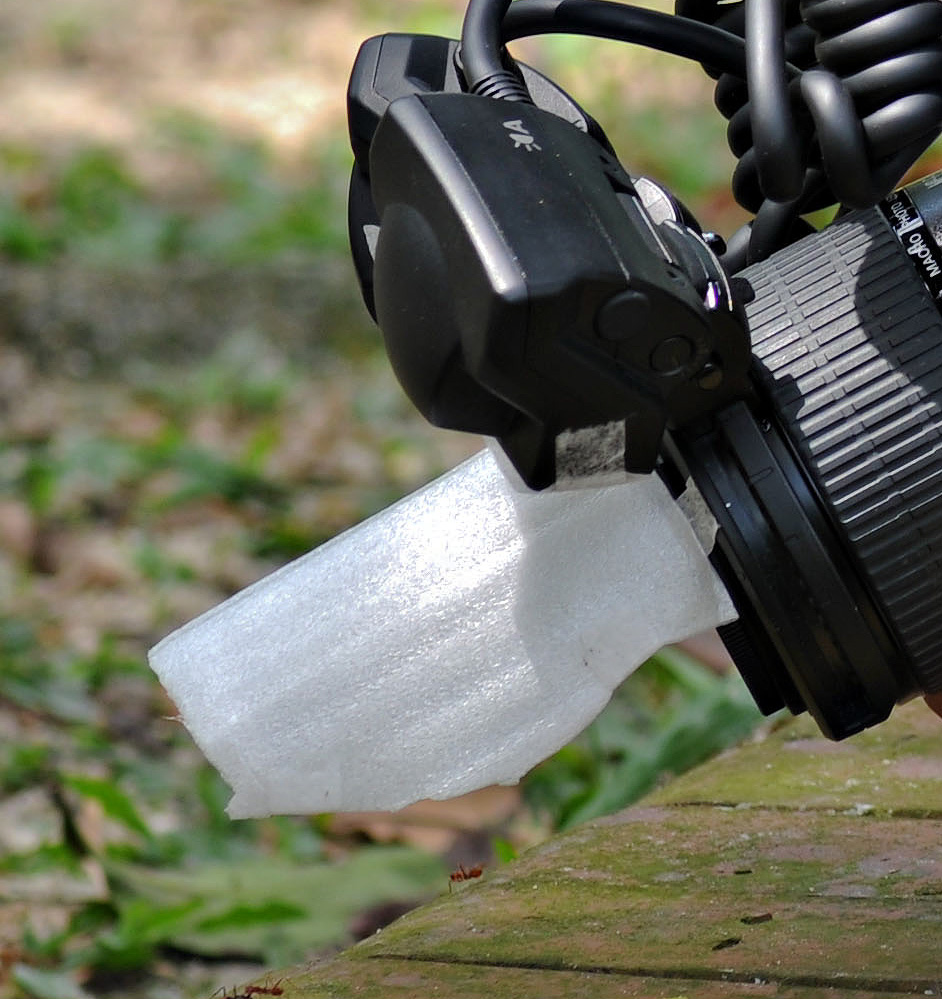
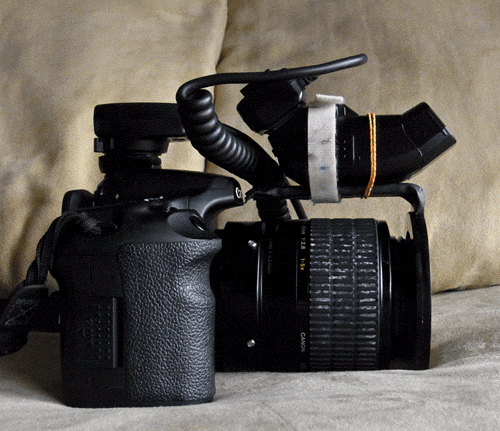
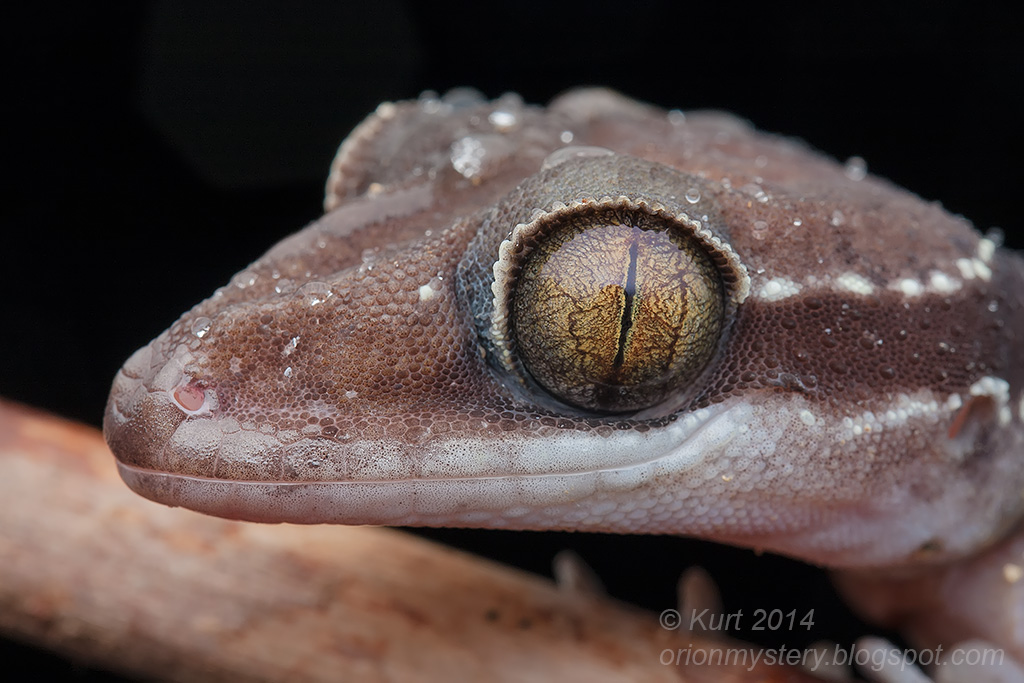
Setup #1 - Canon 40D camera with MP-E 65 macro lens, and MT-24EX twin speedlights with concave diffusers.
3 layers of thin foam as concave diffuser. 2 layers of thin foam on flash heads.
 new diffuser cropped by Kurt (orionmystery.blogspot.com), on Flickr
I use white surgical tape for holding the diffuser onto the adapter.
Sample shots:
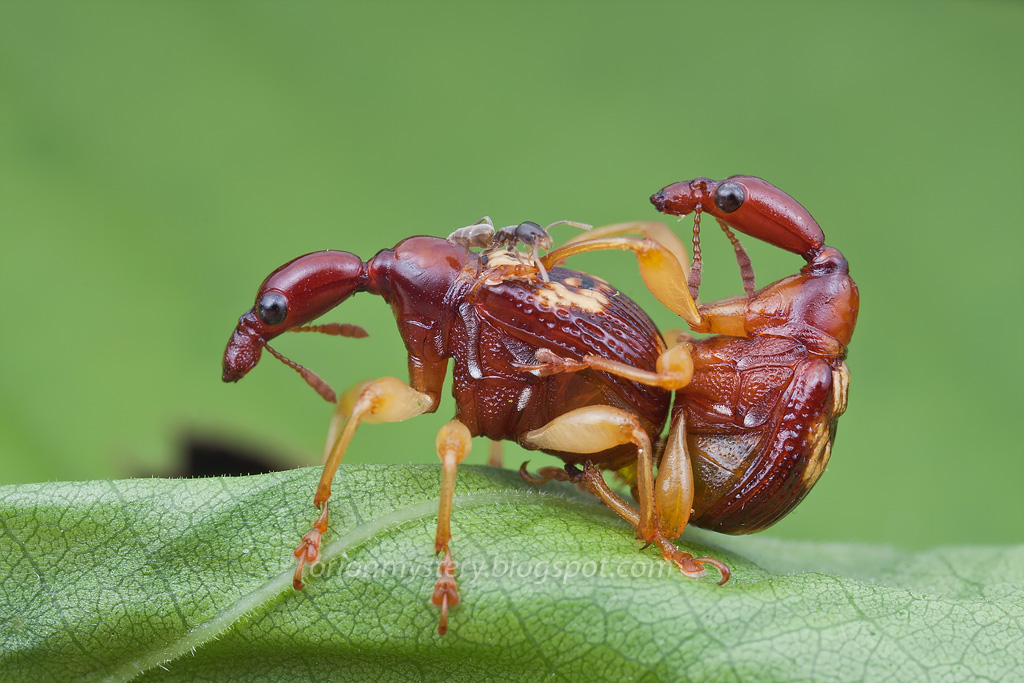 Mating pair of giraffe weevil...IMG_6546 copy by Kurt (orionmystery.blogspot.com), on Flickr
 IMG_8600 copy by Kurt (orionmystery.blogspot.com), on Flickr
I have also successfully used the 270EX speedlight for lighting on the MP-E 65.
Animated gif. If you can't view it, try clicking it to go to my Flickr page.
 270ex upside down b by Kurt (orionmystery.blogspot.com), on Flickr
Sample shots and more about it here: http://orionmystery.blogspot.com/2011/05/270ex-for-macro-improved-version.html
3 layers of thin foam as concave diffuser. 2 layers of thin foam on flash heads.
new diffuser cropped by Kurt (orionmystery.blogspot.com), on FlickrI use white surgical tape for holding the diffuser onto the adapter.
Sample shots:
Mating pair of giraffe weevil...IMG_6546 copy by Kurt (orionmystery.blogspot.com), on FlickrIMG_8600 copy by Kurt (orionmystery.blogspot.com), on FlickrI have also successfully used the 270EX speedlight for lighting on the MP-E 65.
Animated gif. If you can't view it, try clicking it to go to my Flickr page.
270ex upside down b by Kurt (orionmystery.blogspot.com), on FlickrSample shots and more about it here: http://orionmystery.blogspot.com/2011/05/270ex-for-macro-improved-version.html
Dec 1, 2014 21:11:12 #
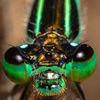
Setup #2, Canon 40D or 70D camera with 60mm macro lens, and 270EX speedlight.
I haven't blogged about this yet, but it's very similar to my friend Melvyn's rig. Still a concave diffuser, but way bigger to cater for the smaller magnification (magnification: 1x and lower, or working distance of 4-inches and longer) of the 60mm f/2 macro lens; as opposed to the MPE's 1x and higher: 4-inches and closer. The concave diffuser on the 60mm is intentionally designed to be this big because I want to be able to photograph big creatures like frogs and snakes (full body shots, big working distance) and get decent light too.
 20121217_233132-copy by Kurt (orionmystery.blogspot.com), on Flickr
Sample shots:
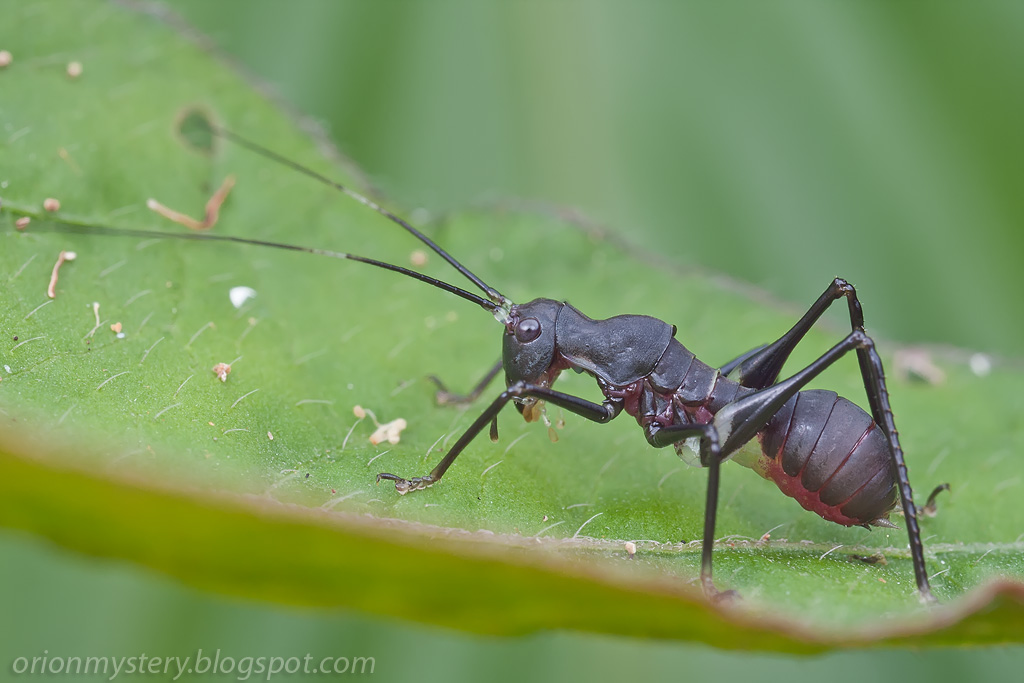
 Monkey Grasshopper IMG_4863 copy by Kurt (orionmystery.blogspot.com), on Flickr
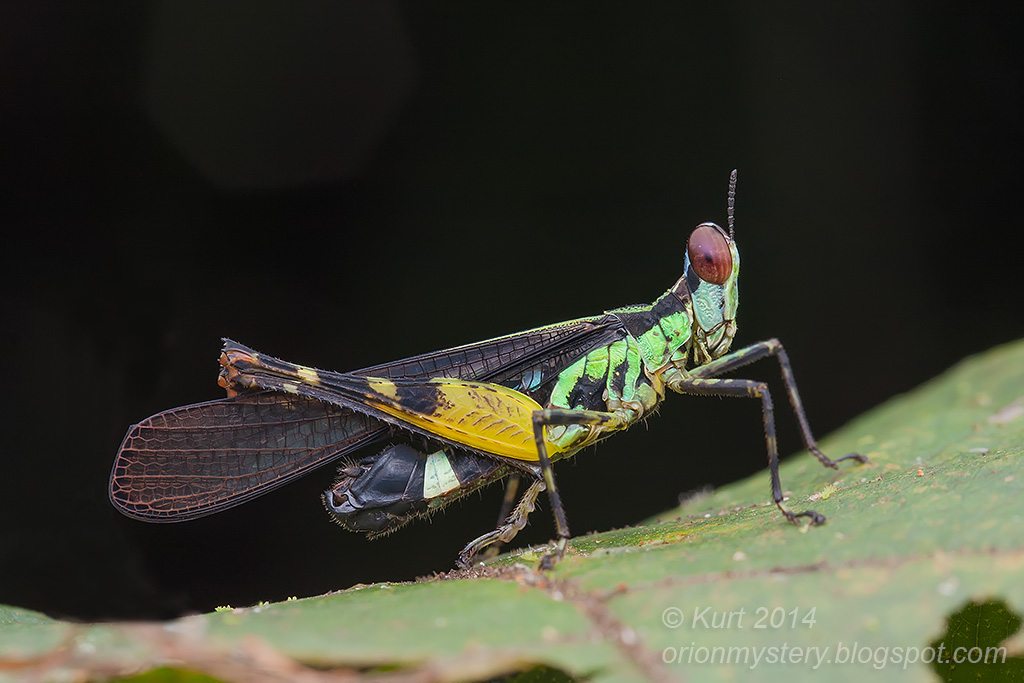
 Cyrtodactylus bintangtinggi IMG_5216 copy by Kurt (orionmystery.blogspot.com), on Flickr
I haven't blogged about this yet, but it's very similar to my friend Melvyn's rig. Still a concave diffuser, but way bigger to cater for the smaller magnification (magnification: 1x and lower, or working distance of 4-inches and longer) of the 60mm f/2 macro lens; as opposed to the MPE's 1x and higher: 4-inches and closer. The concave diffuser on the 60mm is intentionally designed to be this big because I want to be able to photograph big creatures like frogs and snakes (full body shots, big working distance) and get decent light too.
20121217_233132-copy by Kurt (orionmystery.blogspot.com), on FlickrSample shots:
Monkey Grasshopper IMG_4863 copy by Kurt (orionmystery.blogspot.com), on FlickrCyrtodactylus bintangtinggi IMG_5216 copy by Kurt (orionmystery.blogspot.com), on FlickrDec 30, 2014 21:50:53 #
Nikon D750 & 105G macro lens
Setup gleaned from this list. Many thanks to all.
Kalt L grip which I removed the clip and drilled & tapped a 1/4" hole & inserted an old mini tripod ball head into which I screwed a Chinese sync cord. I reinforced the fabric with some skewers as suggested by "Screamin Scott". Thanks!
Setup gleaned from this list. Many thanks to all.
Kalt L grip which I removed the clip and drilled & tapped a 1/4" hole & inserted an old mini tripod ball head into which I screwed a Chinese sync cord. I reinforced the fabric with some skewers as suggested by "Screamin Scott". Thanks!
Jan 14, 2015 17:32:35 #
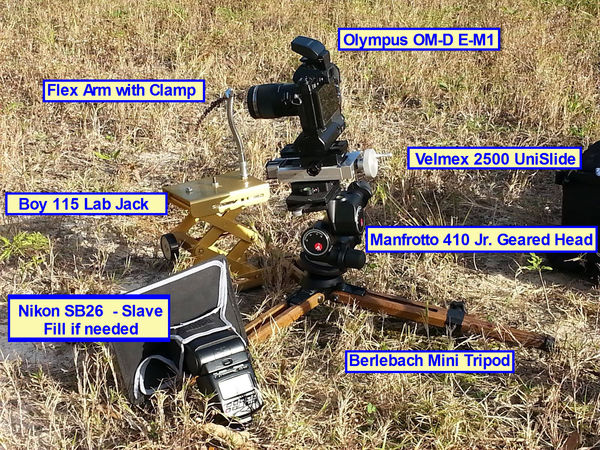
Ive been piecing this field rig together for over a year now. With the exception of the Berlebach Mini Tripod, each piece was acquired second hand either on eBay or local shops. Rig consists of the following:
Olympus OM-D E-M1
Zuiko 60mm f/2.8 Macro
Velmex 2500 Unislide w/ ~1.5 of travel
Manfrotto 410 Jr Geared Head
Berlebach Mini Tripod
Boy 115 Lab Jack w/ flex arm and clamp
Nikon SB flash and diffuser
Its a great little field rig. It can be carried in a backpack as I shoot handheld, set up for single shot ambient light macro, and field stacking. Total weight of everything pictured is 9.5lbs - an easy load in a backpack with good padding. I will skip the camera and lens review as plenty of opinions on those out there.
Velmex Unislide a lot of field stacking folks like the Newport stages, good stages no doubt, but Im not a fan of spring resistance systems. Also the stop/push block tends to loosen over time and needs to be tightened down. Not a big deal, just need an Allen wrench to cinch it down (oh wait - I forgot that at home). Velmex weighs more but is also a better build than the Newport offerings. High precision lead screw with solid milled aluminum guide, sled and end caps. Screw need to be greased every now and then but thats about it.
Manfrotto 410 Jr. Geared head This is not a cheap item, even used. It is worth every cent I paid for it. 3 axis precise control of camera position - no slips, no creep, frame it exactly how you want it, the first time.
Berlebach Mini Tripod with Leveling Base, its short but for macro you dont need tall. It weighs 2-lbs, has great dampening properties, has a built in leveling base which is great for roughing in camera position, and it just looks cool ;-)
Lab Jack and Clamp cheap pickup at local camera shop. Small tabletop tripod and clamp would work just fine.
Nikon SB-26 Like this flash for fill in since you can set it up as an optical slave and it synchs up with the Olympus at 1/320 and only the slightest bottom black bar at 1/400. Easy to attach to a flash bracket and ball socket for handheld diffused flash macro.
Jan 31, 2015 23:24:28 #
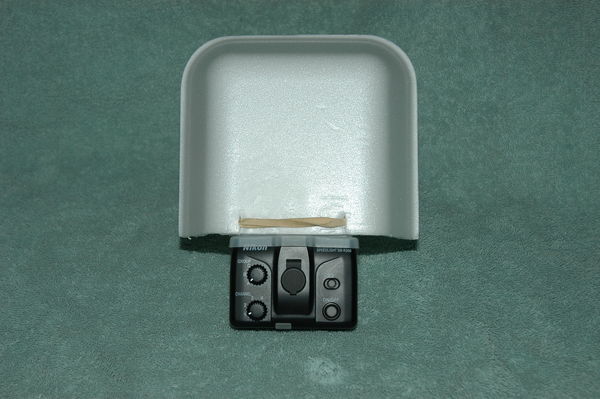
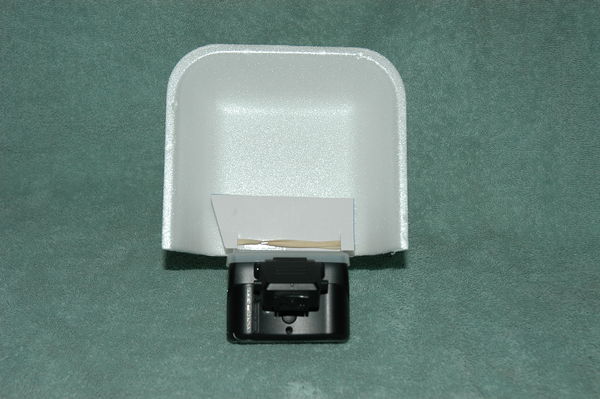
NIKON SB-R200 DIY DIFFUSER
Constructed of two each after market snap on diffusers
(http://www.ebay.com/itm/310772956707?_trksid=p2055119.m1438.l2649&ssPageName=STRK%3AMEBIDX%3AIT ); one each 6.25x10.75x1.5-inch Styrofoam meat tray; two each rubber bands; and heavy card stock (for deflectors).
These were made for a Nikkor 105D lens. they are a little short for my Sigma 180 macro lens.
I cut the Styrofoam tray in half, then cut 2 short slits on the cut end for the rubber bands (Image #1)
Cut a strip of card stock to fit across bottom of inside, cut 2 slits & slide under rubber band (Image #2)
Cover with paper towel (Image #3)
Mar 11, 2015 12:11:44 #
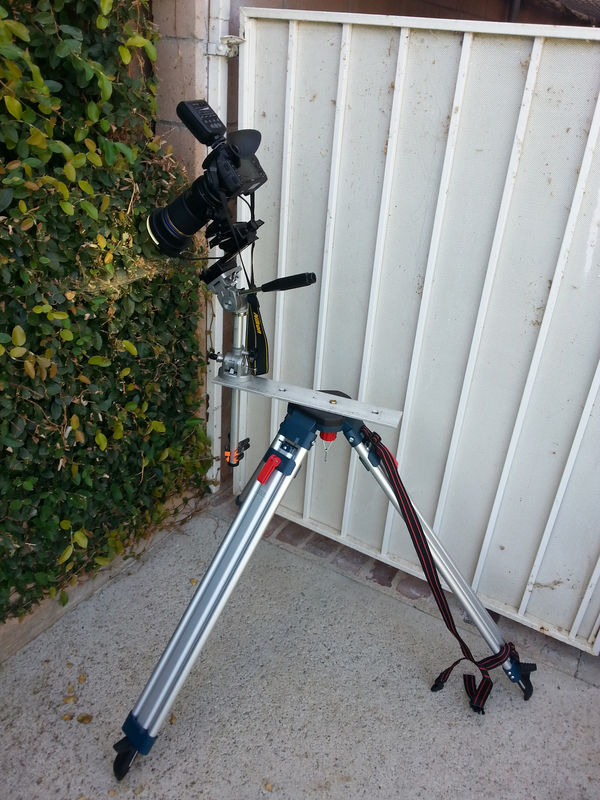
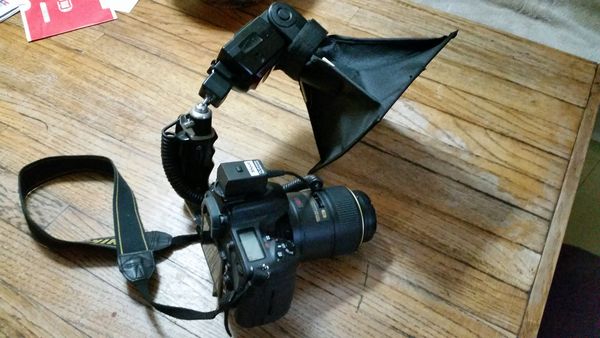
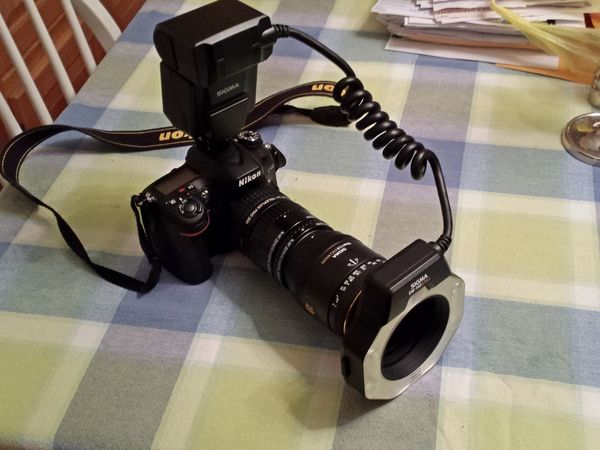
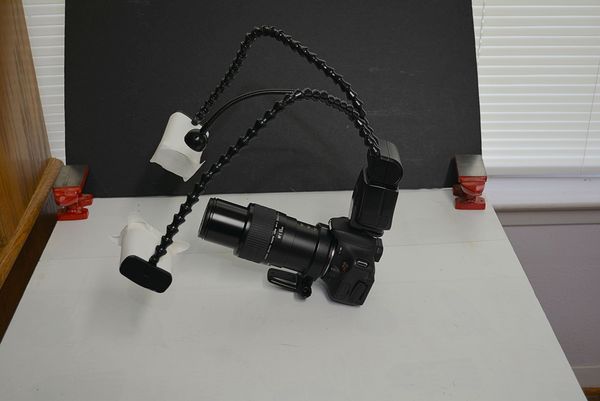
Nikon D7000, Nikkor AI-s 105mm macro, 68mm set Kenko Auto Extension Tubes, Nikon SB-28 speedlight with FotoDiox 6x8-in softbox diffuser, Kalt L-grip bracket, ball-joint shoe extender, Vello TTL off-camera hotshoe cord
With the flash tilted forward like in the picture, I shoot at ISO 100, 1/4 - 1/8 flash power, 1/125-sec at f/11 - f/16. Sometimes, the diffuser hits a branch so then I tilt back, angle the head at 90* and shoot at ISO 160.
With the flash tilted forward like in the picture, I shoot at ISO 100, 1/4 - 1/8 flash power, 1/125-sec at f/11 - f/16. Sometimes, the diffuser hits a branch so then I tilt back, angle the head at 90* and shoot at ISO 160.
Mar 11, 2015 18:24:57 #
Nikon D7100, Sigma 70mm macro, Kenko 2x Teleplus Pro300 TeleConverter, Ziekos extension tubes with Sigma EM-140 DG ringflash.
Set-up for "close as I can currently get" macro at the moment. In the field, I wouldd like to try the 2x TC for a bit more working distance with my 70mm (without the tubes of course).
Set-up for "close as I can currently get" macro at the moment. In the field, I wouldd like to try the 2x TC for a bit more working distance with my 70mm (without the tubes of course).
Mar 11, 2015 19:51:09 #
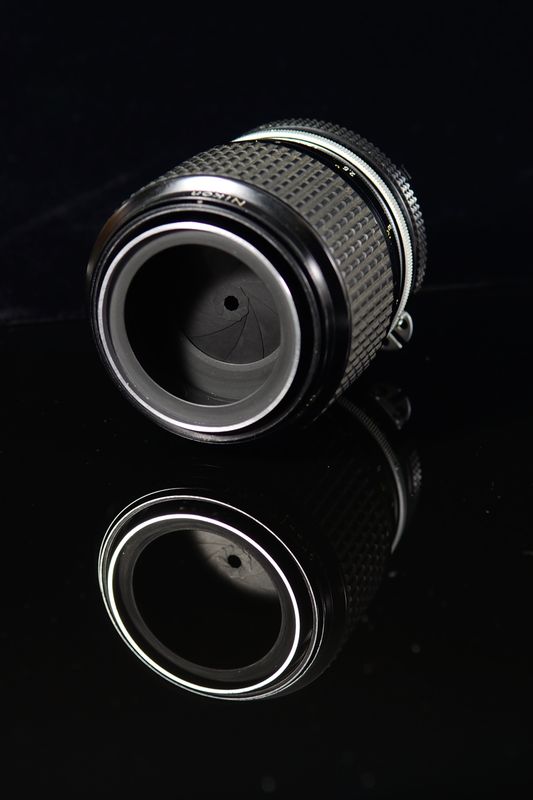
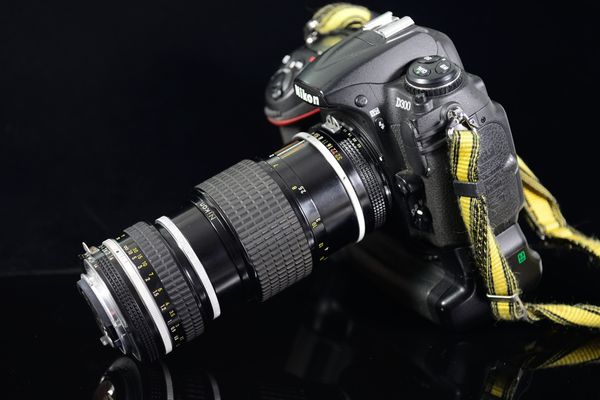
DIY extension tube, converted from a Nikkor Ai 200-mm f/4 lens, retaining auto-aperture for reverse-mounted lens.
Extends from 75mm to 103mm (mags of 2.4x to 2.8x with a reversed 50mm lens)
More images at http://www.uglyhedgehog.com/t-282612-1.html
Extends from 75mm to 103mm (mags of 2.4x to 2.8x with a reversed 50mm lens)
More images at http://www.uglyhedgehog.com/t-282612-1.html
200-mm lens with optics removed
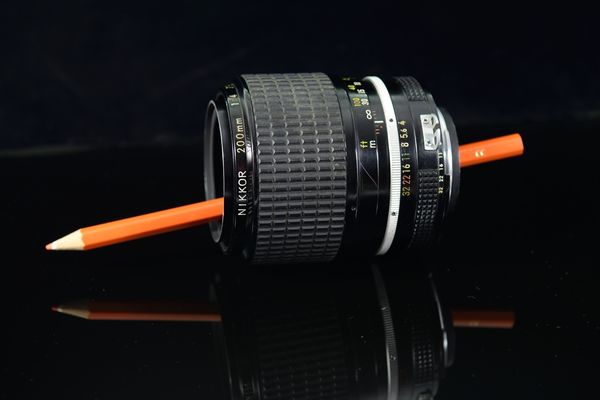
(Download)
Converted 200-mm lens with retained auto-aperture
(Download)
DIY extension tube with reverse-mounted 50-mm lens
(Download)
May 12, 2015 22:52:12 #
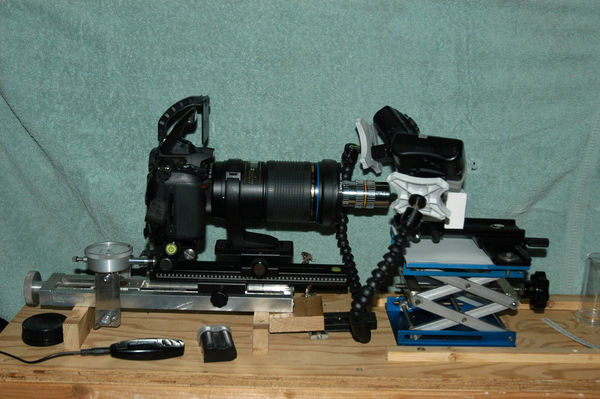
Microscope objective set-up
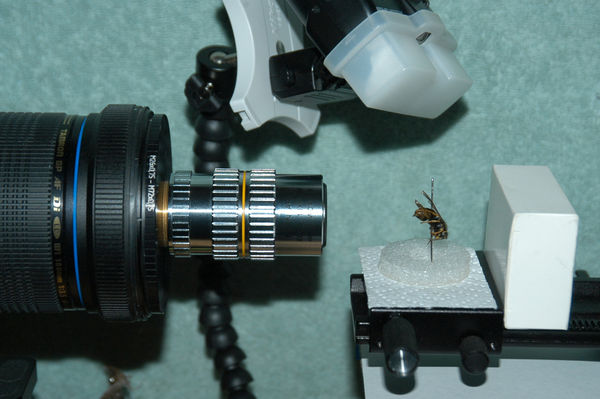
The rig: Nikon D7000 with Tamron 180mm macro lens, Plan APO ELWD 10x 0.28 microscope objective, WD 33.5mm, mounted in an RAFcamera (in Moscow) lens adapter. All of this is mounted on a (long lens) double arca dovetail bracket which is mounted to a Velmex A2500 Unislide with a dial indicator for accurate manual stepping. In front of this is a lab jack with inexpensive focus rails mounted for X-Y adjustment of specimen platform. Two wireless Nikon SB R-200 flash units with cotton filled snap on diffusers @ 1/4 power mounted on dual flex arm bracket (from China). All this is mounted on 3/4 plywood & 2x4 base. I'll be adding a 4x6 to this to help absorb more vibration.
The rig: Nikon D7000 with Tamron 180mm macro lens, Plan APO ELWD 10x 0.28 microscope objective, WD 33.5mm, mounted in an RAFcamera (in Moscow) lens adapter. All of this is mounted on a (long lens) double arca dovetail bracket which is mounted to a Velmex A2500 Unislide with a dial indicator for accurate manual stepping. In front of this is a lab jack with inexpensive focus rails mounted for X-Y adjustment of specimen platform. Two wireless Nikon SB R-200 flash units with cotton filled snap on diffusers @ 1/4 power mounted on dual flex arm bracket (from China). All this is mounted on 3/4 plywood & 2x4 base. I'll be adding a 4x6 to this to help absorb more vibration.
Aug 30, 2015 11:40:00 #
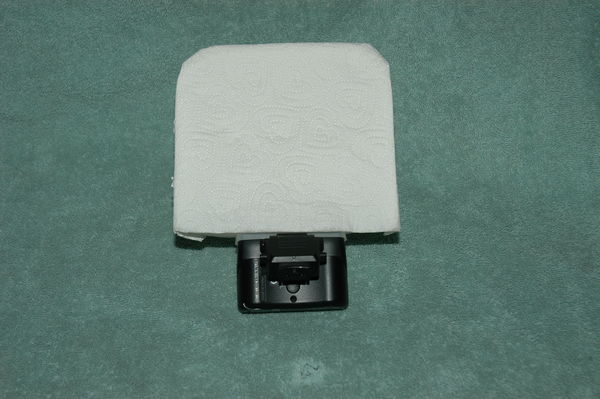
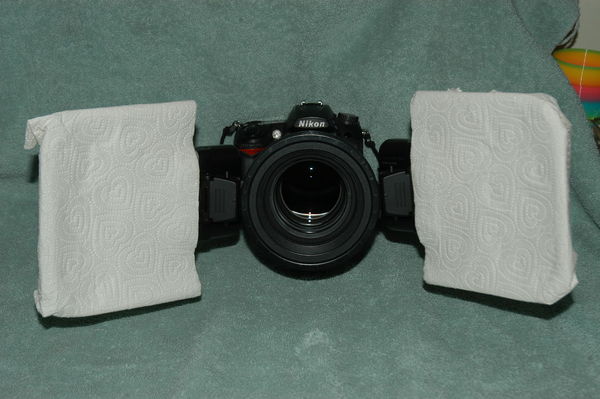
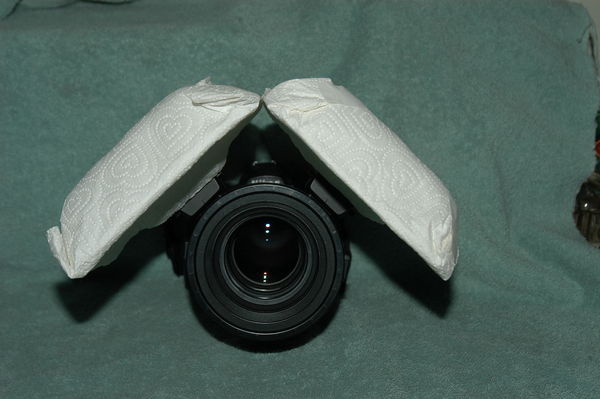
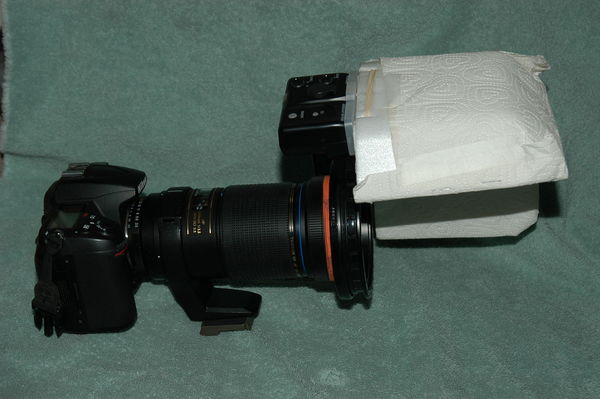
My current macro set-up: Nikon D5200 (or D7100), Sigma 150mm macro lens with 68-mm extension tubes, Yongnuo 560-II speedlight with DIY softbox diffuser & single-thickness paper towel face. Slik SBH-100 Compact Ballhead bolt-mounted to Kalt L-grip (drilled a hole through shoe). ETTL cord base threads to ballhead bolt.
My other set up is Canon T3i, MPE 65 macro lens, KX-800 speed light system, with home made diffuser.
My other set up is Canon T3i, MPE 65 macro lens, KX-800 speed light system, with home made diffuser.
If you want to reply, then register here. Registration is free and your account is created instantly, so you can post right away.