problems shooting the sky
Dec 17, 2012 04:37:16 #
Elisafox22
Loc: Aberdeenshire Scotland
So here's my problem - one that has had me scratching my head for years!
How to shoot the sky without having the land in silhouette?
Where I live I'm in a valley, in the country, so I have wide open skies, and interesting trees, farmland and the village to feature in the foreground.
Light effects are so fleeting - and sunrise and sunset can be wonderful.
So here's what I've tried, and what results I've had.
Until this summer my main camera was a Nikon D80. I tried using HDR, but the settings were very finicky, and I ended up keeping the camera permanently set for HDR. It involved 3 bracketted shots that I had then to assemble in Photoshop. The process was not very successful, and usually ended up with a bleached foreground and an unconvincing result!
Things changed when I got a new Sony RX100. It's an amazing little camera (but that's another story!)
HDR is now easy to access, and I can set it to take 3 shots with a Exposure Diff up to 6EV. The shots are stiched in the camera itself.
It should be perfect for my needs. But the results have been disappointing. The best results for the quality and clarity of the sky still come from a concentration on the sky itself, and the foreground in silhouette. And I tend to cut the silhouette to a minimum, which is a shame.
My latest and most recent move has been to sell my Nikon, and replace it with a second Sony, the new NEX6. I want to have more lens options to experiment with. So my idea now is to use filters. I've ordered an ND Fader, and maybe I should think about a ND Grad? The idea of being able to graduate the light across the lens sounds good - probably better that trying to marry over and under exposed shots?
Any ideas and suggestions would be most welcome!
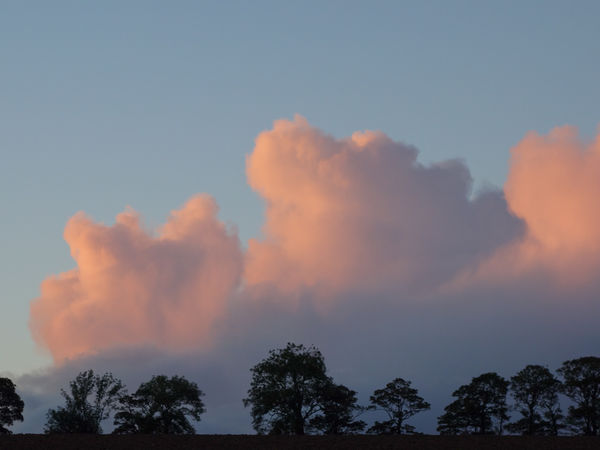
here I've cut the field, and the trees are silhouette
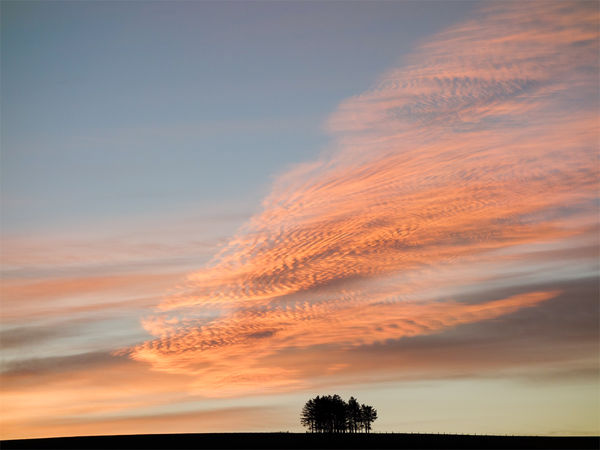
this was before the sun rose over the hill
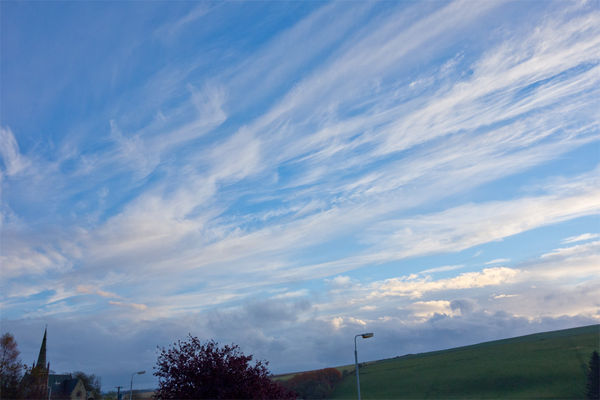
and this one is the closest I've come to having some foreground colour
Dec 17, 2012 05:01:13 #
Dec 17, 2012 05:50:22 #
Hi,
As Lighthouse says an ND grad is the best answer to this perrenial problem. However, graduated filters, as you know come in different densities, so what is the answer?. Well the way that I deal with this sittuation is firstly make sure that you shoot in RAW. Then when you open your raw conversion software firstly adust the sky to give you the result you want, then save that image, after that open your raw image again, onlythis time adjust the exposure to give you the detail you want in the lower half of your image. This will make the sky looked burned out, Next open the two images in PS and blend them together, Hey Presto! you have the image with both the sky and foreground exposed perfectly. It is easy and a relatively quick way of solving the problem without having to purchase expensive ND filters of different strengths. Give it ia try and Good Luck. Norman.
As Lighthouse says an ND grad is the best answer to this perrenial problem. However, graduated filters, as you know come in different densities, so what is the answer?. Well the way that I deal with this sittuation is firstly make sure that you shoot in RAW. Then when you open your raw conversion software firstly adust the sky to give you the result you want, then save that image, after that open your raw image again, onlythis time adjust the exposure to give you the detail you want in the lower half of your image. This will make the sky looked burned out, Next open the two images in PS and blend them together, Hey Presto! you have the image with both the sky and foreground exposed perfectly. It is easy and a relatively quick way of solving the problem without having to purchase expensive ND filters of different strengths. Give it ia try and Good Luck. Norman.
Dec 17, 2012 06:19:36 #
Dave333
Loc: Forres, Scotland
Hi. I agree an ND grad is the way to go. Making 2 jpg's out of 1 RAW is a solution. I also shoot in RAW but if reqd I will fit a ND grad on the idea get it right in camera then if adjustments are required I can do it at the conversion stage from RAW to JPG and not need to make 2 pics to merge into 1. Set your camera to aperture priority. select your f stop. take a light reading from the land this gives shutter speed 1 now take a reading from the sky this gives shutter speed 2. If speed 2 is about twice as fast as speed 1 you will need a 1 stop ND grad. If 2 is four times faster than 1 a 2 stop grad required, etc. Now fit the grad to camera and adjust untiltransition point is on the horizon/ top of land. Take picture in RAW open in ACR (I use Elements 10) adjust recovery slider if necessary. I some times just stick a 2 stop on the camera and trust to processing not ideal I know but if I get a picture I like I am happy. Good luck.
Dec 17, 2012 06:23:09 #
Dave333
Loc: Forres, Scotland
P.S I like 1 & 2 having the trees as silhouettes if they had colour the pictures would not be so striking.
Dec 17, 2012 07:54:51 #
Elisafox22
Loc: Aberdeenshire Scotland
Thanks for the suggestions. Yes, I do like some of the silhouette effects ... but I'd like to have a wider palette of colours on offer. The trees can have some amazing colour effects ;o)
I do shoot RAW + Jpeg when possible, and agree that Photoshop's Camera RAW is great for adjustments. Currently I'm having to convert to Adobe DNG first, as Adobe are refusing to support the 2 Sony cameras I have - unless you upgrade to CS6. And I admit that I'd rather find a solution that doesn't depend on 'post production'.
But the double RAW is one I'll go try out. And I'll post the results - and see if I can make it work
Dec 17, 2012 16:16:20 #
Dave333
Loc: Forres, Scotland
Some nice pics on flickr. Wondered what that big square thing was, you can see a bit of it from my son's kitchen window. Like the pheasant shots remind me of grouse time to get the bottle out and have a wee dram. It would be nice if next time you see the bird you tried to get down to its level instead of shooting from above.
Dec 17, 2012 16:46:00 #
Elisafox22
Loc: Aberdeenshire Scotland
Hi Dave, Thanks for the comments on the Flickr shots. I've just started using it, and am slowly putting photos up there. It's a great way to keep your original photos safely stored, as well as giving a place to show them ;o)
The pheasants shots were so difficult to capture - like all the birds around here they are rarely still. Only the seagulls at the coast will approach us ... looking for food. So it a case of grabbing the fleeting shot when you can.
Hmmm! Yes - the connection with grouse is resonant! And it is the time of the year to bring out the single malts ;o)
Dec 18, 2012 05:29:18 #
Elisafox22
Loc: Aberdeenshire Scotland
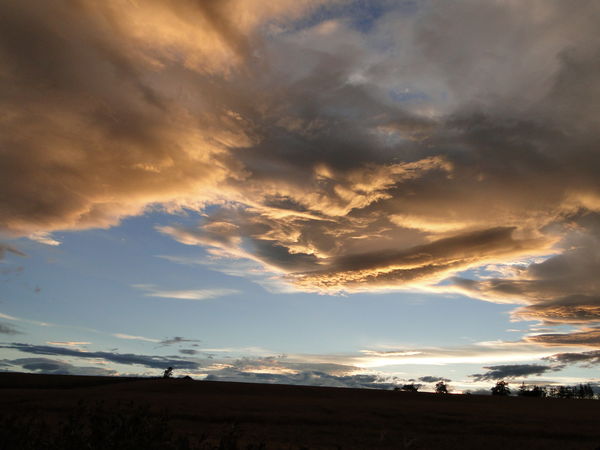
well here is a photo from July that I've worked on using Photoshop to merge 2 shots. One is the original and the other has been adjusted to feature the foreground. The original shot is first.
It took me over an hour to come up with the 'solution' shot. A plus point for the ND Fader/Grad
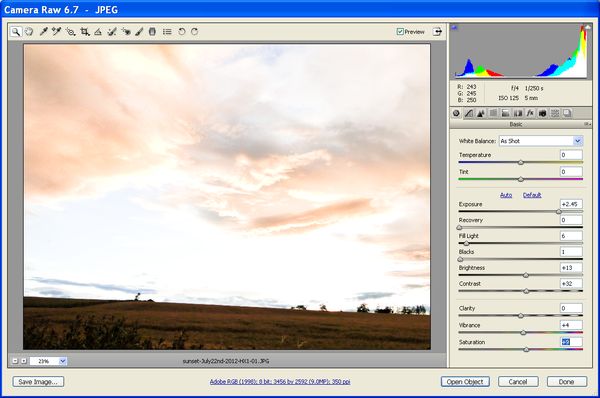
The problems arise when you simply remove the dark foreground and substitute the lighter one. The trees remain in silhouette on the horizon, as it is almost impossible to lighten the branches without bleaching the skyline itself.
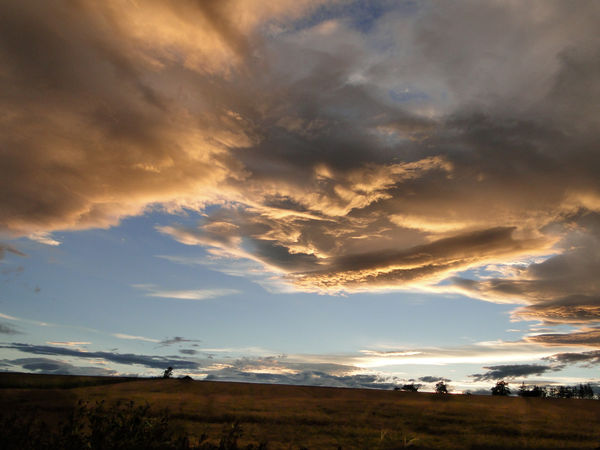
Then a simple wiping out of the foreground reveals a light foreground that doesn't marry with the sky in tonal values, and looks very artificial. It is also very 'flat' in tonal range. So I tried to use 4 gradations of 'wipe' to the foreground. to try and make it look convincing. Not sure I succeeded.
What do you think?
It took me over an hour to come up with the 'solution' shot. A plus point for the ND Fader/Grad
The problems arise when you simply remove the dark foreground and substitute the lighter one. The trees remain in silhouette on the horizon, as it is almost impossible to lighten the branches without bleaching the skyline itself.
Then a simple wiping out of the foreground reveals a light foreground that doesn't marry with the sky in tonal values, and looks very artificial. It is also very 'flat' in tonal range. So I tried to use 4 gradations of 'wipe' to the foreground. to try and make it look convincing. Not sure I succeeded.
What do you think?
This is the original
this is the PS 'bleaching' of the sky to reveal the foreground
this is the final photo with 'added' shadows etc
Dec 18, 2012 05:57:10 #
3Stripes
Loc: Rocester, UK
I always take 2 shots. The first exposed for the sky and the second exposed for the foreground etc. Then simply overlay the 2 in PP. Works for me!
I have a set of various NDs on my Christmas list, question is, have I been a good enough boy for Santa to deliver them? Hmmm....not so sure. :)
I have a set of various NDs on my Christmas list, question is, have I been a good enough boy for Santa to deliver them? Hmmm....not so sure. :)
Dec 18, 2012 09:29:27 #

Elisafox22, thank you for the posting this interesting thread. My first response was to leave the silhouettes alone and to increase the drama in the sky. However, having seen what you did in Photoshop made me realize that more foreground detail could help the picture.
I have CS5 which has a very useful tool for selecting delicate subjects such as those trees. Once you select the foreground, a control called "Refine Edge" appears on the toolbar. You can learn more about this in these links.
http://psd.tutsplus.com/tutorials/photo-effects-tutorials/selecting-hair/
http://russellbrown.com/tips_tech.html Scroll down to episodes CS5_007 and CS5_008. Russell Brown from Adobe is about the best teacher of Photoshop if not the most enthusiastic one.
Finally, here is another approach.
http://layersmagazine.com/exposure-blending-in-photoshop.html
Good luck.
Dec 18, 2012 09:34:48 #
I have done quite a lot of this type of work. It is just my way of doing things, if it works for you, that would be great.
I usually use exposure compensation and take 2-3 or even 4 photos so that in each of them i get different exposure focused for sky and the land.
In photoshop CS5/CS6 i either stack them to create an perfect image or i try to create HDR image out of them. This works very well with a very crispy image.
If you plan to do so, please make sure to use the tripod and use a proper DOF(Depth of Field, say around f11 to f16).
Again you can also process each image from RAW and then take them to the level for either stacking or creating HDR.
Dec 18, 2012 14:25:49 #
Elisafox22
Loc: Aberdeenshire Scotland
Thanks ABC123! I use CS5 so I will check out those tutorials. So glad you agree that sometimes the foreground can add a dimension to the sky shot. The image I chose doesn't have an arresting quality - but it does point up the vastness of the sky itself.
I might be a bit slow getting back with results, as Xmas and accompanying celebrations are demanding more and more time! But I'll post as soon as I can ;o)
I might be a bit slow getting back with results, as Xmas and accompanying celebrations are demanding more and more time! But I'll post as soon as I can ;o)
Dec 18, 2012 14:28:45 #
Elisafox22
Loc: Aberdeenshire Scotland
Thanks mariraju. I had not paid much attention to the Dof F.But will do so. I usually use a tripod or monopod, as we are in a windy area here, and even flower shots are difficult to get most days ;o)
Dec 18, 2012 14:41:44 #

You can keep buying camera bodies or:
Buy a good HDR program/plug-in - There are a bunch out there to choose from; just search UHH
Buy a good graduated ND filter. The Cokin style probably work best because you can position them in the filter holder to meet your needs and they come it various ranges for stopping the light in the sky. This allows for a longer exposure of the landscape.
Or, get a good tutorial on how to use the HDR program built into CS5. I see that you have ACR 6.7 which comes with CS5. If you upgrade to CS6, the HDR Pro that comes has been improved to use 32 bit images. What an improvement! I also see that you use ACR 6.7 on jpg images. You have got to start shooting in raw so that you have more data to work with for achieving the best HDR details on your shadows. You are spinning your wheels working on jpg's for HDR.
If you want to reply, then register here. Registration is free and your account is created instantly, so you can post right away.