Nature of problems seen using single element closeup lens
Aug 22, 2022 16:05:59 #

I had forgotten I had a set of Tiffen closeup lenses, +1, +2 and +4, and I decided to look at some results using these filters. Normally, I use the multi-element closeup lenses such as Raynox, Canon 500d and a set by Minolta labeled as #0, #1 and #2 which are close to +1, +2 and +4.
The street advice on single element closeup lenses was that they are relatively sharp in the center, but subject to CA closer to the edges. I wanted to see if I got similar results.
The filters were 62mm filters, and I decided to use them with my Olympus EM1ii and the Oly 75-300mm lens. For this lens, only needed a 58 to 62mm step up ring. I will show only the results using the Tiffen +4 closeup lens.
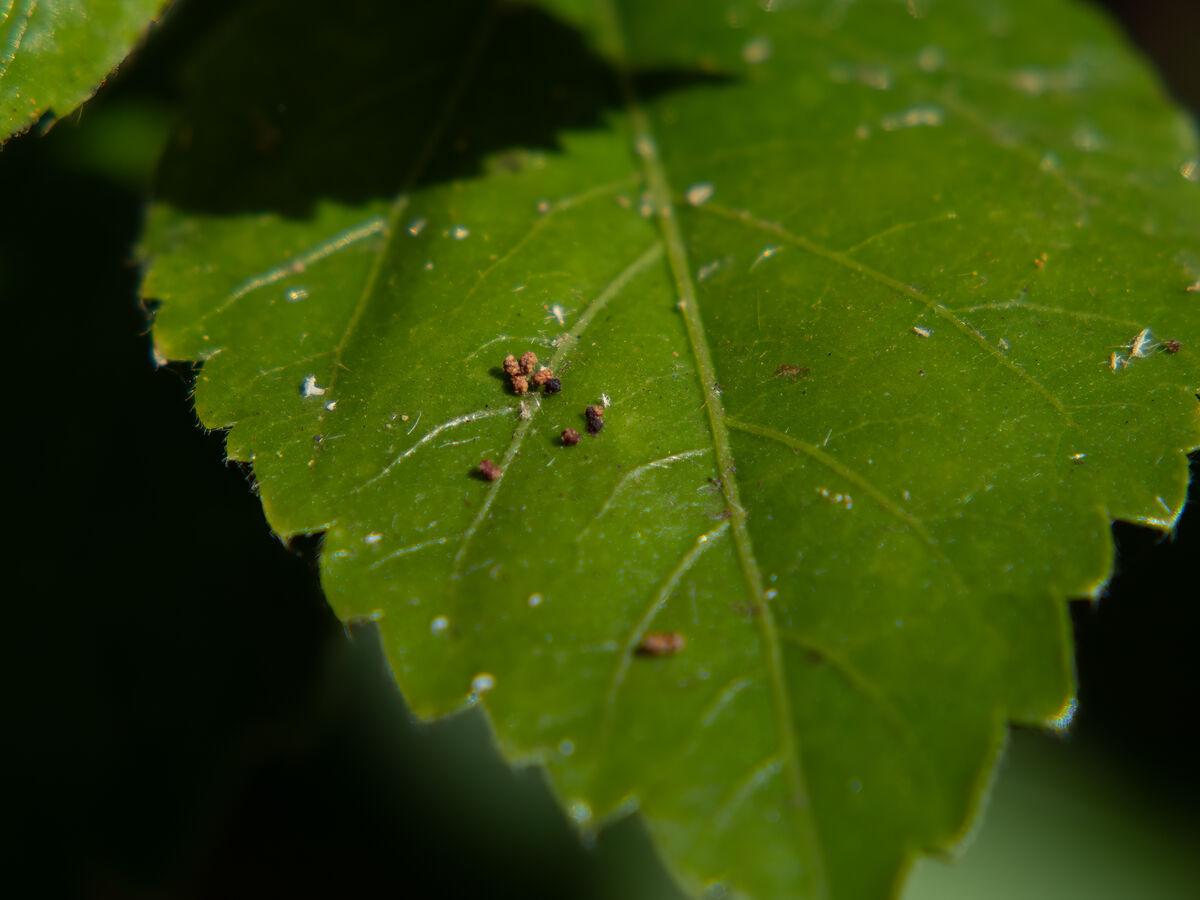
First target was a left on my Hibiscus plant. I handheld which is not that easy with a gentle breeze periodically blowing.
First image is that leaf, followed by a closeup of the left edge showing some CA, and then the same view show the CA dealt with in Photoshop. Lightroom didn't do such a good job on this CA, and in Photoshop, I used the method where I add a layer where I add a gaussian blur and then change the blending mode to color. This did a better job than Lightroom, but you can still see effects of CA even though the color problem is gone. The area still retains a white haze where the CA had been. There are other places on the closeup where the CA fix actually worked well as you compare the two images.
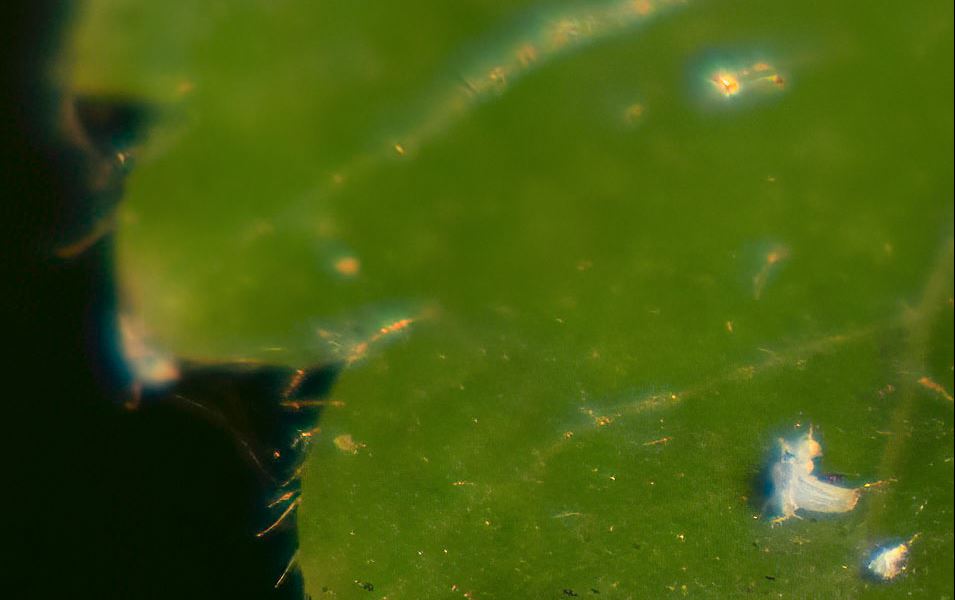
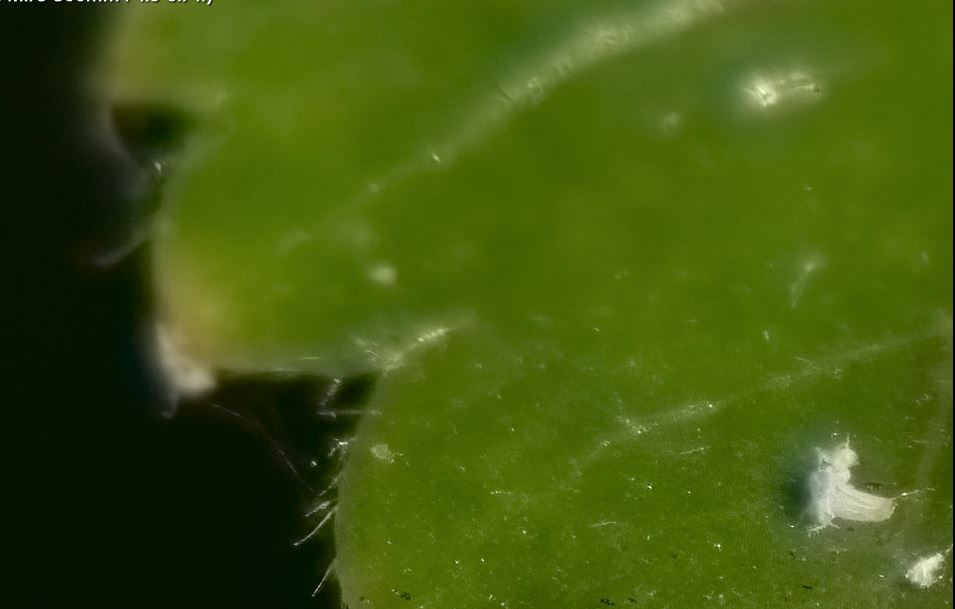
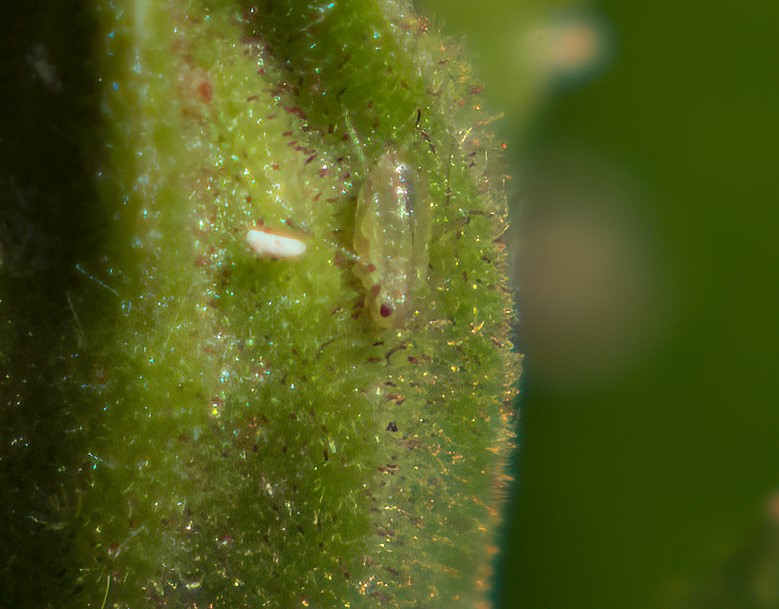
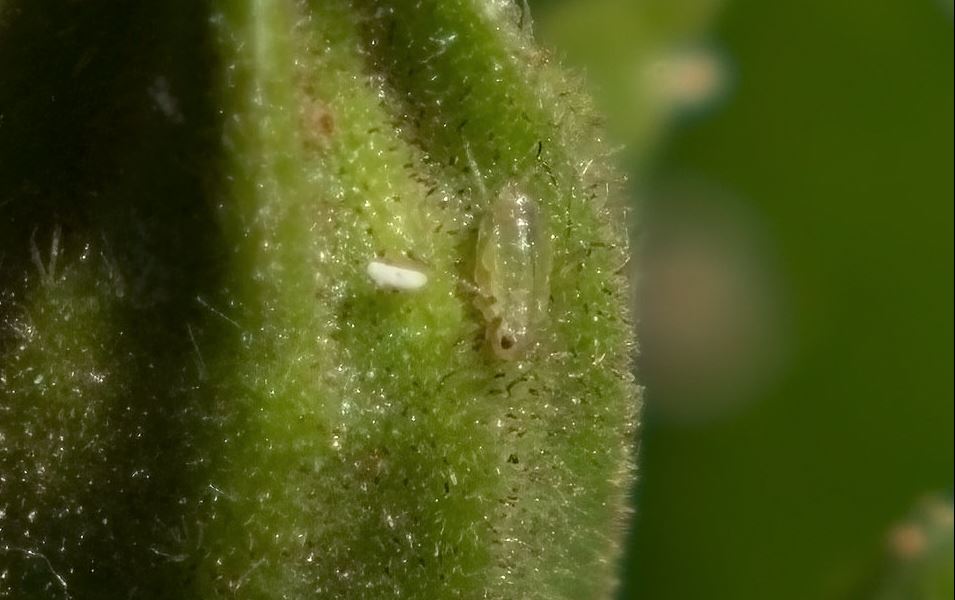
Send target is an unopened flower where there is a focused aphid. This is the center of the image, and CA is not an issue as you can see in the closeup.
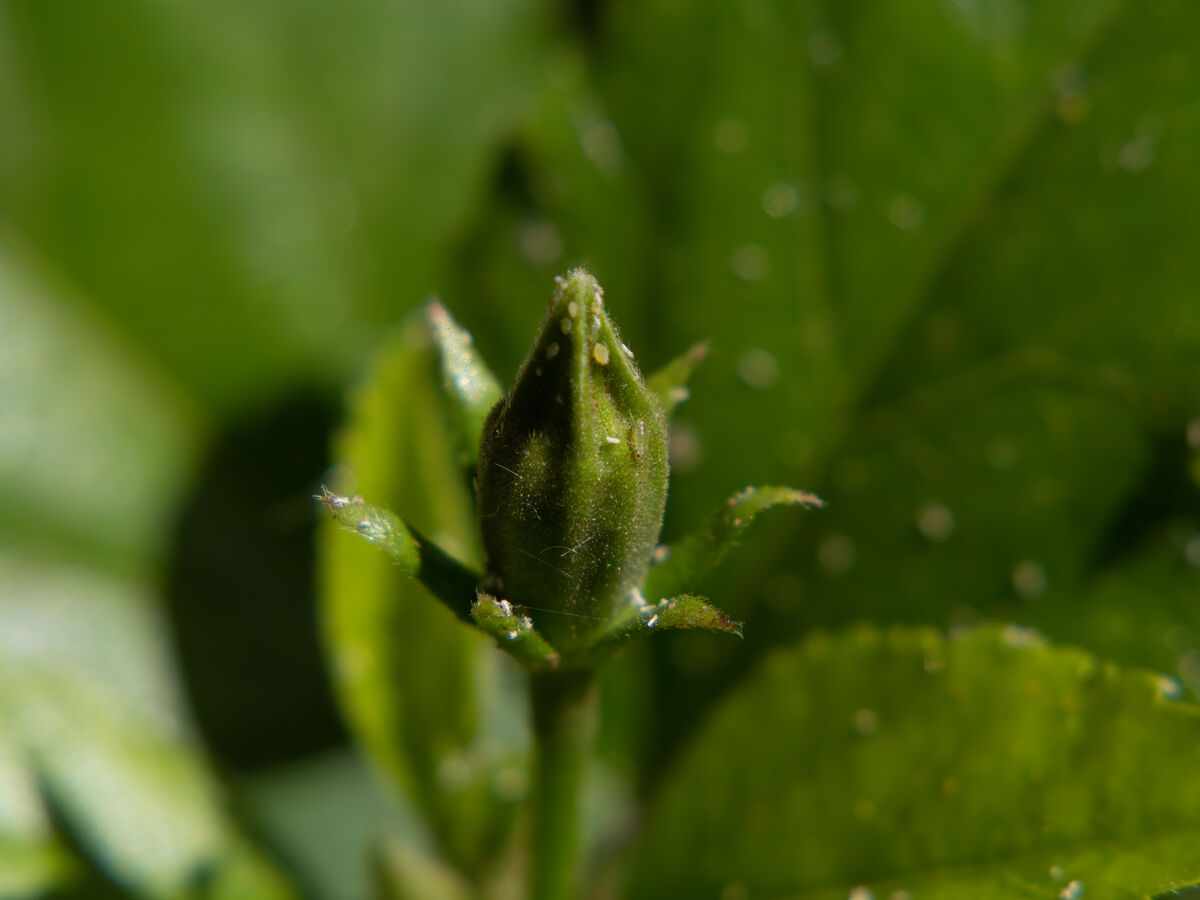
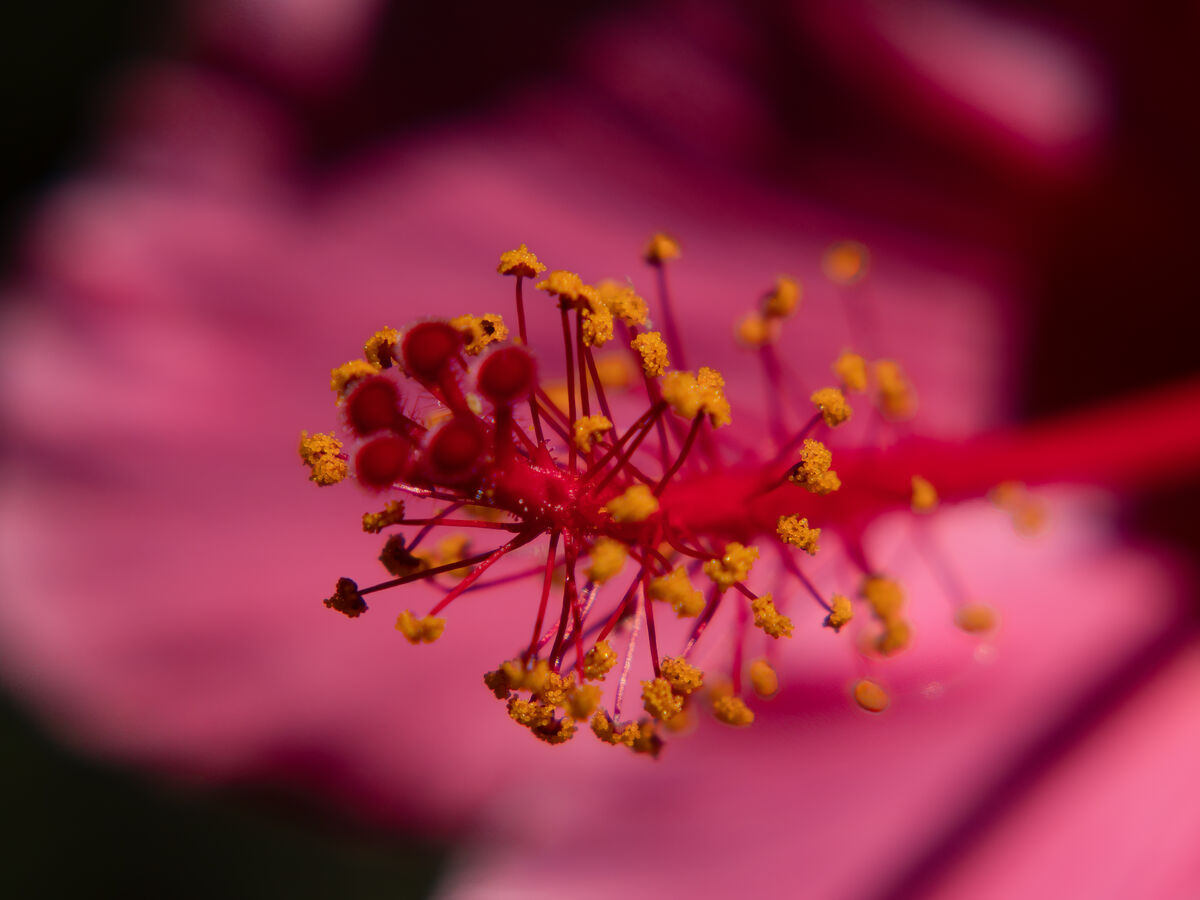
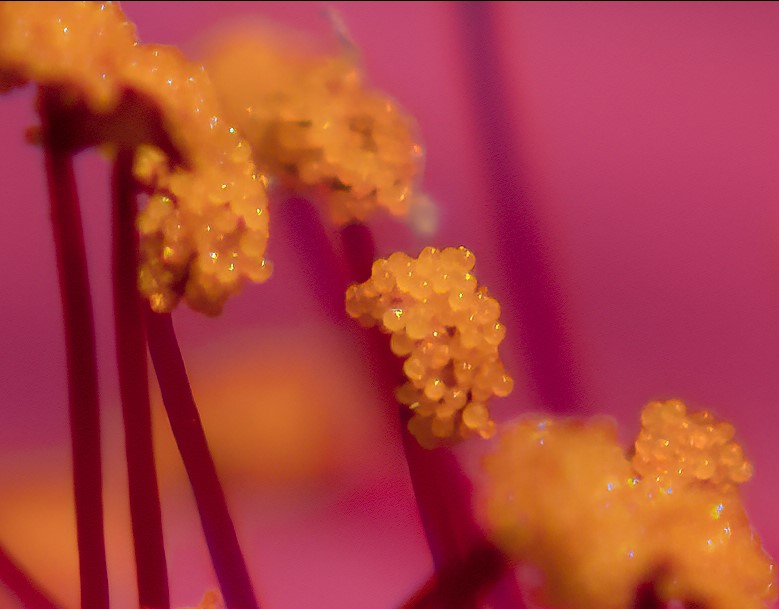
Third target is an open flower. Again, near center and CA is not an issue. The closeup shows the little pollen sacs that appear to be in good focus.
My opinion of what I am seeing from this experiment seems to confirm the story line about CA with single element closeup lenses. But for some of it, I could fix the CA. But Lightroom did not help with the CA problem. It took going to Photoshop and carefully using the gaussian blur. But be aware that too much gaussian blur is not so good either and makes a mess. You need to carefully add gaussian blur until in the magnified view, it just barely blurs out the CA. Then change the blending mode to color and flatten the image.
The street advice on single element closeup lenses was that they are relatively sharp in the center, but subject to CA closer to the edges. I wanted to see if I got similar results.
The filters were 62mm filters, and I decided to use them with my Olympus EM1ii and the Oly 75-300mm lens. For this lens, only needed a 58 to 62mm step up ring. I will show only the results using the Tiffen +4 closeup lens.
First target was a left on my Hibiscus plant. I handheld which is not that easy with a gentle breeze periodically blowing.
First image is that leaf, followed by a closeup of the left edge showing some CA, and then the same view show the CA dealt with in Photoshop. Lightroom didn't do such a good job on this CA, and in Photoshop, I used the method where I add a layer where I add a gaussian blur and then change the blending mode to color. This did a better job than Lightroom, but you can still see effects of CA even though the color problem is gone. The area still retains a white haze where the CA had been. There are other places on the closeup where the CA fix actually worked well as you compare the two images.
Send target is an unopened flower where there is a focused aphid. This is the center of the image, and CA is not an issue as you can see in the closeup.
Third target is an open flower. Again, near center and CA is not an issue. The closeup shows the little pollen sacs that appear to be in good focus.
My opinion of what I am seeing from this experiment seems to confirm the story line about CA with single element closeup lenses. But for some of it, I could fix the CA. But Lightroom did not help with the CA problem. It took going to Photoshop and carefully using the gaussian blur. But be aware that too much gaussian blur is not so good either and makes a mess. You need to carefully add gaussian blur until in the magnified view, it just barely blurs out the CA. Then change the blending mode to color and flatten the image.
Hibiscus leaf with +4 filter. Lens FL = 109mm
(Download)
Closeup of left of leaf showing CA
After Photoshop fix of CA
Unopened Hibiscus flower
(Download)
Closeup showing the aphid. Something white to the left with CA.
Closeup with CA fixed in Photoshop with Gaussian Blur
Open flower
(Download)
Closeup of the pollen sacs. Conditions not ripe for CA to be produced.
Aug 22, 2022 16:16:35 #

Very nice work, Jim. Lightroom has a CA adjustment in the "Lens Adjustment" module. Did you use that?
Aug 22, 2022 16:43:59 #

JimH123 wrote:
I had forgotten I had a set of Tiffen closeup lens... (show quote)
Love those pollen sacs ❤️❤️❤️❤️❤️
Check out Sports Photography section of our forum.
Aug 22, 2022 16:48:13 #
UTMike wrote:
Very nice work, Jim. Lightroom has a CA adjustment in the "Lens Adjustment" module. Did you use that?
Yes, I did try LR first. It didn't work so good on this CA. Some kinds of CA, it is good at. But not this CA.
Aug 22, 2022 20:33:21 #

Here are a few suggestions I have - having experience over many years concerning close up lenses.
The closer you get the close up lens to the native lens the better. IOW, do not use any stepping rings if possible - OTOH,
The larger the diameter of the close up lens, the better. IOW, if you have a lens with a 58mm filter size using a step up ring with 67mm diameter close up lens is better. I can cite no scientific equations or internet sites/links that support this - I am using common sense and experience. The more powerful the diopter, the larger advantage for it being bigger ! ......
Showing CA is just a symptom of the underlying general softness to the image .......
.
Aug 22, 2022 22:53:03 #
imagemeister wrote:
Here are a few suggestions I have - having experie... (show quote)
When lenses are ground, the most accurate portion of the ground lens is the center portion. The edges tend to not be quite as accurate. I suspect that this is the reason you are seeing this effect. And it makes sense.
And yes, you would want the closeup lens to be as close as possible to the lens.
Some closeup lenses exhibit no CA at all. This test that I was doing was using a single element closeup lens. I bought this pack of 3 Tiffen closeup lenses perhaps 15 years ago and had remembered that I had them. Single element closeup lenses are known to exhibit CA. And I wanted to see for myself that this was true. And it was.
The closeup lenses I like to use are the following (and all of them are multi-elements): Raynox 150 -- +4.8 diopters. Nice, but the lens is rather small which limits what lenses it can be used with. Canon 500d -- This is +2 diopter, and it is larger with 77mm thread size. One of my favorites to use. And a 3 piece set made by Minolta. They call them #0, a +0.94 diopter, #1, a +2 diopter, and #2, a +3.8 diopter. This group of lenses is a 55mm thread size. I have bought them all used over a number of years.
Some say to stack closeup lenses for increasing the diopter value. I tend to not do this.
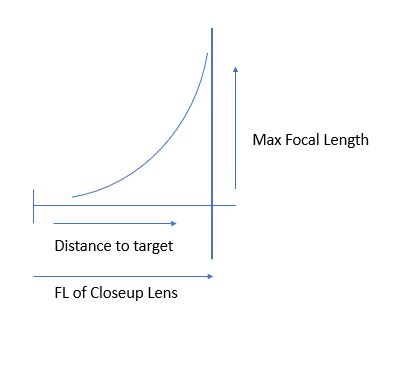
First image is a model of how close up lens works. The bottom axis is the distance to the target with the end stop being the Focal Length of the closeup lens. For example, a +2 diopter would be 1000mm/+2 = 500mm. Or a +4 diopter would be 1000mm/+4 = 250mm.
The vertical axis is the max focal length that can be used at a given distance.
I figured out this behavior using my Nikon P1000 which has a range of 24mm to 3000mm (equiv FL). What I found was that if the camera/closeup lens is farther away than the FL of the closeup lens, you can never achieve focus with the camera. You have to be at a distance less than the FL of the closeup lens. Using the P1000, I managed to put it at a distance just a hair less than the FL of the closeup lens, and was able to go out to 3000mm and achieve focus. But this amount of magnification is like chasing infinity and would never be of use since it is just too hard to achieve.
Backing down the curve shows how the max FL of the camera drops off following the curve on the graph. Also, at the distance you pick, all focal lengths less than the max that the curve represents can be focused also. And as the distance to the target becomes less and less, the max FL falls off rapidly.
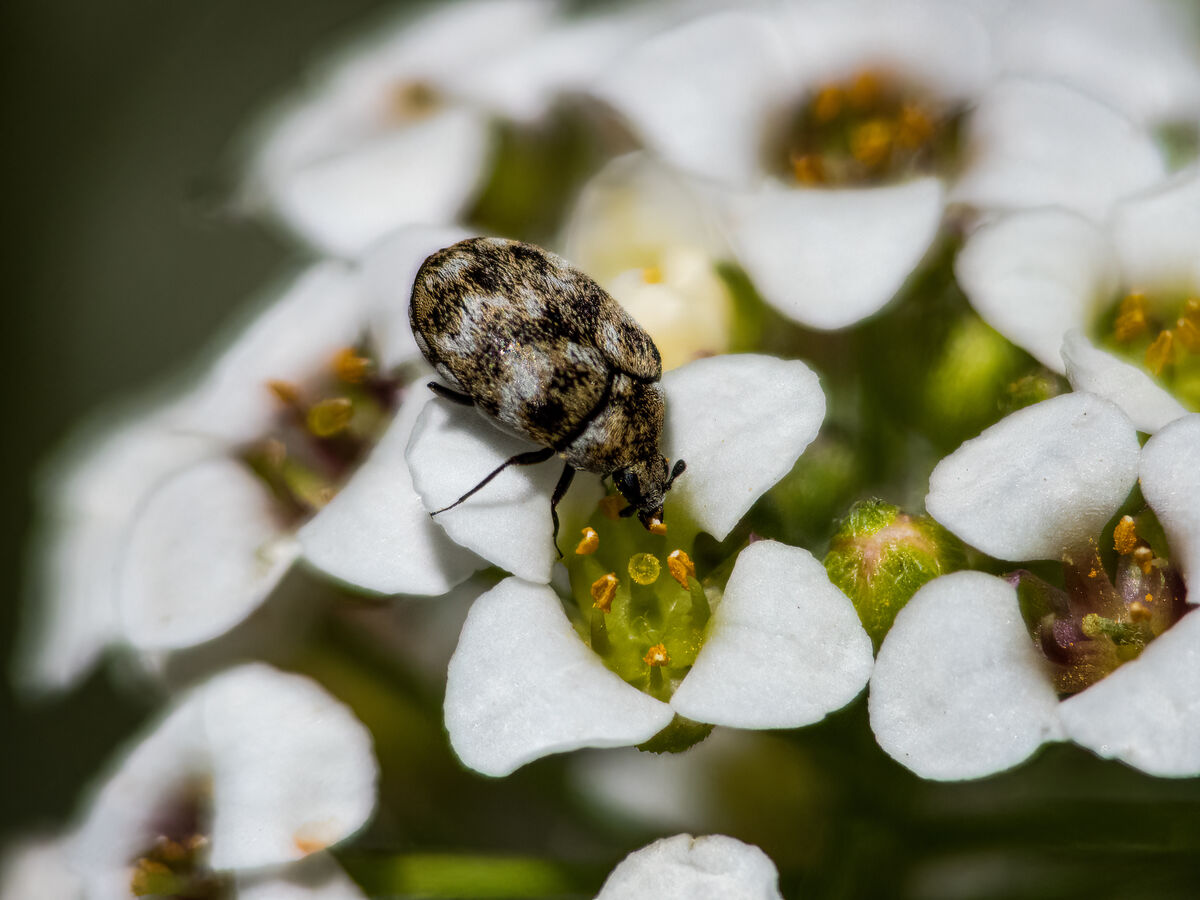
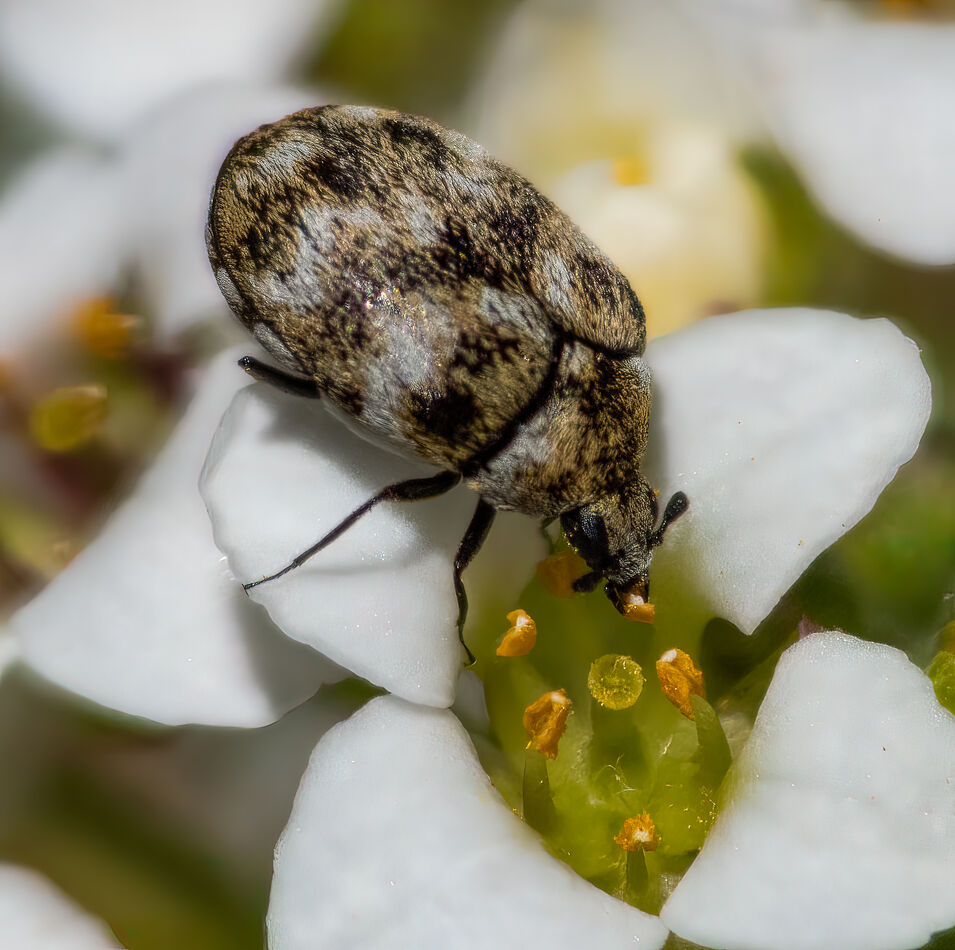
Now for an example. We are looking at a Carpet Beetle. And they are tiny. The flower is about 3mm across. And the beetle is smaller than the flower. I am using the P1000 and the Canon 500d with the P1000 set to 270mm (1500mm equiv) focal length. And I also took the image and cropped and resized it by 1.4x using Gigapixel AI for a better look at what the beetle is doing.
In your case, you have the Sony RX10 which has an equivalent FL of 600mm. If I remember correctly, the actual FL is 200mm with a 3x crop factor.
Thank you for your comments. You are right on in your understanding.
One detail I didn't record when I did the measurements to construct the graph is whether the distance to the target is from the closeup lens or from the sensor. I think it was from the closeup lens, but I made the measurements 4 years ago and now I can't remember. I can't find online anywhere that this is specified.
Adding a picture of my granddaughter's Lego character (5cm tall). Using the Canon 500d on the P1000. This time the camera is set to 234mm (1300mm equiv). The fact that this is larger than the carpet beetle means that I was closer to the closeup lens. And considering that I was doing this on a table under more controlled conditions, it was easier to do this than setting up to do the beetle. If the camera FL remains the same, but the target is moved closer (without exceeding the max allowable FL for that distance), then the apparent magnification appears larger.
Typical usage model of a closeup lens
270mm (1500 mm equiv)
(Download)
Cropped and Resized 1.4x using Gigapixel AI
(Download)
Granddaughter's Lego character

(Download)
Another example. Canon 500d on Tamron 70-200mm at 200mm on Sony A6600
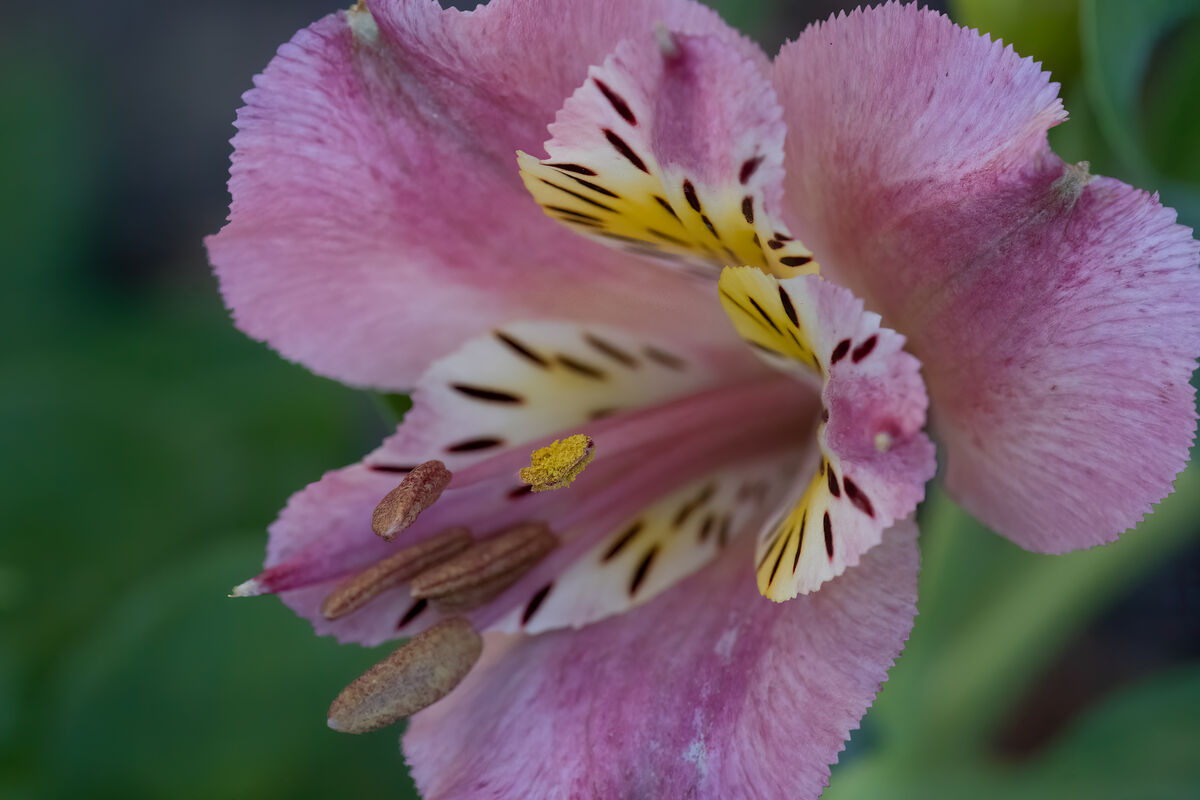
(Download)
Aug 23, 2022 09:27:33 #

If you really want to see how a lens performs or want to compare lenses, I recommend shooting printed material on a flat surface and using a tripod. I typically use my bookshelf. Why? Because we know what to expect of the target, the target does not move, and we see the differences better.
Check out Sports Photography section of our forum.
Aug 23, 2022 16:33:27 #
abc1234 wrote:
If you really want to see how a lens performs or want to compare lenses, I recommend shooting printed material on a flat surface and using a tripod. I typically use my bookshelf. Why? Because we know what to expect of the target, the target does not move, and we see the differences better.
Yes, you are correct. I took the Tiffen +4 filter, which by the way I measured the actual FL and it turned out to be 22cm. If I then solve for diopter where diopter = 1000mm / 220mm FL = +4.55.
Image 1 is with this Tiffen closeup lens looking at the back of a book. The Tiffen is a single element closeup lens. I used the Olympus EM1ii and the 75-300mm lens with is set to 75mm. Also found that the distance from the center of the closeup lens to the book I had set up was 22mm. So, the FL of the closeup ring is added to the front of the camera lens as an FYI. If you zoom in all the way, you will see on the far left, blue fringing on the left sides of the letters. And to the far right, to the right hand side of the letters. Also you can see red fringing on the left side of the letters too. And by the way, Lightroom CA removal struggles with red/blue CA. It does better with magenta/green CA.
Image 2 is a similar shot taken using the Minolta #2 closeup lens which is a multi-element closeup lens. It is spec'd to be +3.8 diopters. I measured a FL of 26cm, and using that FL, the formula says that it is +3.85 diopters. Probably the difference is sloppiness in my measuring the FL which I did with the hot Calif sun bearing down on me at mid-day.
What you will notice is that image 1 has larger print due to the actual +4.55 diopters vs the +3.85 diopters of image 2.
And image 1 has CA when you zoom way in. Image 2 has no CA.
You can see I slightly missed perfect focus on image 2. The sun was so bright I could barely see the LCD.
I'm adding a 3rd image in which I used Sharpen AI and you can see that it rescued the focus on the 2nd image. This wasn't the case for the Tiffen filter. The CA made the edges of the letters mushier and they failed to sharpen up much at all. And it certainly did not remove the CA.
Additional observation. I also captured images with the lens at 200mm and at 300mm. The distance to the target was only adjusted due to the lens becoming longer. After moving the target back by the same distance that the lens grew in length, the distance from the target to the closeup lens remained the same. In the case of the Tiffen filter, CA got worse and worser at 200mm and 300mm.
With the Minolta #2 filter, the sun was now so overhead that I was struggling to even see what I was doing on the LCD and I did not get good results. No CA, but still horrible results. Would have been better to try this at a cooler time of the day.
Tiffen +4 closeup lens. Zoom in all the way. Notice blue edges of letters on each side of book
(Download)
Minolta #2 closeup lens. Zoom in all the way. No blue edges.

(Download)
Minolta #2 filter results sharpened by Topaz's Sharpen AI

(Download)
Aug 23, 2022 17:25:56 #
Jim, that is the way to do it. Thanks for taking the time. One other hint. Compare the same letter. Much easier to focus in on the same shape in multiple places.
Aug 23, 2022 17:37:46 #
abc1234 wrote:
Jim, that is the way to do it. Thanks for taking the time. One other hint. Compare the same letter. Much easier to focus in on the same shape in multiple places.
To do this again under less sunny conditions would have been nice too. It was so bright that all I could determine was I was aimed at the book from the LCD, even with holding something over it to put it in the shade. But these are the only kinds of days we get here this time of year.
But it is clear that the single element closeup lens produces CA and the multi-element closeup lens did not. And the CA that is produced is hard to remove with Lightroom. Of course, you don't really remove CA. You hide CA, and edges remain soft. Sort of like finding the right lipstick to hide the ugly CA colors! I find the Photoshop Gaussian Blur method the only way that seems to hide it.
I was using manual focus and moving the camera back and forth to get focus. Was able to turn on focus magnifier, and I could sort of tell I was near focus, but not that I was at perfect focus. Don't want auto focus for this test since if I am at a distance that there is no way to focus, the lens goes hunting.
Thanks
If you want to reply, then register here. Registration is free and your account is created instantly, so you can post right away.
Check out The Dynamics of Photographic Lighting section of our forum.