Depth of field
Oct 17, 2012 18:56:38 #

coco1964 wrote:
I just did a quick fix by straightening, cropping, adding some contrast with a little color correction. The moms feet are gone but I'd rather have that then the tilt in the photo. Just my shot at making it better.........
Doing good - now defocus the background if you can and the grass immediately behind her. The subject needs to pop out - you don't want any extra unnecessary information to take away the interest from the viewer.
Can you get the feet back again?
Warm color is nice. well done
Cheers,
Take 5
Oct 17, 2012 20:01:46 #
Ivy Beane
Loc: Maine
Hi Take 5,
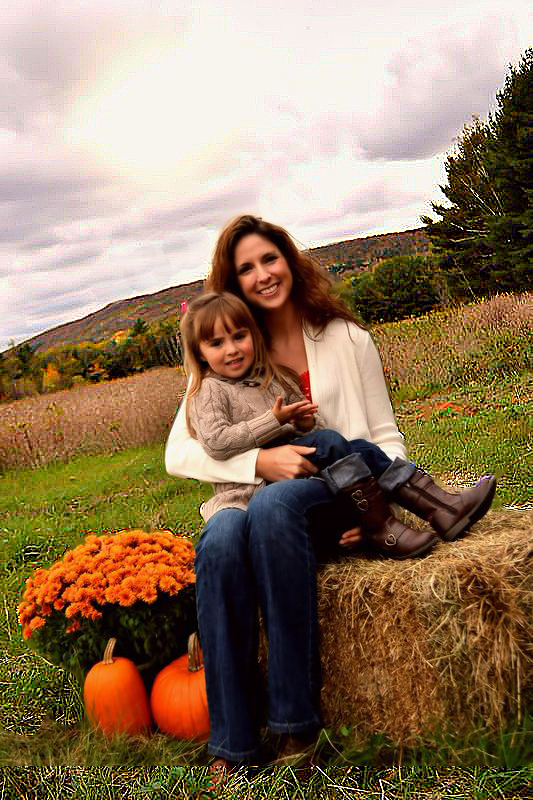
I posted 3 pics (originals) under first photo shoot. I have many comments about the angle of the photo of my daughter and granddaughter on the bale of hay. I dont know how to fix it. I wanted a more professional look (most are done with Photo shop or lightroom). Guess I will just have to be happy with this till I learn more. Thanks~
I posted 3 pics (originals) under first photo shoot. I have many comments about the angle of the photo of my daughter and granddaughter on the bale of hay. I dont know how to fix it. I wanted a more professional look (most are done with Photo shop or lightroom). Guess I will just have to be happy with this till I learn more. Thanks~
Oct 17, 2012 22:36:19 #

Ivy Beane wrote:
Hi Take 5,
I posted 3 pics (originals) under first photo shoot. I have many comments about the angle of the photo of my daughter and granddaughter on the bale of hay. I dont know how to fix it. I wanted a more professional look (most are done with Photo shop or lightroom). Guess I will just have to be happy with this till I learn more. Thanks~
I posted 3 pics (originals) under first photo shoot. I have many comments about the angle of the photo of my daughter and granddaughter on the bale of hay. I dont know how to fix it. I wanted a more professional look (most are done with Photo shop or lightroom). Guess I will just have to be happy with this till I learn more. Thanks~
I still don't understand what you wanted the DOF to be, long or short?
Oct 17, 2012 22:37:10 #

Here's what I just tried: I copied the original picture and auto-sharpened the entire photograph three times. Next I cut out the lady and child from the original photo and pasted it on to the sharpened photo. I then used the eracer around the edges to clean up what I copied. Then I merged down. I'm sort of new at using PhotoShop and perhaps someone knows how to accomplish this with true layering. Unfortunately my version (Elements 10) does not permit using the magic tool and the sharpening together. Perhaps the CS versions do. This was a "down and dirty" effort... I feel the sharpening was overdone and the bottom needs further clean-up.
What I wanted to show is that sharpening part of a picture is possible.
What I wanted to show is that sharpening part of a picture is possible.
Oct 18, 2012 02:27:46 #
Ansel Rosewater wrote:
Here's what I just tried: I copied the original picture and auto-sharpened the entire photograph three times.
What I wanted to show is that sharpening part of a picture is possible.
What I wanted to show is that sharpening part of a picture is possible.
STOP STOP. HOLD THE TRAIN. NADA. WHOA BABY. HALT. DON'T MOVE!! PUT ON THE BRAKES.
Yer going the wrong way! The original picture was good, wonderful subject, gorgeous smile, pose - you have the ingredients for genius. Don't frig it up by trying to alter it adversely.
OK, the picture is crooked, straightening it up - that's cool. What you want to do is to SOFTEN the back ground, not sharpen it up. That is called in effect, SHALLOW DEPTH OF FIELD. It is effectively isolating the gorgeous subject matter from the rest of the picture, which is clutter and too much detail. No one gives a rats ass about the background. IN fact the background if sharpened will server to take the viewers eyes away from the subject which is the most important.
You have to figure out how to blur the background out. I am not a photoshop or lightroom guy - I make movies now so I work on different platforms for movie editing, and as such we have to be very sure that we get exactly what we want in camera, not after the fact.
I know that there are ways to use some sort of a tool to soften any parts of the picture you want, like a soft eraser or something without mucking up the main picture of the girls and the hay. Here is an example I pulled off of Google images that is a splendid example of what happens when you use shallow DoF. Your eyes are riveted on the subject. The background is gone / mush. It is a clean image. It works. That is what you want to attain.
Maybe some lightroom junkie can tell you how to do it. Just remember to learn how to control this valuable tool to the max. It will make your pictures standouts from also rans and ho-hums or ruin and otherwise excellent picture.
Cheers,
Take 5 Cinema
Example of effective use of Shallow Depth of Field - It forces the eyes on the lady, then the guy. Nothing else

Oct 18, 2012 06:35:04 #

Crop and tilt, fill with clone stamp and sharpen mum and child. De saturate a little and add bit of brightness.

Oct 18, 2012 21:24:40 #

Evansgr wrote:
I like the angle you used, To me it makes it a fun picture to look at, more than a portrait type picture I do like the soft background and think it works perfectly for the subject matter. I might brighten it just a smidge but overall it a great shot...Thanks for sharing
Disagree on the angle thing. JMHO, but it just doesn't work for this photo.
Mar 21, 2013 00:17:58 #
If you want a shallow depth field with just the people in focus, use a lens with f1.8 or 2.8. If you want all the foreground and background in focus, close down your lens to f11 or f16 and check your preview button if you have one. Looks better with shallow depth of field.
Mar 23, 2013 09:29:30 #
Mar 23, 2013 12:10:17 #

Ivy Beane wrote:
I wanted to have depth of field...what did I do wrong. Can it be fixed in editing? Is there too much color in this photo?
Thanks~
Thanks~
Is this the DoF effect you were after (very quick retouch in photoshop so no where near what you would get in camera with the right settings

Mar 23, 2013 12:32:09 #
Mar 23, 2013 12:34:27 #
Ivy Beane wrote:
Yes, thank you so much!
Ivy if you post the original image I will convert with instructions for you it will be a lot higher quality than this image, I will also give you the manual camera settings to replicate in camera
Mar 23, 2013 14:33:36 #
Ivy Beane
Loc: Maine
I appreciate all your help and advice....but I already printed these photos months ago. I have a new lens now, so I am getting the depth of field I want :) Thank you :)
Mar 23, 2013 14:35:08 #
Ivy Beane wrote:
I appreciate all your help and advice....but I already printed these photos months ago. I have a new lens now, so I am getting the depth of field I want :) Thank you :)
:thumbup: :thumbup: :thumbup: Just like me...5 months too late :lol: :lol: :lol:
Mar 23, 2013 21:21:02 #

Ivy Beane wrote:
I wanted to have depth of field...what did I do wrong. Can it be fixed in editing? Is there too much color in this photo?
Thanks~
Thanks~
Depth of field would not improve this photo. It would have the opposite affect. Leave it as is.
If you want to reply, then register here. Registration is free and your account is created instantly, so you can post right away.