Night Photography
Oct 8, 2012 11:40:15 #
I accumulated this information from various sources and have it on a six-sided, triple-fold laminated card that's easy to carry. It might not be 100% correct, but it's workable. Maybe you'll notice errors that I can correct.
-------------------------------
Night Photography
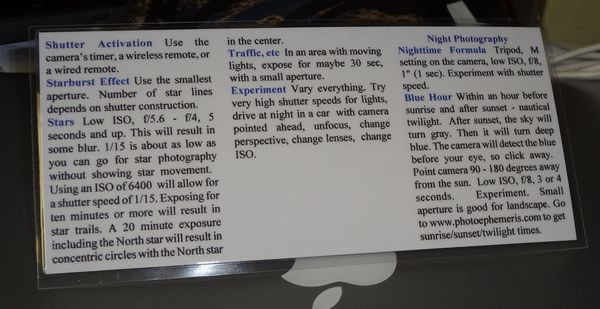
Nighttime formula. Tripod, M setting on the camera, low ISO, f/8, 1" (1 sec). Experiment with shutter speed.
Blue Hour. Within an hour before sunrise and after sunset - nautical twilight. After sunset, the sky will turn gray. Then it will turn deep blue. The camera will detect the blue before your eye, so click away. Point camera 90 - 180 degrees away from the sun. Low ISO, f/8, 3 or 4 seconds. Experiment. Small aperture is good for landscape. Go to www.photoephemeris.com to get sunrise/sunset/twilight times.
Fireworks. Arrive early. Have a small flashlight handy. Low ISO, auto white balance, f/8 and expose for 2 seconds and up. Focus on infinity, or prefocus manually and leave it that way. Try totally unfocusing. Try tapping a tripod leg during exposure.
Histogram. left - dark; right - light. Lots of bars to the right - washed out; bars to the left - totally black.
Lightning. ISO 400, f/8, 6 seconds. Or try ISO 200, f/11, 10 seconds.
Lit-up Building. If a building is lit by some kind of light, make a longer exposure, 8 sec, with a small aperture, f/11. This will expose for the building, rather than the bright lights. If the scene has incandescent lights, set the WB to tungsten.
Moon. Best to shoot it the night before it is full, when the moon rises before sunset. Low ISO, f/16 or f/22, 1/100 - 1/25. Experiment. Use a longer lens, over 100mm. For a full moon alone in the sky, try f/11 at 1/100. For a smaller moon, use a slower shutter.
Lunar Eclipse. Low ISO, f/11, 1/100, 1/125. As the moon gets darker, vary shutter speed, then open up lens a stop or two.
Painting with Flash. This should be done with as little ambient light as possible. Set the camera to a moderate lens opening, say f/5.6. Set the shutter to Bulb and open it. Using a handheld flash, approach the subject and fire the flash from different positions.
Painting with Light. Turn off noise reduction. Low ISO, f/16, several minutes, as you move the light around. If you are shining the light directly at the camera, a small light will do. If you are lighting an object with light, you will need a bright light. Use all sizes and colors of lights. Try both streaks of light and straight illumination.
Shutter Activation. Use the cameras timer, a wireless remote, or a wired remote.
Starburst Effect. Use the smallest aperture. Number of star lines depends on shutter construction.
Stars. Low ISO, f/5.6 - f/4, 5 seconds and up. This will result in some blur. 1/15 is about as low as you can go for star photography without showing star movement. Using an ISO of 6400 will allow for a shutter speed of 1/15. Exposing for ten minutes or more will result in star trails. A 20 minute exposure including the North star will result in concentric circles with the North star in the center.
Traffic, etc. In an area with moving lights, expose for maybe 30 sec, with a small aperture.
Experiment. Vary everything. Try very high shutter speeds for lights, drive at night in a car with camera pointed ahead, unfocus, change perspective, change lenses, change ISO.
-------------------------------
Night Photography
Nighttime formula. Tripod, M setting on the camera, low ISO, f/8, 1" (1 sec). Experiment with shutter speed.
Blue Hour. Within an hour before sunrise and after sunset - nautical twilight. After sunset, the sky will turn gray. Then it will turn deep blue. The camera will detect the blue before your eye, so click away. Point camera 90 - 180 degrees away from the sun. Low ISO, f/8, 3 or 4 seconds. Experiment. Small aperture is good for landscape. Go to www.photoephemeris.com to get sunrise/sunset/twilight times.
Fireworks. Arrive early. Have a small flashlight handy. Low ISO, auto white balance, f/8 and expose for 2 seconds and up. Focus on infinity, or prefocus manually and leave it that way. Try totally unfocusing. Try tapping a tripod leg during exposure.
Histogram. left - dark; right - light. Lots of bars to the right - washed out; bars to the left - totally black.
Lightning. ISO 400, f/8, 6 seconds. Or try ISO 200, f/11, 10 seconds.
Lit-up Building. If a building is lit by some kind of light, make a longer exposure, 8 sec, with a small aperture, f/11. This will expose for the building, rather than the bright lights. If the scene has incandescent lights, set the WB to tungsten.
Moon. Best to shoot it the night before it is full, when the moon rises before sunset. Low ISO, f/16 or f/22, 1/100 - 1/25. Experiment. Use a longer lens, over 100mm. For a full moon alone in the sky, try f/11 at 1/100. For a smaller moon, use a slower shutter.
Lunar Eclipse. Low ISO, f/11, 1/100, 1/125. As the moon gets darker, vary shutter speed, then open up lens a stop or two.
Painting with Flash. This should be done with as little ambient light as possible. Set the camera to a moderate lens opening, say f/5.6. Set the shutter to Bulb and open it. Using a handheld flash, approach the subject and fire the flash from different positions.
Painting with Light. Turn off noise reduction. Low ISO, f/16, several minutes, as you move the light around. If you are shining the light directly at the camera, a small light will do. If you are lighting an object with light, you will need a bright light. Use all sizes and colors of lights. Try both streaks of light and straight illumination.
Shutter Activation. Use the cameras timer, a wireless remote, or a wired remote.
Starburst Effect. Use the smallest aperture. Number of star lines depends on shutter construction.
Stars. Low ISO, f/5.6 - f/4, 5 seconds and up. This will result in some blur. 1/15 is about as low as you can go for star photography without showing star movement. Using an ISO of 6400 will allow for a shutter speed of 1/15. Exposing for ten minutes or more will result in star trails. A 20 minute exposure including the North star will result in concentric circles with the North star in the center.
Traffic, etc. In an area with moving lights, expose for maybe 30 sec, with a small aperture.
Experiment. Vary everything. Try very high shutter speeds for lights, drive at night in a car with camera pointed ahead, unfocus, change perspective, change lenses, change ISO.
Oct 9, 2012 06:15:30 #

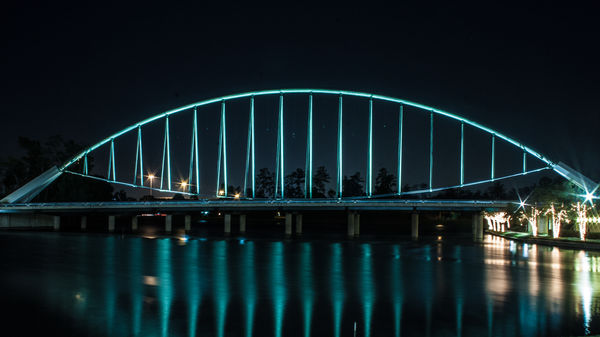
Very useful information - Some of your suggestions I was already following (like 180 degrees from the sunset) and I will give the others a try in future outings. I became interested in night photography after seeing the work of one of my fellow photo club members and now I am hooked! I am lucky that Houston and some surrounding areas are a"target rich environment" for night time captures.The attachment is the first night shot I kept (after pp)Thanks for sharing the info and keep shooting!
The Woodlands,Texas
Oct 9, 2012 06:28:35 #
andrew.haysom
Loc: Melbourne, Australia
All great advice Jerry, especially the advice to "experiment"!
Melbourne, Australia
Oct 9, 2012 06:35:07 #
Oct 9, 2012 06:55:04 #
bbboomer wrote:
Very useful information - Some of your suggestions... (show quote)
I like the star effects in the lights. How did you do that?
Oct 9, 2012 07:06:26 #
sportyman140 wrote:
I like you ideas, how much did it cost to make?
You mean the laminated card? Mostly time. The tricky part was setting up the columns so it would print right on two sides. We've had a laminating machine for years, so I printed it on card stock and ran it through the laminator. With a laminator and a label maker, you can always find something to do. :D
Oct 9, 2012 07:15:32 #
Oct 9, 2012 07:26:51 #

Oct 9, 2012 07:28:17 #
Oct 9, 2012 07:40:17 #
jerryc41 wrote:
quote=bbboomer Very useful information - Some of ... (show quote)
I wish I could say it was planned!
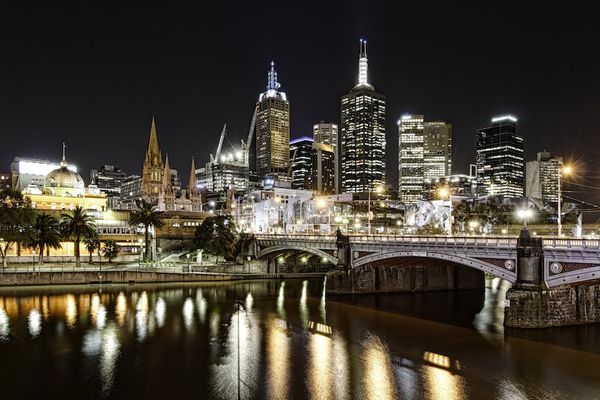
I shot this in raw-28mm focal length- iso400-f22 @25sec on a tripod-pp in lightroom where I changed the wb to tungsten and added a little clarity,etc
Some time its better to be lucky than good(I dont claim to be either!)
Oct 9, 2012 07:42:15 #
bbboomer wrote:
I like the star effects in the lights. How did you do that?
I wish I could say it was planned!
I shot this in raw-28mm focal length- iso400-f22 @25sec on a tripod-pp in lightroom where I changed the wb to tungsten and added a little clarity,etc
Some time its better to be lucky than good(I dont claim to be either!)[/quote]
Sometimes a small aperture will do that.
Oct 9, 2012 07:44:52 #
To get star effects in lights you need to use a very small Aperture - give or take F22
Oct 9, 2012 08:14:14 #
jerryc41 wrote:
I accumulated this information from various source... (show quote)
Hi Jerry
By the time you read all that, do you still have time to catch the twilight and shoot pictures? :D
Jesting aside, I did have a similar reminder card in the film days. Now? I just set the 3 exposures of -2, 0, +2, manual focus, small aperture and wirelessly shoot away. Go to a pub, have a drink, go home, dowload, HDR them and fiddle with them in Photoshop.
Funny you should post this, because 'night shots' is my next posting.
Oct 9, 2012 08:17:52 #
Chinaman wrote:
Hi Jerry
By the time you read all that, do you still have time to catch the twilight and shoot pictures? :D
By the time you read all that, do you still have time to catch the twilight and shoot pictures? :D
I took a speed reading course. :D
Oct 9, 2012 08:46:02 #

If you want to reply, then register here. Registration is free and your account is created instantly, so you can post right away.