Copying Slides (and Negatives) with a Camera - Lessons Learned
Aug 28, 2020 15:17:22 #

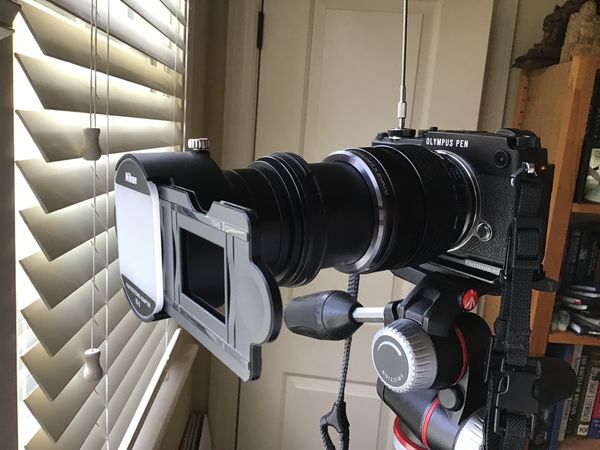
I have been replying to posts about copying slides (and/or negatives). It started when I read a post from a UHH Person in Australia who said he uses an Emora slide copy device, mounted on his camera lens. It’s a screw into the filter thread device. So I did some research and found that Nikon makes one dedicated to the D850. I’m not a Nikon guy any more, so I did a bit of trial and error. For starters, using my small light box, put some slides on it and tried my Canon lenses (on a 5Dii, and also with adapter, on my Olympus PEN-F), and then my Olympus lenses, to see “what do I already have that will focus close?” I found that the best lens of what I have available is my Olympus M.Zuiko 12-40mm f/2.8 MFT lens. For those not familiar, this is equal to a full frame 24-80mm lens. On the front end, I mount a +10 diopter and a +4 diopter (total of +14 diopter) Hoya quality macro adapter lens. At my local camera shop, I bought the Nikon ES-2 kit, which includes step down ring and a slide copier with a fitting that holds two slides. It can telescope a bit to help you with focus. Anyway, with my setup on my PEN-F, I can zoom to fill the digital viewfinder, and the auto focus works almost all the time. The ratio of the slide dimension is not exact to the dimension of the sensor in the camera, so I can crop using the zoom of the lens, or later in PS. I mount the entire thing on my tripod and point it out the window for natural light - the light box gives the slides a color cast that is too warm (sort of orange) but the natural light works better. The beauty is that the camera adjusts for the light, and I can use the built-in HDR in the Olympus camera when needed. I have thus recovered slides that were totally useless with the scanner because of too wide a range of light, or just too underexposed. And also, remember when you had a slide projector, either you needed to focus each slide manually or your Kodak Carousel had an auto-focus, because the film is not always the same distance from the lens in the projector. So, with the camera autofocus, each slide is as sharp as it can possibly be. I have gone back and redone numerous scanned slides that were out of focus, because the scanner does not have a focus mechanism. And all my setup (given that I have the lens and camera) was under $200. And it’s fast. Finally, between the camera and the ES-2 slide copier, it is all “fixed” so nothing moves. I mount on the tripod and use a cable release just to be sure I don’t introduce vibration. If anyone has further questions, please let me know. Happy to offer the benefit of my hours of scanning with a scanner, and now just beginning to recover the poorly scanned slides with this rig. Best regards, JimR.
Aug 28, 2020 15:33:16 #

Very nice! I'm going to get into this, I have a LOT of slides that I would like to take into digital. I also have a lot of medium format slides, 6x4.5 cm, 120 format film. Is there something like the Nikon ES-2 that can handle that format?
Aug 28, 2020 16:30:32 #
Retired CPO wrote:
Very nice! I'm going to get into this, I have a LOT of slides that I would like to take into digital. I also have a lot of medium format slides, 6x4.5 cm, 120 format film. Is there something like the Nikon ES-2 that can handle that format?
I too would like to use this method of copying slides. I'm looking forward to posts on this subject
Thanks
Aug 28, 2020 16:53:10 #
If I’m not mistaken, the 120 format was still a 2in by 2in slide, true? If that’s what you are talking about, the Nikon ES-2 will handle it. But the slide holder that you use with the ES-2 has an opening with the dimensions of a 35 mm slide, obviously, not square like that 120 format, so you will need to crop. You will be somewhat limited. I understand the older Nikon ES-1 does not have a slide holder, but rather you just put the slide in. I did see some of the ES-1 on eBay. I think you would need to experiment with the lens, or lenses, you would plan to use. Hope you can find a way to make it work. JimR.
Aug 28, 2020 17:33:56 #
JimRPhoto wrote:
If I’m not mistaken, the 120 format was still a 2i... (show quote)
The 120 in square format (6x6cm) is actually a bit over 2 1/3 inches on a side but was usually referred to as 2 1/4 by 2 1/4 (actual negative size not counting the margins/frames. So slides using frames would be a bit bigger than that. Somewhere around the house I have a box of 120 color slides I could measure - if I knew where they are now, besides "probably in the house" or maybe the garage????????? I don't think anyone would have arranged for them to go live in a landfill.
Aug 28, 2020 17:39:43 #
Thank you. No the medium format slide's dimension is 6x4.5 cm, not square. E-bay is your friend when looking for slide mounts like that. I'll take a look at the ES-1 on E-bay or other venues. Thanks again. I'll let you know how it works out.
Aug 28, 2020 18:47:39 #
Reply to Retired CPO. Sorry, I did not know the dimensions of a 120 slide. You might want to google the Emora slide duplicating kit. When I did that just now, the Emora comes up, as does the Nikon ES-1. It might be that they could take both a 35mm slide, plus the 120 format you have. Hope you can find something that works on the 120. And you already have read how well the ES-2 works with 35mm slides. By the way, the ES-2 also comes with a negative holder, and PS has an “invert” feature which will convert the negative to a positive. But remember from film days, each film has its own chemistry, so with negatives, I need to adjust color manually, even after the “invert” feature converts it to a positive image. Hope you can find what you need. JimR
Aug 28, 2020 20:33:30 #
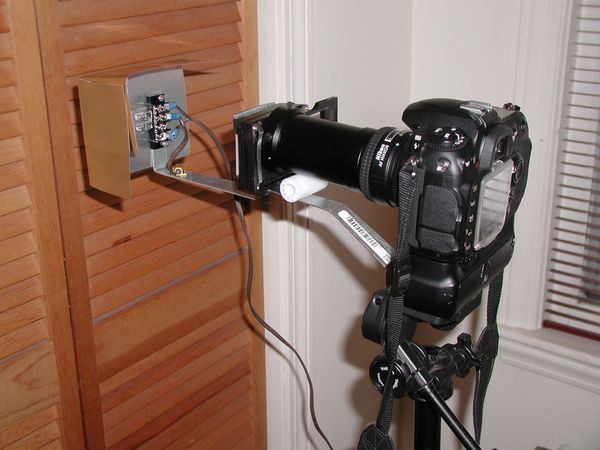
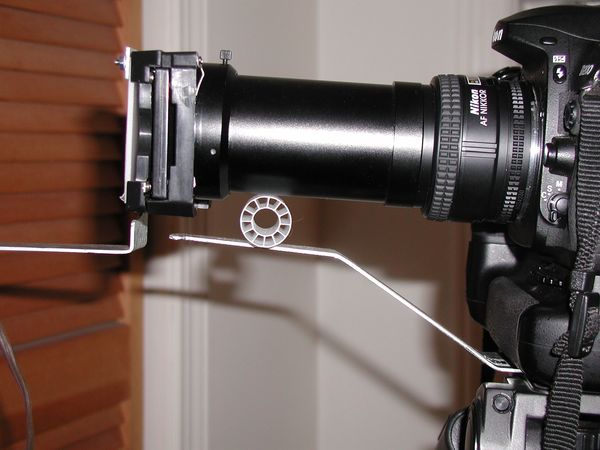
I copied a pile of slides about 12 years ago. I got a slide copier that screwed into a 50mm lens on my old D200. After copying a few slides I found that one of the biggest problems was consistency of lighting. I tried pointing the system out the window. I tried using a lamp placed at a fixed position relative to the copier. I tried several other things but they were all a pain to set up or did not work consistently.
I finally added a halogen lamp to the front of the copier so it was always in the same position. That added weight to the front of the 50mm lens which presented problems in focusing accurately. So I then put a metal bracket under the support for the lamp and used a core from an adding machine tape between the bracket and the lamp support so that when the lens wanted to focus the system could move freely using the cylindrical core as a bearing between the lamp support and the bracket.
At any rate, there were no more problems with variable lighting.
Of course the other big problem with old slides is fading. While I got consistent results with good slides, many of the slides needed significant postprocessing to correct color shifts. I suspect one would have the same problem when using a scanner.
Finally, dust. You can blow and brush to your heart's content and you will still find dust on your images. Just plan that you will have to remove some dust in the final image.
Aug 28, 2020 20:34:20 #

Depends. Just as you can expose 120 film as 6x4.5, 6x6 and 6x7 depending on the camera and film back, you can buy slide holders in all those sizes (I left off 6x9 because while you can expose 6x9, I couldn’t readily find slide holders that size)
Aug 29, 2020 05:00:27 #
TriX wrote:
Depends. Just as you can expose 120 film as 6x4.5, 6x6 and 6x7 depending on the camera and film back, you can buy slide holders in all those sizes (I left off 6x9 because while you can expose 6x9, I couldn’t readily find slide holders that size)
Uh huh. 6x9 goes in glass and you use a kerosene powered Majik Lantern ...
Aug 29, 2020 06:33:42 #
RWR
Loc: La Mesa, CA
TriX wrote:
Depends. Just as you can expose 120 film as 6x4.5, 6x6 and 6x7 depending on the camera and film back, you can buy slide holders in all those sizes (I left off 6x9 because while you can expose 6x9, I couldn’t readily find slide holders that size)
My 6 x 7 mounts are 8.5cm square - I think 6 x 4.5 and 6 x 6 mounts are 7cm square, but cannot say for sure.
Aug 29, 2020 07:00:35 #

no12mo wrote:
I too would like to use this method of copying slides. I'm looking forward to posts on this subject
Thanks
Thanks
You may find this older post helpful.
https://www.uglyhedgehog.com/t-534400-1.html
Aug 29, 2020 09:11:56 #

JimRPhoto wrote:
I have been replying to posts about copying slides... (show quote)
For $229 you can buy this
https://www.dell.com/en-us/work/shop/epson-perfection-v600-photo-scanner-black/apd/a6861056/printers-ink-toner
I would not buy it from Dell though; When this item was scarce, Dell was selling it for over $700, I posted on a previous thread. Dell just happen to be the first link and I am in a hurry.
Aug 29, 2020 11:40:42 #
Here's my recipe using a Nikon D850, Nikkor 60mm micro, Nikon ES-2 slide/film copier:
1. Mount the camera + ES2 adapter on a mini-tripod (or regular tripod).
2. For the 60 mm micro lens, clean the front and rear elements of the lens (use your usual cleaning method). Remove any filters and screw on the "thin" spacer that comes with the ES-2. If you are using a DX camera body, such as Nikon D500, use the "thicker" spacer and a 40 mm lens.
3. For the light source, I use a Lume Cube mounted on a mini-tripod (or regular tripod). The Lume Cube produces daylight (around 5000 K). Adjust the lume cube brightness to 8 or 9 and shine onto the ES-2. Add the white diffuser to the Lume Cube to diffuse the light.
3. Camera settings (these are for the Nikon D850)
a. Manual mode with white balance set to daylight. (Change the white balance to match your light source).
b. F-stop = F8
c. ISO = set to 64 (or your the lowest ISO setting that your camera has). Do not use auto ISO.
d. Autofocus: you can use this or use manual focus. For autofocus, move the red box to the eyes, etc. You
can enlarge the image and check the focus with the + button, left side and then to normal with - button.
e. Shutter speed: will depend on your light source
f. Shoot in RAW. You will have more control in post processing. You may shoot jpegs as well, but less
control.
f. Flip up the LCD screen 90 degrees
g. Use Live View to adjust the image (fill the frame and level the horizontal axis)
h. Adjust the light meter to "0" EV or whatever you want your exposure to be. Remember, the light meter is
going to adjust to 18% neutral gray. You may want more or less exposure depending on your image.
Try different light meter settings until you have what you want. You can always fine adjust in post
processing.
4. Prepare the slide (or film negative):
a. Brush off large dust particle, then use a blower to blow off the smaller dust particles.
b. Place the slide (or film negative) into the appropriate ES-2 holder with the emulsion side toward the lens.
The image with be flipped horizontally. You correct this in post processing software.
5. Adjust the view on the LCD:
a. Zoom in and out with the ES-2 to fill the frame and adjust the horizontal. Tighten down the ES-2 knob
once you have what you want to prevent the ES-2 from inadvertently sliding.
b. Focus the image using autofocus or manual focus, your choice.
c. Turn off Live View. Depress the shutter or use a shutter release cable. Your choice.
d. Review the image, make any necessary adjustments in focus, etc. Retake the image.
6. For more advanced users, the D850 allows you to upload Picture Control Settings. For instance, you can
create a Picture Control on your desktop to automatically flip the image 180 degrees horizontally,
automatically change a negative into a positive, or a change a color image into a monochrome.
It sounds complicated but works very well. Like everything in life, it helps to have the proper equipment. You end up with a large file in RAW that can be enhanced to look better than your original image. I use the technique primarily for a few images that I want to digitize and have printed on metal or glass.
If you want to digitize a lot of images, consider using a scanner such as the Epson V600, etc. Enjoy!
Aug 29, 2020 11:47:15 #
One clarification concerning the use of Picture Control. You create custom Picture Controls on your desktop with Nikon's Picture Control software. You then name and save the custom Picture Control to your desktop. The software than allows you to save your custom picture control setting(s) to your camera's SD or XQD card. You place the card back into the D850 and upload it from the card to the camera using the Picture Control menu. When you set the Picture Control menu in the camera to use the custom picture control, the camera will apply your settings to all of your images.
If you want to reply, then register here. Registration is free and your account is created instantly, so you can post right away.