Challenge Series - Focal Point
Feb 21, 2018 10:47:23 #
Jim-Pops wrote:
I saw the same thing this is what I did to make a ... (show quote)
Thanks for the helpful information, Jim.

Feb 21, 2018 15:19:51 #

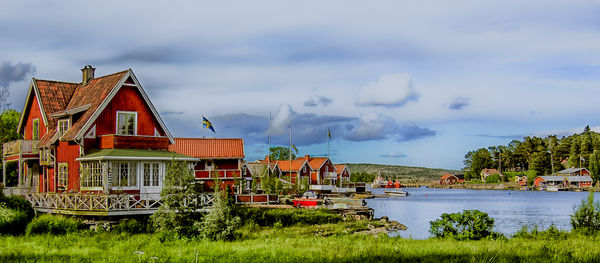
With the right crop and the right lighting, the eye gets led along the shoreline to the distant buildings.
-
-
Feb 21, 2018 15:22:27 #

R.G. wrote:
With the right crop and the right lighting, the eye gets led along the shoreline to the distant buildings.
-
-
R.G., this looks like it could be a post card! Nice!
Feb 21, 2018 15:37:52 #
BrentHarder wrote:
R.G., this looks like it could be a post card!.....
You're right - nothing big enough to show up the flaws
 .
.Feb 21, 2018 16:06:33 #
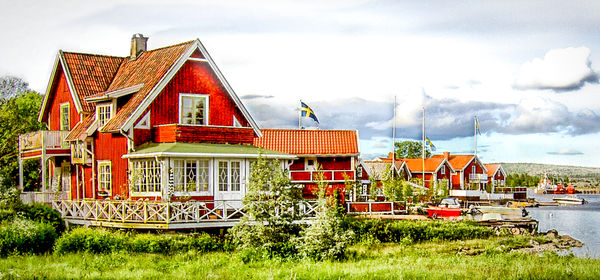
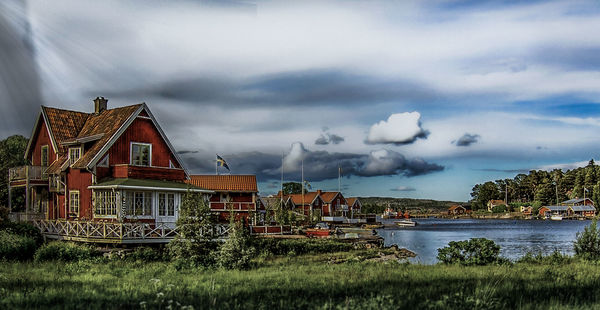
Straightened a little, then lightened the sky. Decided to try a more pano crop to emphasize the home and other red buildings. Enjoyed working on this image. Thanks, Bev

Feb 21, 2018 17:57:25 #
R.G. wrote:
With the right crop and the right lighting, the eye gets led along the shoreline to the distant buildings.
-
-
Excellent, R.G. This is your among your best. Any flaws are so minor they fall away under the impact of this image. Five thumbs.

Feb 21, 2018 18:01:34 #
NikonGal wrote:
Straightened a little, then lightened the sky. Decided to try a more pano crop to emphasize the home and other red buildings. Enjoyed working on this image. Thanks, Bev
NikonGal, welcome. In your eagerness you forgot to click the 'store original' box. I need to see your image full size. Please post again and click the box.
Feb 21, 2018 19:21:16 #
Hopefully I'll get the hang of posting quickly. Here it is again. Thanks for your patience. Bev
Here it is again. Thanks for your patience. BevFeb 22, 2018 08:07:14 #
NikonGal wrote:
Hopefully I'll get the hang of posting quickly. Here it is again. Thanks for your patience. Bev
Here it is again. Thanks for your patience. BevBev, If you want to display a picture in your post, be sure to use, JPG, or PNG files. File size in theory should not be a problem, but files, .jpg for sure, are adjusted automatically. Chin up and try again, please.
Feb 22, 2018 11:37:15 #
I apologize. I did read the posting instructions a while back, but when choosing my attachment, selected my psd working file instead of the merged jpg file. Bev
Feb 22, 2018 12:06:10 #
NikonGal wrote:
I apologize. I did read the posting instructions a while back, but when choosing my attachment, selected my psd working file instead of the merged jpg file. Bev
No problem, Bev, we have all done that at some time. (Me especially LOL!)
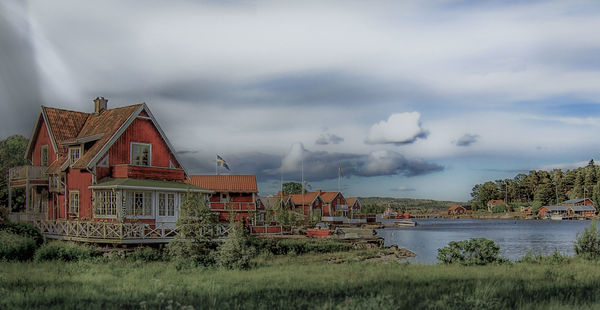
That is a good attempt with the image, but there are a number of problems: the clouds have patches of white with no detail. That's a no-no. Always have detail in whites and blacks, which a inclined to lack detail because of over-exposure for white, under-exposure for black, and post processing which is overdone and too much. Over doing it in PP is easy because you have so many adjustment tools to play with. If you use an adjustment tool or filter and you don't like what you see, click undo and select a different tool. Don't try to cure the mistake you made by adding another tool to hide the mistake. That way leads to disaster. There is also a lot of noise in the sky, check the darker clouds for the grainy effect, that's noise. You can get rid of it with your denoise filter. Be careful how you use this filter as moving the slider too far softens everything. Not good.
The houses also have noise and they need sharpening. There are other problems but I don't want to tear your work to pieces. Lets all learn challenge by challenge. You get three thumbs this time for your interpretation.
Feb 22, 2018 12:15:50 #

Let me jump into the fray, and join the fun. I tried to use the sunray to help draw the eye to the house. I hopefully did not over do the sliders as I ws trying to make this shot look as realistic as possible. Thanks in advane for your critique. I seem to learn something ever time i submit a picture.
Feb 22, 2018 15:46:44 #
NJFrank wrote:
Let me jump into the fray, and join the fun. I tried to use the sunray to help draw the eye to the house. I hopefully did not over do the sliders as I ws trying to make this shot look as realistic as possible. Thanks in advane for your critique. I seem to learn something ever time i submit a picture.
NJ, you had an idea and ran with it. This means you should have thought more about what you wanted to achieve with this image. Right? Yes, you are correct, you should have run in the opposite direction. You did well controlling noise, good work. However, your image lacks contrast, clarity, and sharpness. The clouds have patches of white with no detail. Your sunbeams don't show against the gray sky. Here's a tip, sun beams work best when they come through a dark area. Imagine a dark forest with the sun beams coming through the trees. Now those beams really have impact. Try it with a dark forest photo from Google images, you'll be amazed. Sun beams are not so good with a light or white area. But you know that now, right?
Please load your image into your photo editor. Find the Brightness and Contrast filter. Do not touch the brightness slider. Move the Contrast slider until your image looks stronger. Move the brightness slider a tad if you need to. If you have an Exposure filter adjust that a little until your image pops. If your sky and/or clouds are too bright, make a selection around your sky and reduce the brightness. Post you new image to get a higher rating. This interpretation gets you three thumbs.
Feb 22, 2018 16:58:38 #
[quote=Shakey]NJ, you had an idea and ran with it.
Ok here is my redo. Hopefully I am on the right track. I tried to be gentle with the sliders.
Ok here is my redo. Hopefully I am on the right track. I tried to be gentle with the sliders.
Feb 22, 2018 20:06:38 #
[quote=NJFrank]
Yep, in many ways that is better. The photo is sharper and contains more contrast. However, somehow you introduced a lot of gray into the image. The grass is gray/green; the houses are gray/red, etc. That cloud is still has little or no detail. You are heading in the right direction, NJ. I'll give you four thumbs for effort.
Shakey wrote:
NJ, you had an idea and ran with it.
Ok here is my redo. Hopefully I am on the right track. I tried to be gentle with the sliders.
Ok here is my redo. Hopefully I am on the right track. I tried to be gentle with the sliders.
Yep, in many ways that is better. The photo is sharper and contains more contrast. However, somehow you introduced a lot of gray into the image. The grass is gray/green; the houses are gray/red, etc. That cloud is still has little or no detail. You are heading in the right direction, NJ. I'll give you four thumbs for effort.
If you want to reply, then register here. Registration is free and your account is created instantly, so you can post right away.