Long Lenses, Short Grips?
Feb 15, 2018 23:26:17 #
BB4A wrote:
Thanks for all the questions, and thanks to SS for... (show quote)
================================
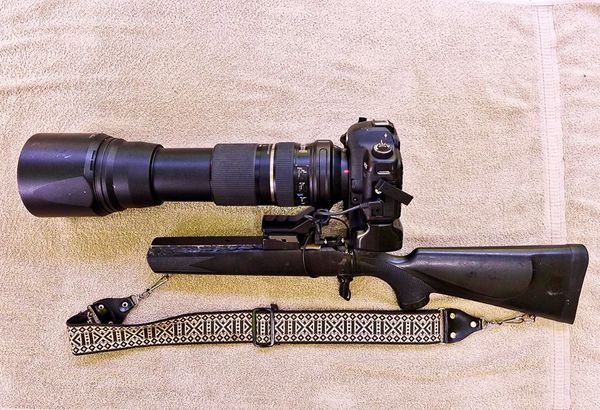
My Remington Riflestock support system....
-------------------------------------------------
Feb 16, 2018 19:34:21 #

Feb 16, 2018 22:58:00 #

Feb 16, 2018 23:02:54 #
Ghost45 wrote:
How does it work for you?
=============
Pardon me...
Are you addressing the "Remington Support System" that I made and posted here? Or someone else?
As you are new - It is common that one makes use of the "Quote Reply" checkbox when replying to another post.
However --
This works well, for me that is. Some might find it a bit cumbersome in that it is a bit "top-heavy". I wrap the strap around my left arm, as one would do with supporting a rifle - to hold it tight. My left had is NOT on the stock, but on the barrel of the lens (Tamron 150-600). The "trigger" is a wire remote shutter cable that I have fastened to the trigger area of the rifle stock and plugged into the Canon 5D Mark II the usual way.
This configuration allows me to freely move with the distant subject in motion and or flight. And -- Yes I do have the stabilization ON when I use this.
Not all people would find this suitable to their needs. It is good to experiment with different systems to see what works good and comfortable for each and every person.
-0-
Feb 16, 2018 23:14:52 #
James R wrote:
============= br br Pardon me... br br Are you a... (show quote)
Thank you, still getting used to this. I like you set up and have thought about creating my own.
Feb 16, 2018 23:16:47 #
Ghost45 wrote:
Thank you, still getting used to this. I like you set up and have thought about creating my own.
================
Hey! Go for it. ;-)
You might make it fit your arm length and position as to where it would be comfortable for you.
-0-
Feb 16, 2018 23:21:49 #
James R wrote:
================
Hey! Go for it. ;-)
You might make it fit your arm length and position as to where it would be comfortable for you.
-0-
Hey! Go for it. ;-)
You might make it fit your arm length and position as to where it would be comfortable for you.
-0-
I have a Rebel T7i I use when hiking and gets a little heavy around the neck at times. I’ve started using a single point sling from one of my rifles. Works well taking the pressure off the neck.
Feb 17, 2018 17:19:09 #
gray_ghost2
Loc: Antelope, (Sac) Ca.
Where did you purchase your your composite and tactical grip from?
Feb 17, 2018 18:12:15 #

I find that the center of gravity and the ergonomic design of the camera or rig (camera. long lens, flash bracket etc.) have more to do with its ease of handling and maintaining steadiness than their actual weight or length. I have used relatively heavy cameras and rigs that were easier and more comfortable to use and hold steady than cameras lenses and accessory combination that were lighter but tended to be more unwieldy because of their shape, industrial design, location of their controls or intrinsic center of gravity.
As an example- In my medium format gear, My Hasselblad with a given lens is the same weight as My Mamiya
RZ 67 but I find the Hasselblad much easier to manage in hand-held situations.
It's a fact, however, that some cameras, lenses and rigs are so heavy that the do require more physical strength in the photographer's upper body, arms and hands in order to maintain safe and steady operation. Many years ago, I did quite a bit of work with a handheld 4x5 Linhoff press camera- I started to develop forearms like "Popeye the Sailor"! The camera, Graphmatic film holder, bracket and flash head weighed in at 13 lbs., however, with their very well designed hand grip, the entire rig was surprisingly easy to steady.
Point is, if someone needs to use and hand-hold an ensemble of heavy gear such as a larger camera, a camera with a long and heavy lens, a larger flash unit on a bracket or a compendium lens shade, they should create a support system to accommodate it by shifting the center of gravity and enabling ergonomic handling. There are grips, shoulder harnesses, gun-stock mounts, belt pods, special camera straps and of course, mono-pods. Sometimes we just have to improvise something using some of the aforementioned accessories.
If you can somehow establish a better center of gravity you can ofttimes solve weight or bulk issues.
There are, of many specialized car and truck window mounts, gyroscopic camera mounts for aerial photography, gimbels and it seems that new support gear is being introduced all the time. Some of this gear is expensive but pays off if you do a substantial amount of work that requires special camera stabilization gear.
There are also causes of unwanted camera shake and movement such as mirror slap, and poor shutter release technique, especially if the shutter release is in an awkward location. Sometimes just using a cable release or electronic release that is wired or mechanically integrated into the grip will help to maintain steadiness and minimize shake. If the release is badly located or hard to actuate, folks ted to poke at it rater than exerting soft even pressure.
Another trick- Many years ago, a friend of mine who is a cinematographer showed me something that he does to cope with very heavy motion picture cameras when they have to be hand held. He sets up the camera and grips as I have explained but the "rehearses" various movements sometimes in front of a mirror. I am talking about holding the camera in place with his eye to the viewfinder and then kneeling, rising, changing heights, panning, "dolly" shots, following, tilting upward and downward etc. - basically simulations of shots that would normally be done on a tripod, a dolly, or with the camera mounted on tracks or nowadays with a "Steadicam". I adopted this method and modified it to make sure I could handle my rig from all the require positions without shake or yanking the camera out of level or composition while attempting to balance or compensate for the wight or imbalance. This was especially handy when designing a set up with heavy gear.
My advice is to assemble a system that will establish a balanced center of gravity and test it out on a dry run before you take it out on an important shoot or event. Try the "practice in the mirror method" that I have alluded to and check out the results with you images at a high degree of enlargement. As others have suggested, sometimes all that is needed is a simple inexpensive grip or bracket, wooden handle with with a strong well anchored screw to match your tripod socket on the camera or lens collar. The only word of caution is to make certain that whatever you rig up is strong and safe and will not result in losing your grip and dropping a camera or lens or even injuring yourself.See that metal parts don't have rough edges and use felt, rubber or cork pads or gaskets to prevent marring the finishes of your gear.
Don't be afraid to improvise in a hitch. If you find yourself out somewhere and you forgot you tripod or grip, don't forget some of the old and time honored methods of steadying a camera by bracing it against a wall, a ledge, uinsg a bean bag, pillow, a folded up jacket or blanket and buffering shake and vibration by placing you elbows, and upper arm against your body holding the camerin your right hand and cradling the lens with your left hand- take a deep breath and squeeze- but don't poke the release button.
Feb 17, 2018 19:53:54 #
E.L.. Shapiro wrote:
I find that the center of gravity and the ergonomi... (show quote)
Thank you for the tips, you are truly an asset to this art.
Jul 22, 2018 16:36:22 #
James R wrote:
"Short Grips" --
Make on in Gold for Donald tRUMP.
-------
Sorry -- I just had to write that .
-0-
Make on in Gold for Donald tRUMP.
-------
Sorry -- I just had to write that .
-0-
You sound jealous, or were you just disappointed the last time you showed up with your knee pads? Sorry...just had to write that.

Jul 24, 2018 14:04:09 #
TBerwick
Loc: Houston, Texas
Guys, a search of Amazon turned up a couple of camera ready grips on the cheap. https://www.amazon.com/CAMVATE-Camera-Support-Camcorder-Stabilizer/dp/B014WISX6I
If you want to reply, then register here. Registration is free and your account is created instantly, so you can post right away.