Check out Black and White Photography section of our forum.
Lightroom Help
Oct 6, 2017 13:09:11 #
Retired fat guy with a camera
Loc: Colorado
The 1st time I picked up a camera was 2 years ago. I read, I check flicker, for gear I am interested in, and I experiment with different camera settings. I researched every word written about the camera I own, and the lenses I have bought. I have taken more bad pictures than good. That doesn't bother me, I use my mistakes to become better.
Lightroom, and all it's uses still baffle me. I am fairly smart [157 IQ ], so even at the age of 64, I do have the ability to learn new tricks. I have learned a lot from the net.
But every time I try to watch a a lightroom tutorial, 30 seconds in, my eyes glaze over, and my brain goes on the blink. I think, I may also drool a little.
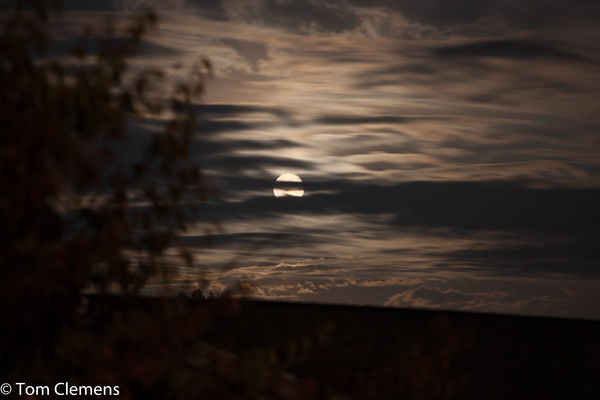
This image is straight out of the camera. The settings I used are as follows.
5 seconds, F/5, ISO 320 @ 200mm's. taken at 6:30. I tried a shorter shutter time, but it was too dark.
The sky, I think is great. The top of moon is blown out, the rest of the moon is under cloud cover.
Is there a lightroom adjustment to fix the blown out part, and leave the rest alone?
I am old and did not grow up with a computer, so, if you have any helpful suggestions, please make them simple.
Thanks, Tom
Lightroom, and all it's uses still baffle me. I am fairly smart [157 IQ ], so even at the age of 64, I do have the ability to learn new tricks. I have learned a lot from the net.
But every time I try to watch a a lightroom tutorial, 30 seconds in, my eyes glaze over, and my brain goes on the blink. I think, I may also drool a little.
This image is straight out of the camera. The settings I used are as follows.
5 seconds, F/5, ISO 320 @ 200mm's. taken at 6:30. I tried a shorter shutter time, but it was too dark.
The sky, I think is great. The top of moon is blown out, the rest of the moon is under cloud cover.
Is there a lightroom adjustment to fix the blown out part, and leave the rest alone?
I am old and did not grow up with a computer, so, if you have any helpful suggestions, please make them simple.
Thanks, Tom

Oct 6, 2017 13:13:54 #

If it's blown out to the point your camera shows the "blinkies" in the image review there typically isn't anything there to recover - it's just white. If it's not truly blown out then try the Highlights slider.
http://improvephotography.com/29251/difference-highlights-whites-sliders-lightroom/
http://improvephotography.com/29251/difference-highlights-whites-sliders-lightroom/
Oct 6, 2017 13:15:18 #

In Lightroom, turn the "Highlights" slider down, the one in the Basics section.
You need to be in the develop module. Also, it helps a lot if you're shooting in Raw, not jpeg. That gives you much more latitude in your adjustments.
You need to be in the develop module. Also, it helps a lot if you're shooting in Raw, not jpeg. That gives you much more latitude in your adjustments.
Check out Digital Artistry section of our forum.
Oct 6, 2017 13:20:18 #
Retired fat guy with a camera wrote:
The 1st time I picked up a camera was 2 years ago.... (show quote)
At that shutter speed, naturally your moon is blown out beyond repair, because you can't fix what isn't there in the first place! The only way to "fix" this, would be to completely replace the moon with another one (one that's not blown out from another image). But for that you need software that uses layers, such as PSE or PS etc.!
Oct 6, 2017 13:28:23 #
Retired fat guy with a camera
Loc: Colorado
It is shot in raw, I did use the develop mode, and posted a shot earlier. I was thinking along the lines of some kind of brush thing. That I have no clue as how to use. Dodge and burn?
Oct 6, 2017 13:34:21 #
Retired fat guy with a camera wrote:
It is shot in raw, I did use the develop mode, and posted a shot earlier. I was thinking along the lines of some kind of brush thing. That I have no clue as how to use. Dodge and burn?
Sure, if your only goal is to darken the moon there's a brush tool that allows you to do many things including exposure adjustments. Check this out: http://helpx.adobe.com/lightroom/how-to/dodge-burn-adjustment-brush.html
Oct 6, 2017 13:50:06 #
Linary
Loc: UK
Retired fat guy with a camera wrote:
The 1st time I picked up a camera was 2 years ago.... (show quote)
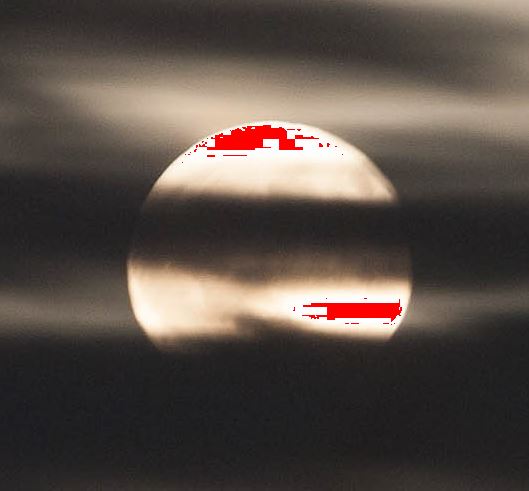
The area you refer to and the right lower segment of the moon are both blown out with no recovery possible, however, if you choose the brush, mask the two areas with a feathered mask (see 1st screen clip), then in the effects panel click on the colour box and choose a hue of somewhere around 40, paint onto the blown areas. Increase/decrease the amount of colour being added by adjusting the exposure, contrast and clarity sliders, even the saturation slider until the colour blends with the rest of the moon. Click done.
With patience, it can be done. My first choice would not be LR for this but Photoshop or Elements.

Check out Professional and Advanced Portraiture section of our forum.
Oct 6, 2017 13:52:34 #
Retired fat guy with a camera wrote:
It is shot in raw, I did use the develop mode, and posted a shot earlier. I was thinking along the lines of some kind of brush thing. That I have no clue as how to use. Dodge and burn?
Since moon shrouded by clouds happens all the time, try exposing for the moon the next time. Then use the Graduated Filter in Develop to adjust exposure up or down depending on the look you are trying to get. This would really work in the posted image from the bottom up to allow you to lighten the foreground. Hold the shift key down when applying the graduated filter to keep the line straight.
Also, before editing in LR, right click and choose Virtual Copy, and edit on the copy. This allows you to keep the original image intact while you edit. It does not take up disk space, only saves the edits into the cataloge.
And IQ and Age have nothing to do with artistic ability
Oct 6, 2017 14:02:41 #
Retired fat guy with a camera
Loc: Colorado
Thanks everyone, I do appreciate the time, you all took to explain.
Oct 6, 2017 14:20:38 #

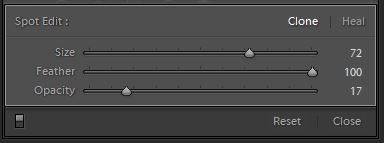
As Linary shows, the bright areas are blown, so there is no detail in those areas. An alternative to using the brush (which won't add details or texture) is to clone over the area using a patch from a part of the sky that has some detail in it. Since all you want is some detail to darken the blown areas slightly, you can reduce the opacity quite a lot. That, together with generous amounts of feathering, makes it easy to get the patch to blend in, so you don't have to be too fussy about choosing a patch.
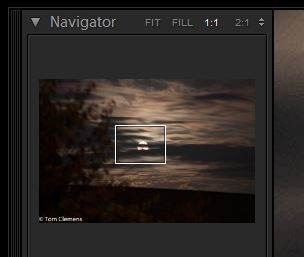
First, zoom in using the Navigation tool (top left). If you're using a bigger file than the one posted you'll need a zoom ratio other than 1:1.
Then select the Clone tool and set the settings roughly to those shown. Use the clone brush to select an area that includes the blown highlights. If it doesn't give a suitable patch, move the patch by clicking down on it and dragging it to a better location.
Then adjust the opacity to give just enough to fix the blown area (it shouldn't take much).
This technique can be used to cover blown areas of cloudy skies. But in that case it helps to select the shape of the patch to match the blown area plus a small margin. Choosing a patch that adds cloud details helps also. If you get a good patch you can use more opacity than is shown below, which will do a better job of covering the blown area in the clouds.
-
Blown areas.
Navigator panel for zooming.
Selecting the blown area and if necessary moving the source of the patch (the upper bit).
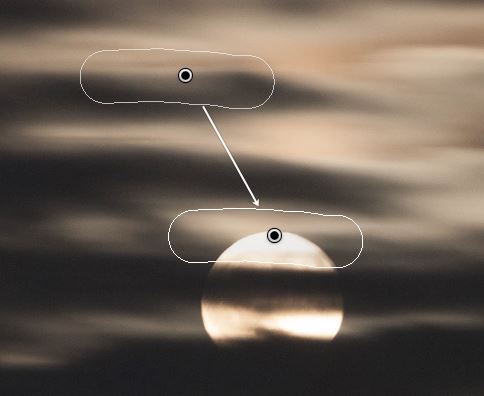
Clone tool settings.
Oct 6, 2017 17:57:47 #
Linary
Loc: UK
R.G. wrote:
As Linary shows, the bright areas are blown, so th... (show quote)
That is probably easier than using the brush !!
Check out Panorama section of our forum.
Oct 6, 2017 23:21:30 #
Oct 7, 2017 06:36:35 #

speters wrote:
At that shutter speed, naturally your moon is blown out beyond repair....
Do you really think that makes sense?
Oct 7, 2017 06:45:07 #
The fact that the moon is blown out does not bother me because moons can be that bright relative to everything else and it heightens the contrast between the moon and everything else which is obviously dark at night. A classic silvery moon. What bothers me are the distracting leaves in the lower left and a general unsharpness. I would have shot this on a stready tripod. From a developing standpoint, I might have boosted the clarity a bit but not the contrast so the blacks and whites, about the only tones here, are nice and crisp.
If you want to see the details on the moon, then you will need an entirely different set up. The moon has to be free of all clouds, you need a long lens (I use 600 mm) and tripod, and your exposure will be at least two stops faster. When you meter on the only the moon, you will be surprised how bright it is.
If you want to see the details on the moon, then you will need an entirely different set up. The moon has to be free of all clouds, you need a long lens (I use 600 mm) and tripod, and your exposure will be at least two stops faster. When you meter on the only the moon, you will be surprised how bright it is.
Oct 7, 2017 07:17:18 #

Retired fat guy with a camera wrote:
The 1st time I picked up a camera was 2 years ago.... (show quote)
I like it as is!
If you want to reply, then register here. Registration is free and your account is created instantly, so you can post right away.