Dodging and burning in
Sep 25, 2017 15:01:23 #
I recently converted to digital and long for the ability to use my hands in my darkroom to dodge or burn in images. Is there an equivalent in digital? What programs are suggested? I do have the Nikon program that is free, and Photo Explosion.
Sep 25, 2017 15:17:24 #

Almost every program worth its salt, free or not, does it.
Two Roll Royce:
- GIMP - Free, must use Therapee to import raw files but also free
- Adobe PS CC, monthly fee (9.99) but the price can co much higher if you start adding ad-dons instead of learning it.
Note that both programs can be confusing at first but both are also well supported on line by incredibly talented folks.
In both cases use the dedicated forums for each program then YouTube then here, in this order.
Sep 25, 2017 15:18:07 #

Most PP software has the equivalent. For example, in Lightroom, there's the Adjustment Brush. Photoshop has dodge and burn tools so named.
Sep 25, 2017 16:07:23 #
toxdoc42 wrote:
I recently converted to digital and long for the ability to use my hands in my darkroom to dodge or burn in images. Is there an equivalent in digital? What programs are suggested? I do have the Nikon program that is free, and Photo Explosion.
You can try to search the software documentation - Ctrl-F and enter dodge, burn, etc. Also, read the documentation for adjusting exposure in one area. Google something like - lighten one area using Photo Explosion.
Sep 25, 2017 20:50:49 #

toxdoc42 wrote:
I recently converted to digital and long for the ability to use my hands in my darkroom to dodge or burn in images. Is there an equivalent in digital? What programs are suggested? I do have the Nikon program that is free, and Photo Explosion.
Dodging and burning are pretty standard, and some are better than others. I prefer not to use the dodge/burn tools in Photoshop, which are destructive (permanent) in nature. Instead I create two 50% gray layers, one which I call dodge, and the other burn. both layers are set to overlay blend mode. If I need to darken an area, I use a black brush on the area, with the burn layer targeted, and if I have to lighten I do the same with a white brush on the dodge layer. I can reverse the effect by using a white brush on burn and black brush on dodge. Or completely remove the effect by either re-filling the layer(s) with 50% gray, or deleting it altogether.
There is no "dodge and burn" tool in Lightroom. But you can apply a mask using a brush that will allow you to adjust some of the characteristics of the image, including darkening or lightening, contrast, sharpening, shadow/highlight recovery, saturation, clarity etc, on a local basis. It also has a radial mask and linear gradient that have the same adjustment capability. They are not very accurate, but they are very intuitive and fast to use.
Capture One has similar capability. And One 1 has very accurate masking and layering in raw conversion and on bit mapped images, as well as a local adjustment brush to tailor the nature of the adjustment, which can be tonal, saturation, sharpness or contrast in nature.
I cannot speak for other programs.
Sep 26, 2017 06:25:13 #
toxdoc42 wrote:
I recently converted to digital and long for the ability to use my hands in my darkroom to dodge or burn in images. Is there an equivalent in digital? What programs are suggested? I do have the Nikon program that is free, and Photo Explosion.
OMG it is SOOoooo much easier in digital. I only use Photoshop. It has burn and doge tools of continuously variable size, hardness, flow and percentage, for highlights, mids or shadows. Then there is the adjustment brush in Adobe Camera Raw, with the same parameters, which can alter exposure, contrast, clarity, blacks, whites, shadows, highlights, and a host of other properties.
Sep 26, 2017 07:05:27 #

kymarto wrote:
OMG it is SOOoooo much easier in digital. I only use Photoshop. It has burn and doge tools of continuously variable size, hardness, flow and percentage, for highlights, mids or shadows. Then there is the adjustment brush in Adobe Camera Raw, with the same parameters, which can alter exposure, contrast, clarity, blacks, whites, shadows, highlights, and a host of other properties.
True, but to the beginner in digital it is like walking into an IceCream parlor and too many flavors. What the beginner needs is a lighten and darken brush and nothing beyond that. Later comes the fine points.
There are such a vast number of edit programs... time for him to get a $50 Affinity and just use a few tools.
Sep 26, 2017 07:12:40 #


Sep 26, 2017 08:52:06 #

Toxdoc, rather than commenting on all the posts for their good information, I will jump to my recommendations. I have been using Lightroom for years and like it for many reasons. To answer your question, yes, Lightroom has tools for burning in and dodging and they are superb.
I did all my printing for years and burned in or dodged just about every print. I would often burn in the bottom or top of a printing in a gradual fashion. Darker at the edge and lighter as I moved in. Lightroom calls that tool the graduated filter. Since you may not even opt for Lightroom, I will not go into details but I assure you it is very easy to use and does indeed give you the look and feel of the darkroom. To burn in or dodge locally, I would use my hand, dodging tool and a piece of cardboard with a hole in it. Lightroom's radial filter beats all those by far. For better control, use the adjustment brush which I rarely need. I finished most of my prints with a little vignetting to darken the corners. Lightroom makes child's play out of that.
Here is an important thing to remember about these tools. In the darkroom, you were moving your hands and tools around a lot to avoid any hard edges. You do the same in Lightroom by adjusting the feathering of the tools (except the gradient tool).
Lightroom has so many other advantages but somehow I think you will not miss wasting paper, time and chemicals on prints you used for tests or goofed manipulating or writing notes on what you did. Everything in digital has a learning curve. However, with your darkroom experience, you should find that Lightroom brings light to the darkroom. Try it, you will like it.
Good luck and let me know if you need more help.
Sep 26, 2017 09:37:50 #

Gene51 wrote:
Dodging and burning are pretty standard, and some ... (show quote)
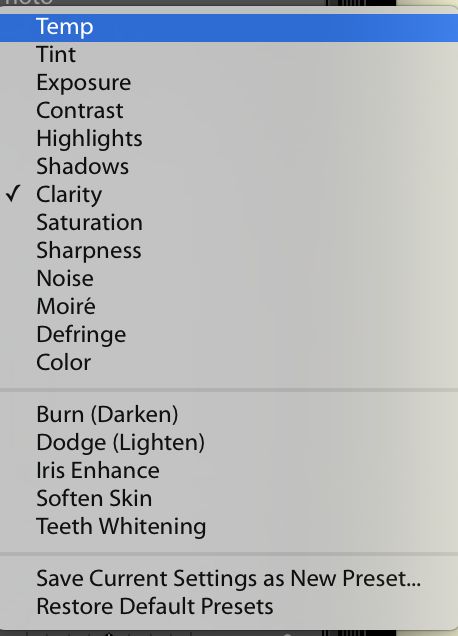
In Lightroom 6 the adjustment brush in the develop module has a drop-down menu where it says effect:
dodging and burning are some of the choices --- please see the screen shot I attached.
Sep 26, 2017 11:29:49 #

Dodging and burning in Photoshop was the first tool I learned how to use 20 years ago. I did it on a copy of the original because Photoshop didn't have layers then.
Sep 26, 2017 12:26:12 #
kymarto wrote:
OMG it is SOOoooo much easier in digital. I only use Photoshop. It has burn and doge tools of continuously variable size, hardness, flow and percentage, for highlights, mids or shadows. Then there is the adjustment brush in Adobe Camera Raw, with the same parameters, which can alter exposure, contrast, clarity, blacks, whites, shadows, highlights, and a host of other properties.
(For those of you unfamiliar with ACR and Lightroom, both use the same software engine. Although their user interfaces are slightly different, their editing capabilities are the same.)
Sep 26, 2017 12:38:56 #
In Photoshop you can now Dodge and Burn on a separate layer. Great flexibility, mistake-proof.
Sep 26, 2017 13:14:44 #
Gene51 wrote:
Instead I create two 50% gray layers, one which I call dodge, and the other burn. both layers are set to overlay blend mode. If I need to darken an area, I use a black brush on the area, with the burn layer targeted, and if I have to lighten I do the same with a white brush on the dodge layer. I can reverse the effect by using a white brush on burn and black brush on dodge. Or completely remove the effect by either re-filling the layer(s) with 50% gray, or deleting it altogether.
Thanks for this very cool method! I have been unhappy with a lot of my dodge and burn results in PS CC, and will try this one out asap!
Sep 26, 2017 14:17:40 #

Gene51 wrote:
Dodging and burning are pretty standard, and some ... (show quote)
How do you create a 50% gray layer?
If you want to reply, then register here. Registration is free and your account is created instantly, so you can post right away.