Landscape with overcast
Aug 9, 2017 22:56:06 #
Thank you Richard and Mundj. This is all some very sound advice! I have dabbled a few times with silhouettes with a close foreground of some trees and plants but have a long way to go on that road. I know the higher end lenses won't magically make me a better photographer, but I've noticed some "wobble" in my 18-55 when I try focusing it. I didn't realize that it was largely plastic components holding the glass until about a week ago (still learning about lenses). This is why I am looking to purchase just 1 or 2 prime lenses, to largely (but not entirely) replace my short telephoto. Also to aid in the low-light shots such as sunset or later.
Thank you all so much for your valuable advice. I will definitely continue learning and practicing. I can't tell you how happy I am to have found this forum and that you are all so friendly and eager to provide input.
Thank you all so much for your valuable advice. I will definitely continue learning and practicing. I can't tell you how happy I am to have found this forum and that you are all so friendly and eager to provide input.
Aug 10, 2017 07:03:28 #

You might want to look into LR/PS it is only $10 a month. There are a lot of youtube videos as learning resources.
Aug 10, 2017 08:11:01 #
I agree here. LR/PS gives you great post processing. The contract is $120/year that can be paid at $9.99/month. Laura Shoe at Laura.shoe.com provides an excellent LR teaching video package for less than $100 but will require a time investment to learn. IMHO you do not want attempt to use either LR or PS without some training and LR is by far the easiest to master.
If you need a replacement lens for your 18-55, there have been good reports on the HOG for the 18-300mm zooms. My personal lens of choice is an 18-135 zoom.
If you need a replacement lens for your 18-55, there have been good reports on the HOG for the 18-300mm zooms. My personal lens of choice is an 18-135 zoom.
Aug 10, 2017 09:54:59 #

My only comment would be the time of day. I am guessing that these photos were taken midday. There is no "depth" to the shots. Even on an overcast day, the lower angle light of morning or afternoon adds some depth to the scenery. There are definitely a lot of cool PP techniques to help also. Have fun experimenting with them.
Aug 10, 2017 10:04:37 #
Affinity is a really good post processing software with lots of video instruction. It is a one time cost of $50 or a very good option is the Lightroom/photoshop combo for $10 per month. I use both. I agree with Bob, you will get the most from your photos if you shoot raw. You initial attempts are quite good and you will catch on fast. Keep shooting and enjoy it.
Aug 10, 2017 11:48:51 #
Many folks advise that you take lots of photos and I agree with that but with a caveat. Take lots of pictures but as you do, look at the result and think about what you don't like about the shot. The young child in the grass - first shot no fill flash - next shot with fill and you can see only partially illuminated - you could have moved model or added a reflector to light the other side of her face???
Child by the river is too dark so change to spot meter on her and shoot or use fill flash and second try would have worked good.
Learning how to fix each thing you saw that didn't work makes you a much better photographer more quickly.
I'm also a supporter of spending 10 bucks a month on PS/LR/Bridge/ACR.
Aug 10, 2017 11:55:41 #

One thing that's rarely mentioned in conversations like these is the recommendation to decide what you want lit and how.
In your shots you have to decide what you want to stand out; the kids? Mountains? Clouds? What is it you want me to see as the main subject.
That's basic to all photography, you have to make it happen.
For example, on the little girl, her back is to the light source and your lens is looking right INTO the light source. What was the effect you were going for? To have her light up more than the sky? Less than the sky? Basically she's in shadow and normally, the subject isn't in the shadow because our eye is drawn to what's lightest or largest in the frame; we perceive it as the main subject.
If you wanted her to be lit well, then either add light to her (reflector, flash or whatever) or get her into the sun, OR turn her around so that the light source is hitting her face.
Start thinking about what the light is hitting and what effect you are going for before you hit that shutter button...don't just fix it in post.
Aug 10, 2017 12:12:30 #

I see that you are trying to do mostly landscape images. That's great. They are fun to do. My first suggestion is to NOT shoot them at 55mm. For landscapes, shoot wide angle or 18mm with the lens you are using. For your daughter, 55mm or 35mm is fine. Take your camera out of M until you really have a grasp of what does what. Use A or aperture priority. The sweet spot in most lenses is about 2 stops up from wide open. Wide open means when your aperture has a smaller number but the actual aperture opens up to a larger iris letting more light in but the end result has less DOF (depth of field) DOF is less when the aperture has a smaller number such as f/1.8 and has more DOF when the aperture has a larger number such as f/22.. But DOF is not affected much, if at all, when you have small focal length. Small or short focal length means small millimeter lenses such as 18-55mm. Medium might be considered 70-200mm and large focal length 300-600mm.
One thing you need to understand about making great landscapes is that there needs to be subjects in the frame that make the image interesting. Consider looking for spots where you have something in the foreground, mid ground and background. You also need to decide what the subject is - in other words, what do you want the viewer to look at and focus on when viewing your image. If it's clouds int the sky, make darn sure that part is focused and that other parts of the image aren't too bright causing the person viewing to become distracted by the brightness of other parts of the image. Bright parts cause the person viewing to look there.
Consider learning how to edit your images with your computer so that you can make that part of your image that you want to stand out become the focus of the image. I know, learning to take pictures and to edit them is a lot to bite off but not impossible. Also, shoot in raw. If you noticed, some of the things people did to your image caused artifacts in your sky and clouds to become almost fake looking. You can tell that the image has been edited and that's what happens when you shoot in jpg instead of raw.
Good luck and keep shooting.
Star_Of_Life89 wrote:
This is my first time submitting photos here and s... (show quote)
Aug 10, 2017 12:35:27 #
Charlie157
Loc: San Diego, CA
It looks like you were metering on the highlights. You can use a Graduated Neutral Density filter. Or Matrix metering if your camera has it. Or use it both together. About the young lady, it appeared that you metered on the highlights and not the face. You can use a fill flash to help that out, or meter on the face
Check the camera's manual to see if they address this. Also check out to see what metering system you camera has been set to. Matrix, Centered Weighted or spot. Read your manual of how the different metering systems work and when to use it. Just keep shooting and ask questions and read. Two and four year colleges usually have courses on photography. You can look into them after receiving your RN.
Good luck on your quest for your RN. Focus on getting your RN first.
Aug 10, 2017 14:43:40 #
Thank you all for your input. I am very pleased with all of your different suggestions. As Charlie stated, my current priority is my RN. I have one last semester and then have to take my board exam which is around $200, so for now the PP will have to wait. I will, of course, be considering this once I have my job and steady income. Thank you for your suggestions as well as wishes for success on my RN.
I would especially like to thank you all for your feedback on the lighting and how to better set the frame up for the shot. Being new, I have only scratched the surface when it comes to placing my subjects. I love the variety of ideas and can't wait to go and try some of them. I definitely need to read up some on the metering systems. I briefly read a little about each, but have yet to really grasp fully the benefits and drawbacks to each.
From a combination of reading, as well as spending time out shooting, I have a relatively good grasp on the aperture settings and rudimentary start on focal lengths. Typically for my landscapes I use an f/32 to get the maximum amount of depth when conditions are permitting, and my lowest appropriate ISO to get the least amount of noise. I know the relationship of the f stops and shutter speeds and how a full stop of the shutter is the same as a full stop of the aperture in respect to the light it allows in, and a decent grasp on how changing one or the other will affect stop motion abilities and DOF. This photo shoot was a little of trial and error (more error than trial) to see how using a slightly lower f stop would change my results especially with the bright clouds. That's probably why the images appear to be more "flat" than I would prefer. One of the reasons for the longer focal lengths, and I hate admitting this, is because I was very short on time and shooting from the driver's seat of my truck :'( Something I rarely ever do because of the MASSIVE restrictions. I chose a little give and take on this photo trip to aim more at gaining the proper exposure than necessarily the greatest depth of field. In order to shoot out the passenger window, I had to zoom. In a few of the other instances, I set the distance for shorter and leaned over the center console to try getting a little better detail. It's not something I'm terribly proud of, but I'm trying to isolate one variable at a time so that with better knowledge on exposing the pictures, when I take the time and have my tripod set up and do it correctly it will yield a far better picture. Only about half of them were done in the truck and are evidenced by the zoom (definitely NOT the one with my daughter).
rpavich and CPR, thank you for your post about finding the subject I want to stand out. Sometimes I get caught up in the moment, and I have a hard time deciding what I want the main picture to even be and try just getting everything. With this in mind, I will start trying to bring out what I want the main theme to be and build my shot from there based on what needs to be done to capture it.
PhotoPhred, These were taken between 6PM and 7:30 PM Eastern time with the sun shining almost directly into the lens (in hind sight, probably not the best idea I have had).
Mundj, I would like to thank you and a few of the others who have given recommendations on lenses. As I am wanting something to replace my short kit lens, I'm having a hard time choosing what would best suite me. I still have much to learn about the pros, cons and uses of each focal distance and your recommendations are well received!
I really appreciate you all taking the time to offer advice. I really enjoy all the ideas you are offering and will be referring to this post often as I try each of them to produce better photos. The more feedback I receive, the more difficult it is waiting for another chance to go out and apply your suggestions with some fresh shots.
Aug 10, 2017 15:39:11 #
Star_Of_Life89 wrote:
Thank you all for your input. I am very pleased with all of your different suggestions. As Charlie stated, my current priority is my RN. I have one last semester and then have to take my board exam which is around $200, so for now the PP will have to wait. I will, of course, be considering this once I have my job and steady income. Thank you for your suggestions as well as wishes for success on my RN.
Regarding the editing software, a while back I was looking to see if the free alternatives would do the job. After trying a bunch of programs, I decided to use LightZone. While it does not have all that the paid program have, it does very well working with both jpg and raw images. You can download it at http://lightzoneproject.org/ . You need to register to do the download, but I have not seen any misuse of my email address.
And good luck with your exam.
Jerry
Aug 10, 2017 18:07:11 #
Erdos2 wrote:
Regarding the editing software, a while back I was looking to see if the free alternatives would do the job. After trying a bunch of programs, I decided to use LightZone. While it does not have all that the paid program have, it does very well working with both jpg and raw images. You can download it at http://lightzoneproject.org/ . You need to register to do the download, but I have not seen any misuse of my email address.
And good luck with your exam.
Jerry
And good luck with your exam.
Jerry
Thank you very much Jerry!!! I will give that a try. Even if it only fixes a few minor issues on my images, it's still better than a completely unedited picture. Especially for free, just to help me until I have the money for something better.
Thank you for wishing me luck on my exams.
Aug 11, 2017 13:48:19 #

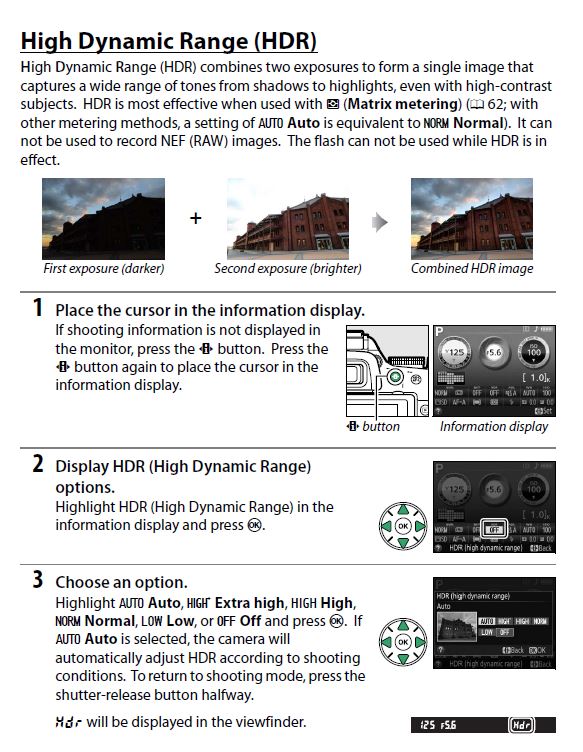
I see my D5200 has an in-camera HDR mode. Not sure if that applies to the D5000. HDR mode produces jpg, not raw, but it sounds like that wouldn't bother you, and it would probably produce shots that capture the full dynamic range of the sort of shots that you've posted, so the need for raw is reduced.
As others have pointed out, the camera is just capturing what's in front of it, which is high dynamic range scenes, so as far as settings are concerned, your priority is to avoid blowing highlights. Most other problems can usually be worked on fairly successfully in PP, but blown highlights can be really problematic, to the point where a sky replacement may be the only viable option. In less extreme cases a certain amount of success can be achieved using cloning, but it's not an easy option and requires a certain amount of skill to pull it off. Matrix metering will give the best protection from blown highlights. It's not total protection but it's the safest option. Even in skilled hands, spot or centre weighted metering can very easily lead to blown highlights.
If you can't (or don't want to) go down the in-camera HDR road you'll definitely need to go with raw. I'm not familiar with free PP software but there may be some that can import raw files. And it's a price that might appeal to you .
.
Alternatively you might want to consider Photoshop Elements which can be got for a reasonable price. It can import raw files, and the ACR (Adobe Camera Raw) section is a very good place to learn the generic editing tools (it can edit jpg as well). If you did find in-camera HDR acceptable you would be working with jpg files and all free PP software can work with jpg.
The need for a very small aperture depends on how close the close stuff is and how important it is to have it sharp. If there's nothing close up you just need to keep the focus point at a fair distance, in which case the f-stop can be relatively low. If you look into hyperfocal distance you'll see that at f/22 the DOF will come very close to the camera, so for most shots you don't need to use a higher f-stop. If you find the amount of information a bit bewildering, just remember the hyperfocal distances for f/22 and f/16 at the focal lengths you're most likely to use (where DOF is concerned, wider is better). That should cover you for most eventualities, and if you think it might be a stretch you can always go higher than f/22.
You've probably already realised that any safe techniques for keeping ISO low are worth knowing, so knowing how to safely keep your f-stops low is useful info to have.
-
As others have pointed out, the camera is just capturing what's in front of it, which is high dynamic range scenes, so as far as settings are concerned, your priority is to avoid blowing highlights. Most other problems can usually be worked on fairly successfully in PP, but blown highlights can be really problematic, to the point where a sky replacement may be the only viable option. In less extreme cases a certain amount of success can be achieved using cloning, but it's not an easy option and requires a certain amount of skill to pull it off. Matrix metering will give the best protection from blown highlights. It's not total protection but it's the safest option. Even in skilled hands, spot or centre weighted metering can very easily lead to blown highlights.
If you can't (or don't want to) go down the in-camera HDR road you'll definitely need to go with raw. I'm not familiar with free PP software but there may be some that can import raw files. And it's a price that might appeal to you
. Alternatively you might want to consider Photoshop Elements which can be got for a reasonable price. It can import raw files, and the ACR (Adobe Camera Raw) section is a very good place to learn the generic editing tools (it can edit jpg as well). If you did find in-camera HDR acceptable you would be working with jpg files and all free PP software can work with jpg.
The need for a very small aperture depends on how close the close stuff is and how important it is to have it sharp. If there's nothing close up you just need to keep the focus point at a fair distance, in which case the f-stop can be relatively low. If you look into hyperfocal distance you'll see that at f/22 the DOF will come very close to the camera, so for most shots you don't need to use a higher f-stop. If you find the amount of information a bit bewildering, just remember the hyperfocal distances for f/22 and f/16 at the focal lengths you're most likely to use (where DOF is concerned, wider is better). That should cover you for most eventualities, and if you think it might be a stretch you can always go higher than f/22.
You've probably already realised that any safe techniques for keeping ISO low are worth knowing, so knowing how to safely keep your f-stops low is useful info to have.
-
In-camera HDR for the D5200.
Aug 11, 2017 14:28:24 #

Excellent suggestion.
--Bob
--Bob
Erdos2 wrote:
Regarding the editing software, a while back I was looking to see if the free alternatives would do the job. After trying a bunch of programs, I decided to use LightZone. While it does not have all that the paid program have, it does very well working with both jpg and raw images. You can download it at http://lightzoneproject.org/ . You need to register to do the download, but I have not seen any misuse of my email address.
And good luck with your exam.
Jerry
And good luck with your exam.
Jerry
Aug 11, 2017 15:57:48 #
R.G.,
Thank you very much for your long and in-depth suggestions! I will look and see if my 5000 has an HDR mode, which I think it does. I have gotten far enough into my "studies" of photography that I was able to digest just about everything and it makes great sense. The one thing I would greatly like to have explained is the hyperfocal distances. I understand focus, a little. As well as a rough estimate of where I should be focusing for shots; however, while looking at prime lenses and wanting to understand what the copious amount of numbers all over the lens means I searched youtube and was first exposed to the term hyperfocal about 3 days ago. I have heard it referred to very often, but don't know what it means to me and how to use it for composing my shot. The video described rather well how to adjust and use it, but no mention of what it is for those as green to lens terminology as myself.
I don't typically ask for hand-outs of things I can google or find in my books, but I feel some of the more important details of lenses, how they work and how to most accurately manipulate them for a shot may better be explained by people I know are knowledgeable in the subject. Let's face it, the internet has a plethora of not-so-accurate information. So if someone would be so kind as to at least give me a starting point, a basic explanation, I will gladly go from there.
Thank you very much for your pearls of wisdom! I appreciate you taking the time to reply, as well as adding the diagram on how to find the HDR. I wasn't able to find it on my camera, but it may be in a different spot than with your D5200. I'll check my manual and get back to you.
If you want to reply, then register here. Registration is free and your account is created instantly, so you can post right away.