Lighting Question - using on camera flash as fill, with one or more off camera lights.
May 13, 2017 18:10:02 #
Ok, Ed got me really wanting to learn this technique, using on camera flash as fill. I can see how this would really be useful to controlshadows & with multiple lights on a dance floor (or reception area). But I'd like to use it also, for formals - portraits - and table shots, with one voice activated light stand.
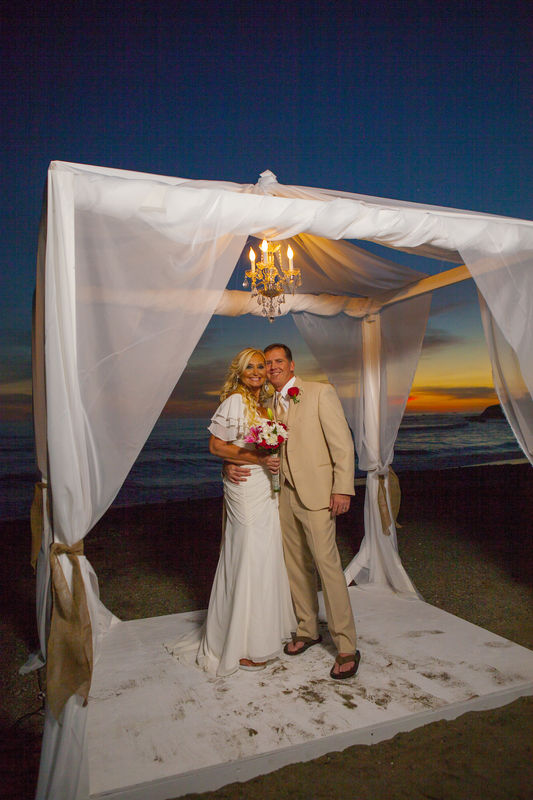
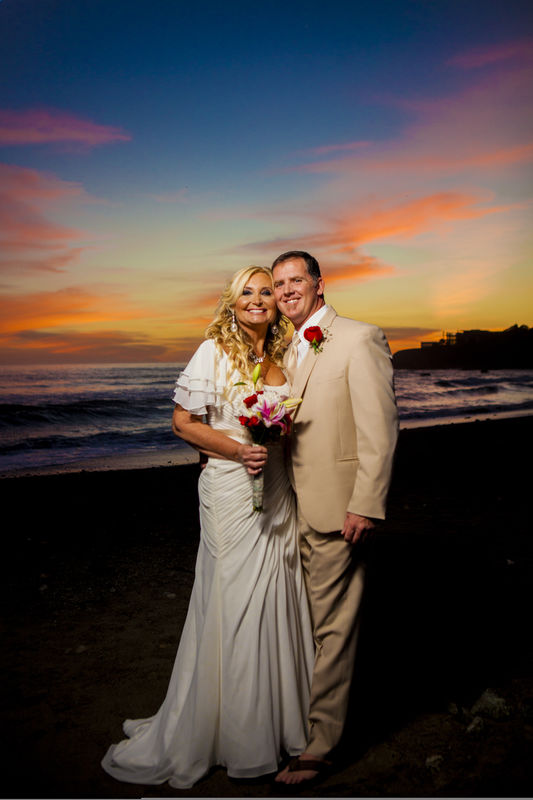
I have been using an off camera speedlight in either an 30" umbrella (outdoours) or softbox (indoors). I usually meter F/4@6', so I tell my assistant to hold the light at 6'from the subject, & that pretty much leaves me free to wander around & shoot at will. Whether it be one person or a group -from testing--I can go about 3' from either side of the light (6' total), or 3' in depth before I lose a stop. Attached is a couple examples....
I got the spider webs off and mounted my flash bracket..(to keep the light above lens-prevent red eye).The speedlight is pretty harsh when up close (2 1/2' away with a 50mm lens), even 2 stops below main it's leaving unsightly shadows. So I mounted a 12" diffuser which helped alot.
But I quickly realized, I'm not as free to roam.
It seems to me, that the trick is to try to keep a consistent distance -from the subject. Just as the main.(I shoot manual - no TTL)...
I was wondering if any of you have a 'rule of thumb' that you follow? Like, you 'always stay 8' away, and keep the fill 1 1/2stops below main. Unless it's a group greater than 4, Or a head shot of two'? or 'Remove the diffuser after 135mm and stay 12' away'?
Also, do you use a speedlight on camera, with a diffuser?
Thanks.
Fill flash would have improved both
May 15, 2017 09:53:46 #
Bermbuster,
VERY nice shots.
I wish I could give you some sage advice, but frankly, other than some light fall off towards their feet, (flip flops??? yeah, we get to see it all, don't we?) I would be happy with them lit just like they are. The fall off draws attention to their faces (a natural vignette)
If you filled in the shadows too much, you would lose all the detail in her dress.
As you may have seen in my previous posts, I'm a "manual flasher" as well. I tried to go with TTL during my last wedding (on the 6th), and it took me twice as long to try to fix all the lighting issues that I had in lightroom after the fact.
I will keep watching this post to see if Jerry or Ed have any wisdom to add, but in all honestly, I think the ratios look pretty good in the main part of the photos. The shadows are kind of dark in the leg, and feet area, but that frankly doesn't bother me. You could probably brighten it up in lightroom without much effort, but I don't think I would.
Just me of course. There are others, better than me, that probably can help more.
Bob
May 15, 2017 10:11:27 #

Buster,
I too will be watching this thread. I like to use fill with my on camera flash diffused with the Lite Scoop. I use a very low power setting 1/16 or 1/8 just to add a little life to the skin tones. I also shoot manual and have the same lighting issues Bob has when using TTL and as far as distance, I kind of figure that out through experimentation. It does make a difference.
I would like to add off camera lights during the reception, but I have a technical issue I am trying to work out. I have the Photix Oden II which works beautifully, but it occupies the hot shoe exclusively leaving no room for on camera flash. I need to find a bracket or other accessory to allow both.
May 15, 2017 13:09:00 #
jaysnave wrote:
Buster, br br I too will be watching this threa... (show quote)
Hey, Jay...
How about using your trigger on a hot shoe, and putting a receiver/flash on a standard bracket? That way, you could fire the flash on (above) your camera, and also the ones on the stands?
May 15, 2017 13:11:04 #
Bermbuster, I did forget to mention that I try to get some ambient light with a higher ISO and as slow a shutter speed as possible, then supplementing with the flash. If you try to do it all with flash like you do in a studio setting, your flashes will eat batteries, and quickly overheat.
I try to never have my flashes above 1/2 power on the top end.
Not sure if that helps or not.
Bob
I try to never have my flashes above 1/2 power on the top end.
Not sure if that helps or not.
Bob
May 15, 2017 14:12:56 #
Thanks guys, I do drag the shutter, but don't usually use higher ISO's, so glad you mentioned that Bob. I'm going to play with that.
My diffused speedlight will put out f/4 at 1/2 power, and 5.6 at full. So I got a bracket to use 2 speedlights, but that only gained me one stop. & I really don't want to consider 4 speedlights for one more stop.
jaysnave, when I'm wandering with no help, I always use a light scoop...& you just gave me something to think about too...
When I use my scoop, set my lens around 70mm, I only use it for headshots of 1 or 2 people, so it's easy to maintain a consistant distance every time I compose a shot...then set my flash exposure at least 2 below an average Metering of the room...
So I probly need to do some testing to come up with a formula...for using fill with main off camera.
example - when a group of 4 or more is composed in camera - 70mm lens, I need to figure out that average distance...(instead of using a tape measure) Then when I get my ratio's set, just composing the same at 70mm will get me in the sweet spot quickly.
Then maybe another for full length couple - headshot only etc?
BTW - on testing with the light bracket,( I did as Bob suggested), used my Yongnuo flash with built in radio,& trigger on camera to control main & fill flashes. Worked really good . :)
Thanks again!
May 16, 2017 18:36:43 #

Hey Guys, great questions and there are a number of different answers. The best method depends on the specific shooting situation such as whether you are shooting indoors, where your flash is the main source of illumination or if you are shooting out of doors where your main source is existing daylight. So...here is a few different scenarios to try out and the perfect as per your own shooting styles and tastes.
Candid lighting in a ballroom, hall or church: My method is to place one or more off camera lights at strategic positions around the perimeter of the venue. Theses lights act as main lights or kicker depending on their relative angle of incidence to the camera position. An on-camera light acts as the fill light source. The exposure is based on the off camera lights so since the are equidistant from the main subject areas of the room, the exposure, once determined, shooed be even and consistent throughout the given area. The on-camera fill light determines the lighting ratio or key of the resulting image. Depending on the effect I desire, from a normal ambiance to a more dramatic. I adjust the power of my fill light accordingly. For a medium key effect I keep the fill light about 2 to 3 f/stops BELOW the main lights and for a more dramatic effect with deeper shadows, I go form 3 to 4 f/stop differential. Since I am operating in MANUAL mode I simply increase or reduce my fill light output by manually switching from full power to 1/2 or 1/4 power as needed. I might remove the reflector (from my on camera fill light) and shoot bare bulb, to give me, in effect create 1/8 power.
Another method I have been successful with is to use my AUTO FLASH settings. This is basically the same as the above method but I simply dial in the f/stop differentials on my on-camera unit. On my flash equipment, my AUTO FLASH settings are completely independent of the camera's metering system, in other words, it is NOT a TL or an iTTL system.
If you use a TTL or an iTTL system, it is possible to fine a number of setting to accomplish the aforementioned ratio control. I occasionally use my Canon Speedlights of non-wedding and press assignments and I fine that the system works well enough and yields correct exposure and acceptable ratios but I don't have as much precise aesthetic control as I get with the other the methods I have mentioned thus far.
Theses methods works equally well in a simple two light configuration where an assistant mans a second light. I use this method where setting up light stands is not practical due to time and space restrictions. In this method, the assistant needs to be trained in basic lighting pasterns and distances. The off camera light can serve as a main light or a KICKER. The assistant has to know where to be for each shot and how to make sure that he or she or the light is not in the camera's field of view or in the case of a KICKER, not to cause lens flare. I have developed a few simple hand signals to help direct my assistant for critical lighting conditions. My assistant are photographers-in-training so the soon become very familiar with the lighting forms that work well. After a while, the instinctively know where to place that second light. When the off-camera main light is between 20 and 45 degrees form the camera/subject axis, my exposure is based on the off camera light and the on-camera light is the fill source. When the off-camera light is in the kicker position, that is between 45 and 135 degrees, my exposure is based on the ON CAMERA LIGHT and the kicker is held at a far enough distance or powered down so it will not overexpose or over power the on-camera light- it just place a nice accent light on the subject's hair, the side of the faces and the profiles bit the exposure still remains within the dynamic range of the camera's. Lights coming in at a steep angle of incidence (90 degrees or more) will seem brighter than a light at the same power or distance that is striking the subject at a lesser angle such as 45 to 25 degrees from the camera/subject axis.
SHUTTER DRAGGING: This may seem odd but in order to enable good shutter dragging techniques at practical had held shutter speeds, I prefer to work a LOWER ISO settings like 100 or 200. Here's why: A lower ISO settings I can use wider f/stops by adjusting my flash outputs accordingly. At around say f/8 or f/5.6 I don't have to use very slow shutter speeds to record ambient room light levels in most of the halls, ballrooms, churches and synagogues that I work in. The lower ISO also yield more noiseless files.
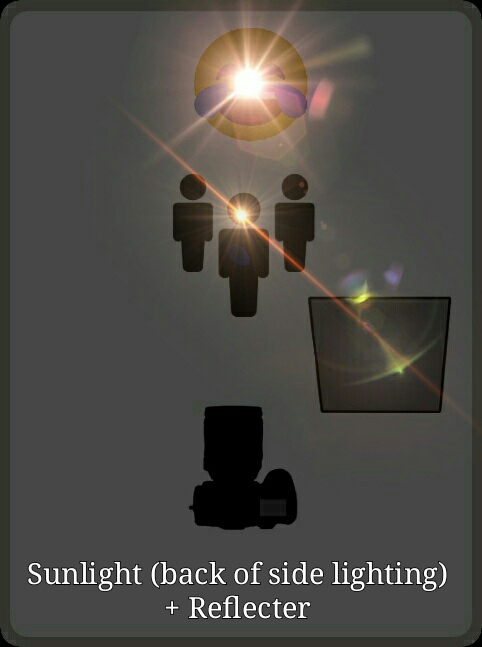
OUT-OF-DOORS, I usually employ an entirely different approach. For candid work, I simply determine the flash exposure for the distance I am working at and the just set the shutter for the appropriate speed for THAT f/stop so as to admit the perfect level of ambient light as desired. On a bright sunny or cloudy/bright day, the sun becomes my MAIN light source as to aesthetics and exposure. I try for side of back lighting when possible such as when grabbing shots after the ceremony as the couple and family leave the church, hug and kiss. shaking hand and back slapping, and getting into cars, etc. I st my flash at a power that will give me about f/16 or f/11 and the shutter speed coincides with the ISO number (the old f/16 rule) so the shutter speed is at 1/125- t exact f/stop depend on the lighting condition as to volume. On cloudy or overcast days, I simply reduce my flash power to accommodate a f/8 or f/5/6 aperture and still maintain an hand-holdable shutter speed. In overcast dull days, I often use bare-bulb to adequately reduce flash output and main tan the soft effect of an overcast day. The bare bulb will retain softness bu remedy the "raccoon" eyes that oftentimes result on overcast days where the light is coming form directly above the subject and there is little natural bounce to illuminate the eyes and the eye sockets, especially in subjects with deep set eyes.
FORMALS: When I shoot formals indoors, I use an entirely different system unless I am severely time-restricted. Indoors, I use my mono-light with a soft box and fill with a reflector for close-up and 3/4 length portraits and groups and fill in with an on-camera modified flash for full length portraits and groups. I base my exposure on the off camera mono-light. The modeling lamp in the mono-light enables precise portrait lighting and complete aesthetic control- no guess work! If I am pushed for time, I can always resort to my "candid" two light system if need be. Usually, we plan for a time-out period for the formals and can use my "studio" system.
OUTDOOR FORMALS: Again, y'all might find this odd but I seldom use flash out of doors. I have my assistant put aside the flash gear and man a reflector instead. Late in the afternoon, I like to use back lighting to illuminate the bride's veil and create a rim light or kicker effect on all the subjects and kick back the MAIL LIGHTING with a super silver type reflector. This method allow for my choice of f/stops to create better bokeh (via less depth of field) on the portraits or more depth of field for casual and group shots where required. The basic concept is to redirect side and back lighting back toward the subjects- the position of the reflector is about the same as one would place a main light and the exact lighting pattern can be seen and adjusted right on the spot.
Here's an alternative method that I sometimes use for outdoor shooting of formals. This is where I use the off camera light as a main light source and the ambient light becomes the fill light source. This method comes in handy of the direction or quality of the existing light is aesthetically unsuitable. I expose for the off camera ligh and adjust its power so that is about 2 stops brighter that the available light. Again the shutter speed is critical in order to admit the correct volume of natural light.
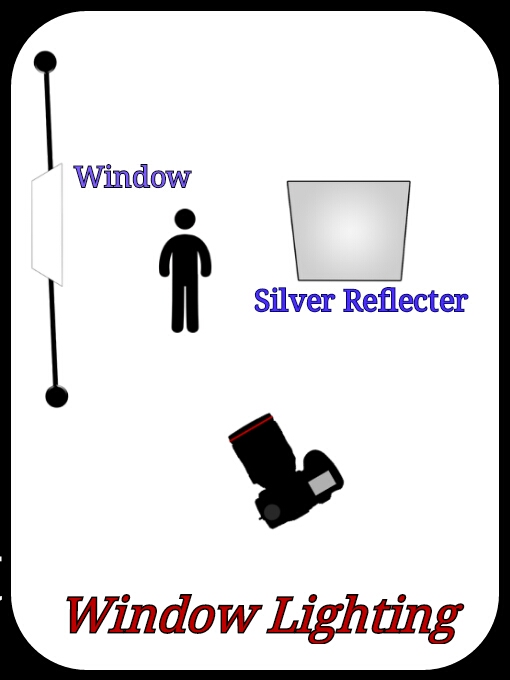
Window lighting method: I sometimes do my bridal formal portraits with window light Ideally, the sky light form a NORTH LIGHTED window is best. Unless the window has decorative aesthetic value, I never show the window in the image- it is strictly a light source. Obviously, since i can't move the widow or the position of the building, I need to move the subject into the lighting pattern in order to achieve the lighting I am looking for. Again, I prefer to fill in the shadows with a reflector rather that any kind of flash equipment in that I like to work a fairly large apertures in order to limit depth of field and render backgrounds out of focus. This is a very delicate quality of light and can easily be OVERLY FILLED if the flash is not precisely controlled. At f/2.8 or thereabout, the flash would have to come in at about f/1.0 or f/1/5 or so in order to enable a decent enough lighting ratio. I do have an old GVI flash head for my Lumadyne equipment that has a WINK LIGHT feature and can be powered down to about 6 watt/seconds. I also have mad a "HOOD-WINKER", that is an old Braun or Vivitar flash unit where I have removed the original capacitor and replaced it with a coup of very small ones that will yield only 6 or 12 watt/seconds. I mount this on my lens HOOD (thus the Hood-winker name) for a complete flat fill at a very low output and use it for low window light situations. This is good for working in small spaces where a reflector on a light stand or even hand held by an assistant could be cumbersome. This light meters at about f/1.4 and f/2.0 respectively at about 5 to 6 feet away, depending on the switch position. I designed a circuit that can switch one of the small capacitors in an out of the circuit as required. If anyone is interested and is into electronics, I can publish the circuit whereby you van get an old flash unit and make this conversion. This is not my invention, back in the 1970s Braun Electronics marketed a unit like this- it was then limited supply and soon disappeared form the market. It was one of the handiest little accessories that I had back in the day- that's why I reproduced it. The original unit had only one power setting- mine has two.
I hope some of this information proves to be useful. It's always best to check any of theses methods out in dry runs before employing them at a wedding. My approach, whenever I learn a new method or come up with some kind of a newfangled or hair-brained notion is to get into an empty church, hall, garden location in my home and test the lighting out in simulated conditions. Because of the presence or absence of light that bounces of walls and ceiling, various lighting methods will work differently in smaller or larger indoor environments. Once you get to master each method and then tweak them to your own individual working methods and tastes, you can preform any of theses methodologies as second nature without too much metering and fumbling with gear. An occasion "chimp" will verify your results as you work. Some photographers don't like the idea of STANDARDIZATION as to lighting methods, however, if you can get you exposure, ratios and lighting techniques down pat, there is more time to concentrate on creative posing, getting good expression and grabbing peak candid action through quick camera a lighting handling. Consistent control over lighting, contrast, ratio add exposure also make for efficient and rapid editing and printing.
Please check out a few lighting diagram in my next post...stand by.I gotta do them on my PHONE!
Kindest regards, Ed
Candid lighting in a ballroom, hall or church: My method is to place one or more off camera lights at strategic positions around the perimeter of the venue. Theses lights act as main lights or kicker depending on their relative angle of incidence to the camera position. An on-camera light acts as the fill light source. The exposure is based on the off camera lights so since the are equidistant from the main subject areas of the room, the exposure, once determined, shooed be even and consistent throughout the given area. The on-camera fill light determines the lighting ratio or key of the resulting image. Depending on the effect I desire, from a normal ambiance to a more dramatic. I adjust the power of my fill light accordingly. For a medium key effect I keep the fill light about 2 to 3 f/stops BELOW the main lights and for a more dramatic effect with deeper shadows, I go form 3 to 4 f/stop differential. Since I am operating in MANUAL mode I simply increase or reduce my fill light output by manually switching from full power to 1/2 or 1/4 power as needed. I might remove the reflector (from my on camera fill light) and shoot bare bulb, to give me, in effect create 1/8 power.
Another method I have been successful with is to use my AUTO FLASH settings. This is basically the same as the above method but I simply dial in the f/stop differentials on my on-camera unit. On my flash equipment, my AUTO FLASH settings are completely independent of the camera's metering system, in other words, it is NOT a TL or an iTTL system.
If you use a TTL or an iTTL system, it is possible to fine a number of setting to accomplish the aforementioned ratio control. I occasionally use my Canon Speedlights of non-wedding and press assignments and I fine that the system works well enough and yields correct exposure and acceptable ratios but I don't have as much precise aesthetic control as I get with the other the methods I have mentioned thus far.
Theses methods works equally well in a simple two light configuration where an assistant mans a second light. I use this method where setting up light stands is not practical due to time and space restrictions. In this method, the assistant needs to be trained in basic lighting pasterns and distances. The off camera light can serve as a main light or a KICKER. The assistant has to know where to be for each shot and how to make sure that he or she or the light is not in the camera's field of view or in the case of a KICKER, not to cause lens flare. I have developed a few simple hand signals to help direct my assistant for critical lighting conditions. My assistant are photographers-in-training so the soon become very familiar with the lighting forms that work well. After a while, the instinctively know where to place that second light. When the off-camera main light is between 20 and 45 degrees form the camera/subject axis, my exposure is based on the off camera light and the on-camera light is the fill source. When the off-camera light is in the kicker position, that is between 45 and 135 degrees, my exposure is based on the ON CAMERA LIGHT and the kicker is held at a far enough distance or powered down so it will not overexpose or over power the on-camera light- it just place a nice accent light on the subject's hair, the side of the faces and the profiles bit the exposure still remains within the dynamic range of the camera's. Lights coming in at a steep angle of incidence (90 degrees or more) will seem brighter than a light at the same power or distance that is striking the subject at a lesser angle such as 45 to 25 degrees from the camera/subject axis.
SHUTTER DRAGGING: This may seem odd but in order to enable good shutter dragging techniques at practical had held shutter speeds, I prefer to work a LOWER ISO settings like 100 or 200. Here's why: A lower ISO settings I can use wider f/stops by adjusting my flash outputs accordingly. At around say f/8 or f/5.6 I don't have to use very slow shutter speeds to record ambient room light levels in most of the halls, ballrooms, churches and synagogues that I work in. The lower ISO also yield more noiseless files.
OUT-OF-DOORS, I usually employ an entirely different approach. For candid work, I simply determine the flash exposure for the distance I am working at and the just set the shutter for the appropriate speed for THAT f/stop so as to admit the perfect level of ambient light as desired. On a bright sunny or cloudy/bright day, the sun becomes my MAIN light source as to aesthetics and exposure. I try for side of back lighting when possible such as when grabbing shots after the ceremony as the couple and family leave the church, hug and kiss. shaking hand and back slapping, and getting into cars, etc. I st my flash at a power that will give me about f/16 or f/11 and the shutter speed coincides with the ISO number (the old f/16 rule) so the shutter speed is at 1/125- t exact f/stop depend on the lighting condition as to volume. On cloudy or overcast days, I simply reduce my flash power to accommodate a f/8 or f/5/6 aperture and still maintain an hand-holdable shutter speed. In overcast dull days, I often use bare-bulb to adequately reduce flash output and main tan the soft effect of an overcast day. The bare bulb will retain softness bu remedy the "raccoon" eyes that oftentimes result on overcast days where the light is coming form directly above the subject and there is little natural bounce to illuminate the eyes and the eye sockets, especially in subjects with deep set eyes.
FORMALS: When I shoot formals indoors, I use an entirely different system unless I am severely time-restricted. Indoors, I use my mono-light with a soft box and fill with a reflector for close-up and 3/4 length portraits and groups and fill in with an on-camera modified flash for full length portraits and groups. I base my exposure on the off camera mono-light. The modeling lamp in the mono-light enables precise portrait lighting and complete aesthetic control- no guess work! If I am pushed for time, I can always resort to my "candid" two light system if need be. Usually, we plan for a time-out period for the formals and can use my "studio" system.
OUTDOOR FORMALS: Again, y'all might find this odd but I seldom use flash out of doors. I have my assistant put aside the flash gear and man a reflector instead. Late in the afternoon, I like to use back lighting to illuminate the bride's veil and create a rim light or kicker effect on all the subjects and kick back the MAIL LIGHTING with a super silver type reflector. This method allow for my choice of f/stops to create better bokeh (via less depth of field) on the portraits or more depth of field for casual and group shots where required. The basic concept is to redirect side and back lighting back toward the subjects- the position of the reflector is about the same as one would place a main light and the exact lighting pattern can be seen and adjusted right on the spot.
Here's an alternative method that I sometimes use for outdoor shooting of formals. This is where I use the off camera light as a main light source and the ambient light becomes the fill light source. This method comes in handy of the direction or quality of the existing light is aesthetically unsuitable. I expose for the off camera ligh and adjust its power so that is about 2 stops brighter that the available light. Again the shutter speed is critical in order to admit the correct volume of natural light.
Window lighting method: I sometimes do my bridal formal portraits with window light Ideally, the sky light form a NORTH LIGHTED window is best. Unless the window has decorative aesthetic value, I never show the window in the image- it is strictly a light source. Obviously, since i can't move the widow or the position of the building, I need to move the subject into the lighting pattern in order to achieve the lighting I am looking for. Again, I prefer to fill in the shadows with a reflector rather that any kind of flash equipment in that I like to work a fairly large apertures in order to limit depth of field and render backgrounds out of focus. This is a very delicate quality of light and can easily be OVERLY FILLED if the flash is not precisely controlled. At f/2.8 or thereabout, the flash would have to come in at about f/1.0 or f/1/5 or so in order to enable a decent enough lighting ratio. I do have an old GVI flash head for my Lumadyne equipment that has a WINK LIGHT feature and can be powered down to about 6 watt/seconds. I also have mad a "HOOD-WINKER", that is an old Braun or Vivitar flash unit where I have removed the original capacitor and replaced it with a coup of very small ones that will yield only 6 or 12 watt/seconds. I mount this on my lens HOOD (thus the Hood-winker name) for a complete flat fill at a very low output and use it for low window light situations. This is good for working in small spaces where a reflector on a light stand or even hand held by an assistant could be cumbersome. This light meters at about f/1.4 and f/2.0 respectively at about 5 to 6 feet away, depending on the switch position. I designed a circuit that can switch one of the small capacitors in an out of the circuit as required. If anyone is interested and is into electronics, I can publish the circuit whereby you van get an old flash unit and make this conversion. This is not my invention, back in the 1970s Braun Electronics marketed a unit like this- it was then limited supply and soon disappeared form the market. It was one of the handiest little accessories that I had back in the day- that's why I reproduced it. The original unit had only one power setting- mine has two.
I hope some of this information proves to be useful. It's always best to check any of theses methods out in dry runs before employing them at a wedding. My approach, whenever I learn a new method or come up with some kind of a newfangled or hair-brained notion is to get into an empty church, hall, garden location in my home and test the lighting out in simulated conditions. Because of the presence or absence of light that bounces of walls and ceiling, various lighting methods will work differently in smaller or larger indoor environments. Once you get to master each method and then tweak them to your own individual working methods and tastes, you can preform any of theses methodologies as second nature without too much metering and fumbling with gear. An occasion "chimp" will verify your results as you work. Some photographers don't like the idea of STANDARDIZATION as to lighting methods, however, if you can get you exposure, ratios and lighting techniques down pat, there is more time to concentrate on creative posing, getting good expression and grabbing peak candid action through quick camera a lighting handling. Consistent control over lighting, contrast, ratio add exposure also make for efficient and rapid editing and printing.
Please check out a few lighting diagram in my next post...stand by.I gotta do them on my PHONE!
Kindest regards, Ed
May 16, 2017 21:14:47 #

May 17, 2017 00:04:18 #
Ed,Thank you very much!
I'm gonna need a couple weeks to get this down.
This is GREAT, because I am searching for any and all "STANDARDIZATION as to lighting methods"....My technique has me fumbling with meter readings and ratios all the time, killing me in the 'Posing & Expression' dept.(I should just stick to Ring shots).
I finally have two strobes- (Paul Buff einstein 640ws) & a battery pack. That I'll be integerating into my event shooting. I'm glad you pointed out the modeling light for formals.
A couple questions if you don't mind....
1) What size soft box do you recommend for your Formals & Groups? & what diffuser do you use for on camera?
2) When you base your exposure on the off camera light and the on-camera light is the fill source(whether it be your room set up, or your man with the light)... How do you judge your distance (so your fill exposure doesn't change)? especially with moving people?
I'm thinking, if I keep my lens at a predetermined length ( say 70mm or 135mm ) and compose my shot for a full length... my distance from every subject should remain pretty constant. Or I could just eyeball, say 8'...& that should give me about 3' of leeway before I lose a stop?
Thanks again, You're getting pretty good on that phone! I feel like I owe you a new computer (wish I had the money), this advise is way above any book I've read!
May 17, 2017 09:19:37 #
Again, great questions!
For most candid shooting situations I do not use a light modifier on my on-camera fill light- I just use raw light but here's the hitch; I am not using conventional Speedlights but rather kind of "old school" strobes with interchangeable parabolic reflectors. One wouldn't think that this makes much of a difference but theses reflectors are at least twice the size of the ones in most Speedlights supplied by Canon, Nikon and most of the aftermarket brands. My lights are made by Lumadyne and there are a variety of reflectors made by both Lumadyne and Norman that can be fitted to the basic lamp heads. The flash tubes are not the smaller linear ones used in most Speedlights, the are the large helical type. I also prefer the wide angle reflectors as opposed to the normal ones- this softens the light even more. So... the reflector size and flash tube configuration make a significant difference when compared to the average Speedlight. When guys and gals are starting out in wedding photography, I oftentimes suggest that the invest in Q-Flash (Quantum) or Lumadyne equipment, at least two units- one for main light usage and one for the on-camera fill light.
This dose not mean that Speedlights are all that bad even when used directly without modifiers. If you find that your on-camera light is too harsh and not filling in evenly a simple modifier my remedy the issue- one of those fan-shaped bouncers can work well. I have had good results with some of the Gary Fong stuff too- I know it looks like Tupperware but it works just fine.
Another suggestion- I often use my "studio" or mono-lights as off camera lights mounted in stationary positions on the perimeter of reception rooms. If AC outlets are available this works well in that you don't have to worry about batteries, the are powerful enough to provide good working aperture at some distance away and the usually have fairly large standard reflectors which distribute the light evenly. I aim the lights, wile setting them up, with the modeling light on and once the are positioned, I turn off the modeling lights during the reception. With fixed off-camera light you can meter and "chimp" your results before the reception begins and you can use one exposure all through the reception at any point on the dance floor or at the head table for shot of the toasts and even the cake cutting. You will get nice texture on the wedding cake with plenty of highlight detail and no burning out of the whites.
Fill Light and camera distances: With experience, I have learned to estimate distance quite accurately as to camera/subject distance and main light/subject distances. Here's some tricks I have used over the years. I use a system that I call photo-metrics to measure distances. OK- I have lots of wide angle and telephoto lenses and some zooms as well but I prefer to shoot most of my wedding candid shots and some formals with a normal and slightly wider that normal prime lens or fixed zoom setting. With a normal lens or zoom setting, I know that a usual full-length formal shot of the bride and groom and most adults, with a nice comfortable (vertical) composition in the frame is at 12 feet. This also apples to full length dancing shots and aisle (procession) shots in the church. For all of theses kinds of shot I can pre-set my fill exposure based on 12 feet. 3/4 length shots with a normal composition, usually go at about 7 to 8 fee as do horizontal 3/4 length groups of 4 or 5 subjects such as folks congratulating the couple in a receiving line etc. Vertical groups of 4 people go about 12 feet, larger groups in horizontal compositions come in about 15 feet.
Now, this does not mean that I wont use a wide angle lenses or zoom settings in tight spaces or for interesting wide angle perspectives or a longer lens or zoom setting for portraits with selective focus and better bokeh. I do all of those things but by standardizing my distances and exposures for many of my routine candid shots, I can work faster with less chance of exposure or even focusing errors. A normal lens or zoom position will also yield better perspective with less distortion. The use of wide angle lenses on full length formals and candids can cause foreshortening of the subjects if the camera is not at the subject's waist level. I use my telephoto lenses when I can't get close enough to ceremonies and for shooting "faces in the crowed" and reaction shots during the ceremony but I don't like too much image compression (perspective wise) in my candids- I like to see the environment and more space around the action.
So...here are some typical situations: The bride and groom are gonna cut the cake- I preset the footage scale at 8 feet for a 3/4 shot with a normal size cake. Mu fill exposure is set for that distance. I compose and since my distance is preset, my auto-focus system just has to travel a short distance and is less likely to go nuts and fl out of control- sometimes that happens! Even if the AF system should fail, I still have acceptable pre-focus. Say there is some wild rock 'n' roll or ethnic dancing going down on the dance floor- I just pre-set everything for a 12 to 15 foot shot and shoot away! If I need to go to wide angle to work on a tight dance floor or to get in close to the action, shoot over my head or grab a low angle shot from the floor- I just pre set up for an 8 or 10 food distance and shoot without hesitation. The best man toasting the couple at the had table- 8 feet horizontal and so on and so forth.
One you get the hang of it you will be able to capture even the wildest action with no fumbling of the gear or excessive metering techniques. It is a good idea, however, to do some occasional metering and chimping just to make certain that everything is going in the right direction. I will meter any unusual available light situation and meter and chimp at a few points during formal sessions just to make sure all systems are go.
Thanks for the sentiment- it is warmly appreciated! A new computer is in the works. I have a new laptop that is tethered to the camera in my commercial camera room . It is finely calibrated for shooting and printing so I don't use it online for fear of a virus or customer data disruption. A colleague of mine got hacked and ransomed a few weeks ago and had hell to pay! Crazy stuff is going out there. My office computers are dead- their operating systems are long gone so they are due for replacements (thank you Microsoft!). I'll be glad when I have a new desktop so I will be able to more easily post images here on the forum again.
Kindest regards, Ed
May 17, 2017 09:42:52 #
Oh...I forgot about the Soft Box size thing! I like a box no larger than 24 to 30 inches- anything larger it too cumbersome for wedding work. For your Buff equipment, I recommend their soft boxes, they are very well designed and made and set up and take down quickly and easily. I find that this size works beautifully for close up and 3/4 portraits and full length and group shots well. As with any light source, the closer you get into the subject, the softer the lighting quality. A lie a little more snap in my full lengths and groups so the further distance gives m a bit more contrast.
Ed
Ed
May 17, 2017 09:46:21 #
Once again, Ed is by far the master, and best at describing things.
I do have one comment on your comment about "standardizing" and your method requiring the light meter.
I can tell you that my light meter has saved me countless times when going from outside, to inside, to a bright hallway, to etc...
One of the easiest ways to screw up a whole series of photos, is to get away from metering things with a handheld meter. If you meter before you start, it is a perfect reminder to reset your ISO. (which, those of us from film days, had to mess with changing film, or carrying a few cameras, so you had the right film for the right light, so ..... that's the thing that seems to catch me every time, remembering to check the ISO) Since using a meter is a habit, I quickly know when I'm changing settings what ISO, Aperture, and SS I need, and I can make adjustments right on the meter to get the ambient light where I want it.
Just my 2 cents. It only takes a few seconds, but having a whole series of blown out photos because the formals were done outside the church, is enough to make you appreciate the hand held meter.
You could go by the in camera meter, but because I'm too stuck in my ways, I don't trust it to give me what I want, so I normally only give it a cursory glance.
I also don't chimp as much as I should. (still stuck in the film days, I know......bad habits)
May 17, 2017 14:57:38 #
Agreed BK!
Thinking back to the good old film days I remember one of the first principles I learned from my first boss and mentor. He told me that one of the major differences between a true professional and a good amateur is that the professional knows what is gonna be on the film when he or she releases the shutter- the amateur may not be quite as sure. That notion kinda stuck with me over the years so we want to make certain that all before. during and after each wedding assignment.
I am admittedly a METER MANIAC I have three meters with me at all times whether I am working in the studio and on location. I routinely carry my old Minolta flash/ambient light meter. it's over 25 years old and still works perfectly. I also have a more current Sekonic model which is an incident light model with a build in spot metering system and if all else fails, I still have my trusty old Lina-Six for incident and reflected non-flash readings.
When I train photographers and assistants or teach classes, I usually go into quite a bit about metering technique with hand held meters. Using the meter improperly can lead to inaccurate exposure issues. A copy of the good old Kodak Professional Photo Guide has a generous quantity of exposure and metering information. Although it is mainly based on film technology, lots of the information such as filter factors, bellows extension and strange available light conditions is still applicable to digital photography- it has a handy 18% gray card for accurate reflected light readings too.
Meter readings can help determine basic exposures, check out highlight and shadow values to make sure we are operating within the dynamic range of our camera systems. For those who have adapted the ZONE SYSTEM to their digital work, a meter is a must-have tool. We can average out exposures in difficult lighting conditions and help establish lighting ratios.
In my so-called emergency tool kit, I have a battery tester that measures battery condition under a load- it's the most accurate way to test batteries. I check all my batteries prior to heading out on every assignment. I also keep a electronic multi meter on hand to check out line voltage fluctuations on industrial locations and monitor the performance of my electronic flash equipment.
Over a very long tenure in the business, I have learned to "eyeball" many different exposure situations and I have my flash exposures down pat for my own gear but I still use my meters to double check myself. I don't suggest that anyone should not use the metering systems in their camera or external hand held meters. Using standardized settings and pre-setting our equipment for certain routine situations does no preclude the use of meters but theses methods entail doing most of the metering in the set up stage of the wedding assignment so as to enable rapid and flowing shooting. There should be no need to meter for every shot.
Of course, "chimping" or continuously monitoring things on the camera's LCD screen is a good fail-safe method to insure that we are not getting severely under or overexposed files or files that are beyond the contrast range of our systems. Again, it is not necessary to do this for every shot as it can become an encumbrance rather that a helpful method especially if it slows down your shooting efficiency and it causes you to miss critical shots, peak expression and spontaneous candid situations. On the other hand, however, I am a firm believer in MURPHY'S LAW, that is "whatever can go wrong, will go wrong". So is is important to spot check to make certain that all your exposure and focus systems are working, that you are in perfect flash synchronization with your camera's shutter and to prevent any number of gremlins such as lens flare, unwanted vignetting with wide angle lenses and lens shades and to make sure things like that are not occurring unbeknownst to you when you are in the heat of shooting at a rapid pace. It is better to head off any problems before they becomes a serious editing issue or causes you to loose important must-have images. In the olden days we could check flash sync by releasing the shutter and observing the flash coming through the lens from the back of the camera- I would always do this intermittently when changing film holders or magazines. Of course, with digital gear we have no access to the back of the lens when it is mounted on the camera so checking is essential.
Oftentimes, the image that we see on the LCD screen is not exactly what we will see on a properly calibrated computer screen but with experience, you will get to know what you will actually get by assessing the LCD screen image. It's like when we used to make Polaroid test prints; if the Polaroid looked half way decent as to color and density, the film image would be a "masterpiece"!
Part of developing a fast and efficient shooting technique is leaning to meter, and chimp quickly and accurately so as to maintain quality control without cramping your shooting style. That's why I love my ancient Minolta meter- it makes direct and accurate readings with no fiddling around. It has an ISO dial, a shutter speed dial and a mode setting- no other bells and whistles! The only thing I have to replace are the batteries and I wore out about a dozen neck straps- must be the sweat!
See the next post for a shot of my meter drawer!
More question, suggestions and even arguments are always welcome.
Ed
May 17, 2017 15:04:25 #
This is my meter collection. Missing, is my Minolta color temperature meter- it's out on loan.
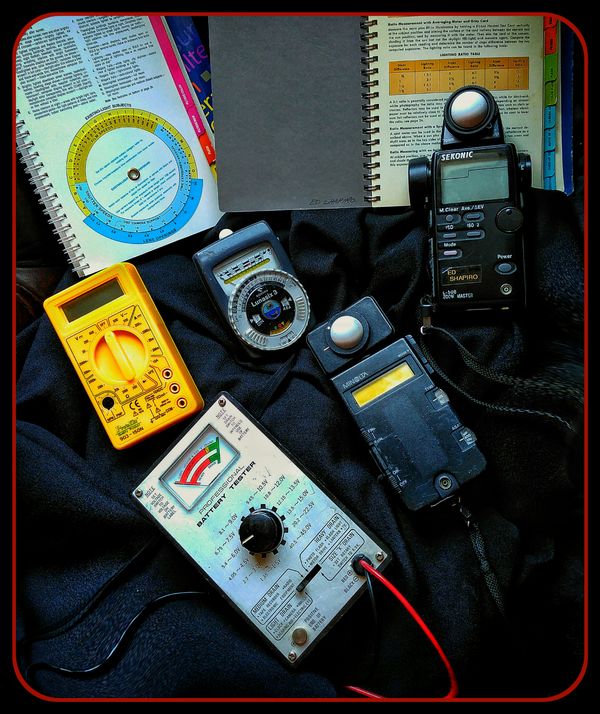
May 18, 2017 00:12:37 #
Thanks for the GREAT info guys!
I'm glad to hear that you both use your meters frequently during a shoot. I've been thinking the main way to speedup my shots, was to get away from the meter. I have just finished 'çhaining' my flashes and strobes (ropes with knots where f/8 - f/4 etc).... My biggest struggle has been with Groups and dance floor. ESP outdoor groups, where I try to include ambient BG (Like the beach). Now that I have made these ropes calibrated to each flash...it's no wonder. I just don't have enough light.
I do like that I can throw one of these on the ground, and as long as my people (be it 2 - or 3 rows) fit between a couple knots, I know my light will not lose more than a stop from front to rear.
Another Question if I might....
Fill flash exposure. I have been using 1 off camera flash for a long time.It is either my main-or fill. So - When I use fill flash, I generally set my main exposure to the ambient I want (indoors or out)...then meter my off camera flash at a predetermined distance, & adjust until I get 20-30% fill contribution (according to the meter). Now as long as my voice activated light stand maintains that distance from every subject I shoot, (And the light doesn't change)...It doesn't matter where I stand, or what lens I use...exposure is constant.(BTW-I am no good at eyeballing exposures).
So to adapt your style, using on camera fill...
I get the main lights being preset on the floor, ... & I can meter my fill @ 12' away with a 200mm lens & I'm ready to go.
...But at 6-8' for the toast @ maybe at 70mm - I'd have to run up and re-meter and adjust fill. & it certainly doesn't sound like you would be running up there beside me . :)
On your 'photo-metrics', when you pre-set your fill exposure based on 12 feet, then have to change it to 8'. What is your reference (if you are not using meter)?
I was thinking you (and the guys), were using some 'rule of thumb or chart'. Maybe you just know, the 'fill' set at 6' has to increase 2 stops at 11' ?
Hope this makes sense.
If you want to reply, then register here. Registration is free and your account is created instantly, so you can post right away.