Where did i go wrong
May 24, 2012 09:41:37 #
dlwhawaii wrote:
The SD14 has a mirror that pops up out of the way ... (show quote)
Thank you very much for the advice, as you know the SD14 does have the mirror lock up, (although i have never used it) i will start using it.
i also have a couple of remotes one with a wire and the wireless one, so i will try that, the 2 second delay is also a great idea, thanks.
Nice to meet another Sigma user on here, i have 2 SD14 cameras, i think there pretty good, i want to get the SD1 when the price goes down a bit next year, they are 42mp. regards Allan
May 24, 2012 09:53:51 #
May 24, 2012 11:19:45 #
May 24, 2012 13:42:16 #

allanpar wrote:
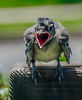
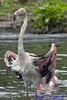
Hi can you please tell me were i went wrong on this photo, Camera Sigma sd14, lens sigma 170-500mm APO DG, using tripod, settings Aperture 6.3, shutter speed 1/20, iso 100, focal lenth 500mm.
was it the shutter speed? as the Heron does not seem crisp it looks slightly out of focus. any comments regards Allan
was it the shutter speed? as the Heron does not seem crisp it looks slightly out of focus. any comments regards Allan
Yup, it's way too slow a shutter speed. If your focal length is 500mm, you should have a minimum shutter speed of 1/500th.
May 24, 2012 13:46:29 #
allanpar wrote:
quote=dlwhawaii The SD14 has a mirror that pops u... (show quote)
This is good advise for images that are static and you're using a slow shutter speed. You never use mirror lock up for shooting wildlife. Most people will tell you to increase the shutter speed to match the focal length or double the focal length. In low light on a GBH that is standing relatively still, using a tripod, I might use 1/500th, but if I have the light I'll use 1/1250th on a 500mm lens.
May 24, 2012 14:09:56 #
When I shoot standing birds I try to use a shutter speed of 1/500 sec. Flying birds 1/1000 sec.
I agree with the earlier responder...increase the ISO if necessary.
I agree with the earlier responder...increase the ISO if necessary.
May 24, 2012 21:43:29 #

allanpar wrote:
Hi can you please tell me were i went wrong on this photo, Camera Sigma sd14, lens sigma 170-500mm APO DG, using tripod, settings Aperture 6.3, shutter speed 1/20, iso 100, focal lenth 500mm.
was it the shutter speed? as the Heron does not seem crisp it looks slightly out of focus. any comments regards Allan
was it the shutter speed? as the Heron does not seem crisp it looks slightly out of focus. any comments regards Allan
500mm and 1/20 shutter don't play well together. Just the movement of pushing the shutter button gently without a remote can cause motion blur at 1/20 with that focal length. You could pump up the ISO to 200 and get your shutter speed up but it may still be a problem. Try ISO 400 while you're at it.
May 24, 2012 22:17:10 #
birdpix wrote:
Allanpar: You can't shoot birds with a 500mm lens ... (show quote)
Excellently put in 2 nutshells, birdpix. I think such info should be made available in a separate section in this forum so that others can access them readily another time. It is such a pity that it will be 'lost' after this discussion thread ends and I know for sure that this discussion will crop up again and again.
May 25, 2012 16:36:13 #

May 25, 2012 17:57:35 #
Thank you everyone, for responding and for all the information sent, it is really helpful, and hopefully my photos will improve greatly. regards Allan
May 25, 2012 18:01:52 #
birdpix wrote:
Allanpar: You can't shoot birds with a 500mm lens ... (show quote)
Thank you very much, and wow i love the photos on flickr and smugmug, fantastic work. regards Allan
May 26, 2012 04:00:01 #
birdpix wrote:
Allanpar: You can't shoot birds with a 500mm lens ... (show quote)
Birdpix - this is a great lesson summary and has helped with some personal leaning - thanks
May 26, 2012 05:51:36 #

May 26, 2012 06:13:12 #
One more question please, should i be shooting in RAW or JPEG? when taking shots of birds
May 26, 2012 06:33:57 #
It dont make no never mind if you shoot raw or Jpeg it depends on what you want to do with the image. If you want complete control over the manipulation of the photo then shoot in raw but if you just want to be able to do a bit of basic manipulation then jpeg is fine
If you want to reply, then register here. Registration is free and your account is created instantly, so you can post right away.