Where did i go wrong
May 23, 2012 17:00:52 #
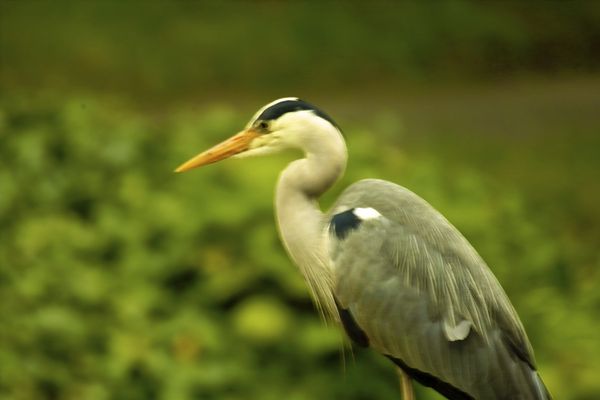
Hi can you please tell me were i went wrong on this photo, Camera Sigma sd14, lens sigma 170-500mm APO DG, using tripod, settings Aperture 6.3, shutter speed 1/20, iso 100, focal lenth 500mm.
was it the shutter speed? as the Heron does not seem crisp it looks slightly out of focus. any comments regards Allan
was it the shutter speed? as the Heron does not seem crisp it looks slightly out of focus. any comments regards Allan
2760
2764

May 23, 2012 18:51:33 #

May 23, 2012 18:53:12 #
The second one is a little sharper than the first. I'm not sure if it's motion blur, focus, or a very small DoF due to the magnification from a 500mm.
May 23, 2012 19:17:00 #
gdwsr wrote:
First thing that has to be asked is did you have the IS turned off?
Hi Sorry what is the IS, i'm a novice. regards Allan
May 23, 2012 19:19:32 #
snowbear wrote:
The second one is a little sharper than the first. I'm not sure if it's motion blur, focus, or a very small DoF due to the magnification from a 500mm.
Thank you, may be i have got motion blur when i have pressed the shutter due to the magnification, as you suggest. regards Allan
if you would like to take a look at the shots i took please follow the link. regards Allan
http://www.flickr.com/photos/allanpar/sets/72157629868093568/
May 23, 2012 19:28:41 #

IS is Image Stabilization for Canon...VR for Nikon...When you shoot on a tripod you should turn it off...I am assuming these are hand held contributing to the problem..at 500mm everything is more critical and w/o a tripod you can't expect much more..although IS and VR really help...you should start by shooting 500mm on a tripod and see how the images improve...I also recommend the use of a remote or cable shutter release...watch your composition...Have you taken a good course or read a few books? You can easily educate yourself just starting out.
May 23, 2012 19:42:21 #
ward5311 wrote:
IS is Image Stabilization for Canon...VR for Nikon... (show quote)
Thank you, i did have a tripod with me, to be honest i am not sure if i was using it on these shots, or i was holding the camera, i did have the Stabilisation turned on though when i wasn't using the tripod, i will try using the remote as i do have one. Regards Allan
May 23, 2012 19:51:07 #
allanpar wrote:
quote=ward5311 IS is Image Stabilization for Cano... (show quote)
Allen...please take this as constructive...forget about everything you are trying to fiddle with and do some basic self education. Without it nothing else matters..you will get more confused. Put the camera down and read, take a class, view videos, anything that helps. There is a book called "Digital Photography for Dummies" that is a great starting point. No I'm not calling you a dummy, but you seem to lack basic photography knowledge which is essential...Peace..Randy
May 23, 2012 20:05:40 #
ward5311 wrote:
quote=allanpar quote=ward5311 IS is Image Stabil... (show quote)
Thank you your right, i am happy for the comments and help, i have downloaded a lot of ebooks already from the internet, i do need to sit down and read them. regards Allan
May 23, 2012 22:25:30 #
Allanpar: You can't shoot birds with a 500mm lens at 1/20 sec. I am including part of a post I did recently regarding shooting backyard birds and sharpness but it will be equally valid with this type of photo:
Factors that contribute to getting sharp pictures. A primer for backyard bird photographers.
There are two major factors that need to be considered in getting sharp photographs: accurate focus and camera or subject movement. Here are a number of things that we can do to assist us in getting accurate focus and things that we can do to minimize the effects of camera or subject movement.
Accurate Focus:
1. We need to learn to control what the camera will focus on. We do this by using single point Auto Focus. That is when we use only one of the many AF points available with our camera. When we take the photograph we need to be certain that this AF point is placed on the subject in the area of most critical focus. With birds, we usually use the eye or head as that location. With birds that are not moving or are only moving parallel to our position we can use One Shot AF. To do this we place the focus point on the critical area, half press the shutter button to lock the focus, recompose the photo if necessary, then fully press the shutter button to take the picture. We can also use AI Servo-AF if we have a subject that is moving closer to or farther away from us. With this mode, the camera will continue to adjust focus when the subject moves BUT we need to keep the AF point on the area of critical focus.
2. We need to control our aperture in order to achieve appropriate depth of field. Especially with longer focal length lenses, depth of field will be very shallow when we use the widest apertures our lens is capable of. In addition, most lenses are not as sharp when used at either extreme of our f/stop range. We therefore use the middle range of f/stops like f/8 or f/11 which will give us the best compromise between depth of field and sharpness.
Minimizing the effects of camera and subject movement:
1. Shutter speed is the single most important factor in mitigating both camera shake and subject movement. With long lenses, the rule of thumb is that you can hand hold a lens if you are using a shutter speed at least 1 over the focal length. So for a 300mm lens that means shooting at 1/300th sec. That is fine if your bird is perfectly still but birds move, feeders and tree branches can move with a breeze and if your 1/300th shutter speed is not enough to stop that motion your subject will be blurry. For birds, I suggest you double the minimum requirement. In our example of the 300mm lens, we would then need at least 1/600th sec. This rule applies even if we have Image Stabilization in our lens because IS does not help subject motion blur! In fact, I apply this rule even if my camera is on a tripod because, again, the tripod only addresses camera movement not subject movement.
2. Learn to release the shutter gently by rolling your finger across it to first get the half press to initiate focus and then to fully depress it to take the picture. Fire your camera just like you fire a rifle. Take a breath and slowly breathe out as you roll your finger over the shutter button and take the picture. This help minimize camera movement at the instant we take the picture.
3. I advocate using a tripod only for longer, heavier lenses in which case we do not lock the tripod down as we need to be able to move our camera to keep the focus point where we want it on the bird. Because of this need to move the camera the use of mirror lock up or a remote shutter release becomes impractical. When handholding the camera, brace it against something, if possible. A tree, fence post, railing, the arm of a chair, whatever is handy will help. Keep the viewfinder tight to your face, left arm bent with the hand cradling the lens from below, left foot comfortably forward, right foot back, feet at a 90 degree angle, then use your breathing technique along with the rolling motion of the shutter finger to take your shot.
Your basic settings, using a 300mm lens would look like this: 1/600th sec at f/8 at whatever ISO is needed to achieve good exposure. In bright sunlight your ISO will be around 150. If you need to adjust for lighting conditions my preference is to adjust ISO first. Only you know how high your camera will allow you to go before you get too much noise. After ISO adjust aperture and finally f/stop.
These tips are just a basic primer on getting good focus and are geared towards folks trying to take pictures of backyard birds whether they are at a feeder or perched in a tree or bush. More advanced techniques are needed for birds in flight, longer telephoto lenses and extreme distances. Since I own Canon equipment I have used Canons terminology. You may have to translate some of that. These are my personal thoughts based on long experience but I dont claim any special knowledge. I welcome all additions and comments.
Using the formula above, you would be shooting at 1/1000, f/8 at ISO 400 in bright sunlight.
May 23, 2012 22:34:04 #
May 24, 2012 01:52:03 #
birdpix wrote:
Allanpar: You can't shoot birds with a 500mm lens ... (show quote)
Thanks, will try to follow//Gert
May 24, 2012 05:54:17 #
Even though the camera was on a tripod with a shutter speed of 20th will render camera shake with the release of the shutter button. generally speaking if you want sharp as shots with a lens this size you need a shutter speed of 500th unless you have a remote shutter release and the subject is stationary not a moving subject like the bird and of course if there is no breeze. Turn up the iso it's better to have a bit of noise than soft images
May 24, 2012 06:14:10 #

allanpar wrote:
Hi can you please tell me were i went wrong on this photo, Camera Sigma sd14, lens sigma 170-500mm APO DG, using tripod, settings Aperture 6.3, shutter speed 1/20, iso 100, focal lenth 500mm.
was it the shutter speed? as the Heron does not seem crisp it looks slightly out of focus. any comments regards Allan
was it the shutter speed? as the Heron does not seem crisp it looks slightly out of focus. any comments regards Allan
No matter if you are on a tripod or not...500mm and 1/20 do NOT make for a clear shot. (unless your tripod is VERY heavy duty and your subject is a rock.
Photographing a living thing at 1/20 at 500mm is asking for problems like this.
May 24, 2012 07:20:12 #

The SD14 has a mirror that pops up out of the way when you press the shutter button. At slow camera speed and long focal length that vibration gets multiplied into blurred focus. In the future, before you take a picture at slow shutter speed, use the mirror lockup and if you have one, use the wireless remote shutter release. Otherwise set the shutter release button timing for 2s after pressing the shutter button (setting button is to the left of the lens looking through the eyepiece). Experience speaking, since I also have an SD14. I thought I was the only one on the UHH forum with Sigma camera. Welcome to another Sigma shooter. :-)
If you want to reply, then register here. Registration is free and your account is created instantly, so you can post right away.