EXPORTING FROM LIGHTROOM
Sep 20, 2016 08:22:26 #
Cryppy
Loc: Gouldsboro, ME
I'm a new LR user and I always shoot jpg with my D7200. My images are all 300dpi when I import them. I just noticed that after export all my images reduce to 240dpi. The file size of each image increases though (which I discovered early on in using LR) and I've had myself convinced that means I can produce good quality larger prints. The lower dpi discovery, however, makes me wonder.
Sep 20, 2016 08:27:36 #

Cryppy wrote:
I'm a new LR user and I always shoot jpg with my D7200. My images are all 300dpi when I import them. I just noticed that after export all my images reduce to 240dpi. The file size of each image increases though (which I discovered early on in using LR) and I've had myself convinced that means I can produce good quality larger prints. The lower dpi discovery, however, makes me wonder.
First I would suggest that once you learn your workflow in LR you will discover more fine detail and broader dynamic range shooting raw. Unless there is a critical need for jpeg, you may find that you end up using raw for everything.
DPI is a meaningless term. Take any image and export it at 16 dpi then at 600 dpi - nothing will change. I'm pretty sure your file size is increasing as a result of quality settings and editing in LR that may reveal more detail and noise.
This is what you need to know about PPI - which is not the same as dpi - for print quality
http://www.photokaboom.com/photography/learn/printing/resolution/1_which_resolution_print_size_viewing_distance.htm
Sep 20, 2016 08:36:14 #

Cryppy wrote:
I'm a new LR user and I always shoot jpg with my D7200. My images are all 300dpi when I import them. I just noticed that after export all my images reduce to 240dpi. The file size of each image increases though (which I discovered early on in using LR) and I've had myself convinced that means I can produce good quality larger prints. The lower dpi discovery, however, makes me wonder.
You can change the resolution on the export screen. You probably will not see a difference between 240 and 300 at normal viewing distance. If you are emailing photos for viewing on a monitor or mobile device, you can probably go down to 150, 96 or 72 dpi and people will still be happy. The higher resolutions are for printing. Even though printers may boast 1440 dpi, the eye sees only about 300. And then export at the final aspect ratio without resizing and 300 dpi.
Sep 21, 2016 04:20:02 #
Cryppy
Loc: Gouldsboro, ME
Thanks for the good advice. I've tried shooting RAW a few times but haven't been successful in managing the files during post processing. Can you recommend a website or YouTube video that will give me easy to understand step-by-step instructions? My other problem is that I've raced into Lightroom without paying attention to proper work flow. I use it for editing only and haven't yet taken advantage of its strong cataloging capability. Starting with my camera, my steps are: (1) insert card into desktop PC and upload. (2) Do preliminary PP in Picasa then if I need better editing I Import all the files that I uploaded from my card into LR. (3) In LR, I simply select the images I want to edit then Export them into a subfile in the original photo file on my PC. It's a haphazard kind of operation but it works for me - sort of.
Sep 21, 2016 05:48:28 #
abc1234 wrote:
You can change the resolution on the export screen. You probably will not see a difference between 240 and 300 at normal viewing distance. If you are emailing photos for viewing on a monitor or mobile device, you can probably go down to 150, 96 or 72 dpi and people will still be happy. The higher resolutions are for printing. Even though printers may boast 1440 dpi, the eye sees only about 300. And then export at the final aspect ratio without resizing and 300 dpi.
This is not correct.
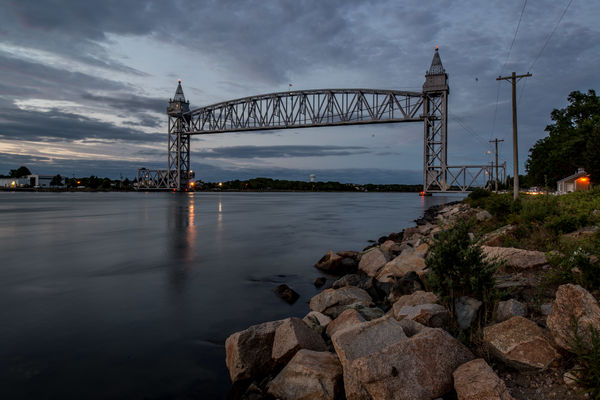
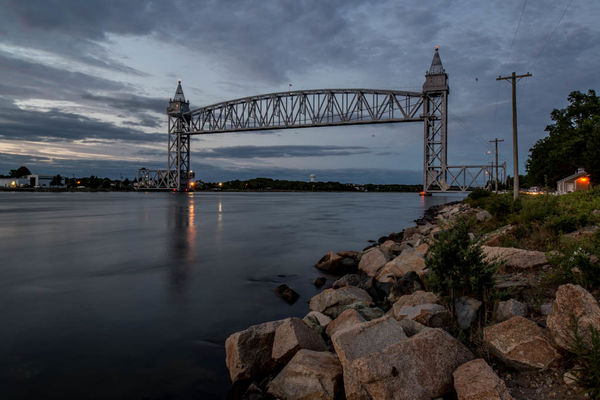
These are 2 images, one at 12 dpi (incorrectly labeled as ppi in Lightroom), and 600 dpi. Can you tell which one is which?
Same file size, same image quality, different dpi. As you can see there is zero difference. You can check the resolution settings in the metadata.
And lastly, you use high ppi values for printing small prints, and lower for large prints.
This should clarify printing resolutions for you:
http://www.photokaboom.com/photography/learn/printing/resolution/1_which_resolution_print_size_viewing_distance.htm
What actually determines size and quality is the number of pixels in height and width, and the quality settings, and whether you choose to resize the image and employ interpolation.

Sep 21, 2016 06:01:18 #
Cryppy wrote:
Thanks for the good advice. I've tried shooting RA... (show quote)
This is my workflow.
Open Lightroom.
Insert card in reader.
Open Library tab in LR.
Click Import (bottom left)
Select Copy as the behavior during import
Mouse over the destination (upper right corner)
Change the destination, creating a new folder (if you don't do this, it will put them in your previous import location)
Press import (bottom right).
Edit images. Changes will be stored in the preview database. It will slow you down a bit, but I suggest that you change the catalog setting to write changes to XMP (as long as you are editing raw files).
At this point you have done everything you need to do to your files. If you recorded raw files (recommended), you still have your untouched original file that came out of the camera, and all the changes in the preview database and the xmp sidecar file (if you select that option).
If you want to do more editing beyond the parametric adjustments possible in LR, then you can export a file to Photoshop or similar pixel level editor. I always export a 16 bit psd file, in prophoto color space, to edit in the largest color space possible. Editing the file in a pixel editor gives you precise control over adjustment with tools not available in LR, and gives you access to content aware tools, layers, accurate masks, custom brushes, blend modes for layers and brushes, etc etc etc.
A lot of this may be too much information, but fee free to contact me if you have questions. As I don't always check the forum, a PM is the best way to do this. Happy to help.
Sep 21, 2016 07:36:39 #


Sep 21, 2016 08:01:52 #
For good LR instruction, search Anthony Morganti on YouTube. He takes you from workflow basics through all the steps, in individual videos. They're not too long, usually around 20 min. He has literally taught me LR. Good Luck!
Sep 21, 2016 08:24:53 #
Gene51 wrote:
This is not correct. br br These are 2 images, on... (show quote)
Gene, what is not correct in what I posted?
Sep 21, 2016 09:03:17 #
abc1234 wrote:
Gene, what is not correct in what I posted?
"You probably will not see a difference between 240 and 300 at normal viewing distance. If you are emailing photos for viewing on a monitor or mobile device, you can probably go down to 150, 96 or 72 dpi and people will still be happy. The higher resolutions are for printing. Even though printers may boast 1440 dpi, the eye sees only about 300. And then export at the final aspect ratio without resizing and 300 dpi."
Not only will you not see a difference between 240 and 300 dpi, you won't see it between 12 and 600 dpi - as the two images I posted illustrate. The images are visually identical, and have exactly the same file size. You can download the 12 dpi image and be just as happy with it as you would if you downloaded the 600 dpi one.
The principal determinant of image quality and file size is the dimensions, in pixels, of the image, and the quality setting for the jpeg on export - not the "dpi" setting.
I print 40x60 images at about 40 ppi, which is not the same as 40 dpi - and no one complains about lack of clarity and sharpness. I will print the same image at 300 ppi when I do smaller prints, like 5x7 or 4x6. Viewing a print up close requires higher resolution, or ppi, because your eye can see the fine detail at 18" better than it can at 6', the average viewing distance for a 40x60. Required print resolution is always based on viewing distance. Billboards will look super sharp though they may be printed at 25 ppi. Up close, the dots that create the image will be the size of golf balls.
If I wanted to resize my image for email for instance, I would resample the image to a lower resolution. By this I mean to reduce the number of pixels in the length and height. Let's say I take the image I posted, which is 7317x4883px, and downsampled it for email to 1024x683. it would look like the images below. Note that I used 5 dpi to export the first one, and 2880 dpi to export the second. Do you see any difference at all between them? Both files are 170kb, btw.
If you compare the 1024x683px image to the 7317x4883px you will see a big difference - the file is bigger, at 5 mb I believe, and will display much bigger on the screen, as you would expect a .7mp image would compare to a 35.7 mp image, regardless of dpi.
So, other than your first sentence, regarding the difference between 240 and 300 dpi, which while technically is true, it's because there is no difference in image quality when setting dpi when exporting in Lightroom, not because, as you are hinting, there is a difference in resolution and it is imperceptible between 240 and 300.
I am not sure if this will clarify things or increase the confusion:
http://99designs.com/blog/tips/ppi-vs-dpi-whats-the-difference/
But you are not alone in thinking that dpi and ppi mean the same thing.

Sep 21, 2016 09:37:33 #

Cryppy wrote:
I'm a new LR user and I always shoot jpg with my D7200. My images are all 300dpi when I import them. I just noticed that after export all my images reduce to 240dpi. The file size of each image increases though (which I discovered early on in using LR) and I've had myself convinced that means I can produce good quality larger prints. The lower dpi discovery, however, makes me wonder.
When you export in lightroom, it is ppi, not dpi. Pixels per inch and that does affect the quality of the print.
dpi is the printer dots per inch.
Sep 21, 2016 09:38:38 #
Cryppy wrote:
Thanks for the good advice. I've tried shooting RA... (show quote)
My workflow differs a bit. First of all, I see no reason to use Picasa. While I have not used it in years, my recollection is that it does little or nothing that LR does not do. Furthermore, Google is discontinuing it.
I prefer to make a new folder in the camera for each shoot so that I can copy that folder to its home on my pc. This is faster than importing which loads everything on the card and then you or LR has to select the files to import. I also organize chronologically as follows. Photos>2016>09 September, 2016>Session folder. Copy the pictures using the copy command in Windows. Rename the folder to whatever you wish. Once copied, right click on 09 September, 2016 and go down to synchronize. And there your new pictures are, all cataloged. (I do not use sidecars.)
Next, I assign keywords. This is the beauty of LR. No one likes doing so but once you look for those photos having them and get all of them in an instant, you will probably become a believer.
I am now ready for my preliminary sort. I use numbers because they are so easy to assign. I delete obvious bad shots like an out-of-focus shot of my foot. Delete from catalog and HDD. 1 is reject (move to the reject subfolder), 3 is to develop, blank is I do not know if I want to use it.
Next is development. I use ExpoDisc to set my color balance so I synch this and the lens profile across all the pictures. I am finally ready to develop. Using the crop tool, I align and crop. Next, adjust exposure, clarity* and contrast*. These are the global adjustments. Now comes the art. This is what you learn from experience and looking at other photos. I fine tune with the local tools like spot removal, graduated and radial filters and adjustment brush. Add a slight negative vignette*, if appropriate. If I want to sharpen or do something more complicated, I go PS. * means I use a preset.
As I develop, I increase to 4 stars so I know at a glance what has been done and what has yet to be done. If something is really a standout, it gets a 5. If I edit in PS, I key in 6 to assign red. Time to export now. Select your desired shots according to whether you want to email them or print. Again, I use presets to speed things up. Emails might be 1 or 2 M with screen sharpening and go into the email subfolder. Prints are not resized, have sharpening and go into their own subfolder under the session folder.
We all develop our own workflows and you will too. I would make learning LR your top priority. It is really a great program. As for tutorials, I think Julieann Kost at tv.adobe.com is the best.
I hope this helps. Good luck and keep coming back for help.
Sep 21, 2016 09:53:30 #
gvarner
Loc: Central Oregon Coast
Cryppy wrote:
I'm a new LR user and I always shoot jpg with my D7200. My images are all 300dpi when I import them. I just noticed that after export all my images reduce to 240dpi. The file size of each image increases though (which I discovered early on in using LR) and I've had myself convinced that means I can produce good quality larger prints. The lower dpi discovery, however, makes me wonder.
As others have noted, the resolution for the product in cameras is PPI. The resolution for output to a printer is DPI. You can change the PPI of JPEG's in your camera's menu.
Sep 21, 2016 16:05:41 #

I agree with all those that recommend RAW over jpeg, and in a BIG way! That said, I would strongly spending some time learning Lightroom as it will be time well spent. I have, and have viewed, Laura Shoe's Lightroom DVDs. There are two, at about $ 50 each. Although I have been at this for almost 50 years, I have only switched to Lightroom in December 2015. I used these DVD to really learn it, and also have a cop of Kelby's book. I would get the DVDs first and I recommend them without hesitation. I now do 90% of my pp in Lightroom and about 10% in something else, mostly Photoshop. For my money, the $ 10 a month rental deal for BOTH can't be beat. Best of luck.
Sep 21, 2016 22:46:05 #

I am teaching an Introduction to Lightroom course at our local community college on October 3. It is primarily designed to explain what LR is and what it can do. I will be including a work flow set-up. If you are interested in my handout, please contact me via a PM and I will send it to you after the course.
Bud
Bud
If you want to reply, then register here. Registration is free and your account is created instantly, so you can post right away.