Sharpening Reality Checks: In Defense of the Much-Maligned "Halo"
Feb 13, 2016 10:38:12 #

Sharpening Reality Checks: In Defense of the Much-Maligned "Halo"
Reality Check A:
Every digital image that has received ANY sharpening, either in-camera or during post-processing, will display halos. Edge sharpening cannot occur without brightening the bright edge of an image detail. That brightened bright edge is, in fact, a "halo".
Halos do not become a problem until they become noticeable at normal viewing distance of the intended image at its intended size, whether on your computer display or as a print.
Reality check B:
Some details, for example a well-focused slender twig silhouetted against a clear, light blue sky, will, with no in-camera sharpening and SOOC, have no halo, nor, likely, any need to be sharpened. Other details,in the image, however, do require some sharpening, if only to overcome the "sensor fog" introduced by subdividing the continuous tonal gradations of the scene into tone-averaged pixels. The process of global "Capture sharpening" will, if properly applied, not result in objectionable halos even on the edges of the aforementioned twigs against the sky....but if examined at high magnification, the inveterate halo-haters will be able to cry out: "See? Halos!" That's O.K. Watch their disappointment when the targets of their derision become indiscernible at normal viewing distance (NVD).
Reality check C:
Discussion of edge sharpening solely from the perspective of using only "Strength" and "Radius" controls is very much like doing fine woodworking with only a ripsaw and a hammer. Which is why edge sharpening in Adobe Camera Raw (ACR) and Lightroom (based on ACR) provides the greatest opportunity possible for the most precisely refined control of edge sharpening, and, specifically,offers a means of specific control of those halos that may reach the point of being noticeable and objectionable.
The ACR/Lightroom edge-sharpening controls are:
AMOUNT: The "strength" control. As the slider is moved right, it strengthens the effects of the other three controls (Radius, Detail, and Masking).
If "Amount"is set to Zero, the other controls exert NO EFFECT !
RADIUS: determines the width of brightening of the bright side of a detail edge(the bright halo) , and the darkening of the dark side of that edge.
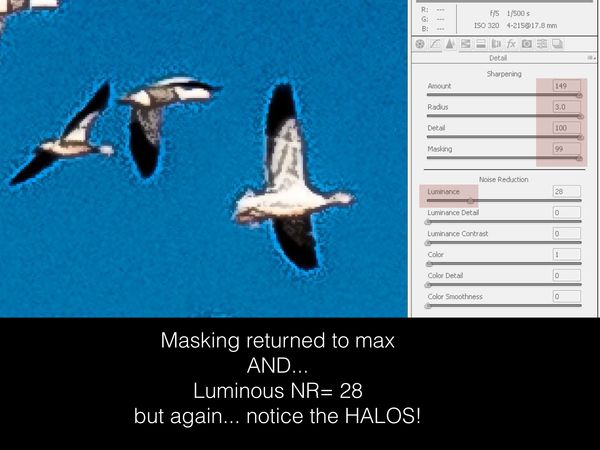
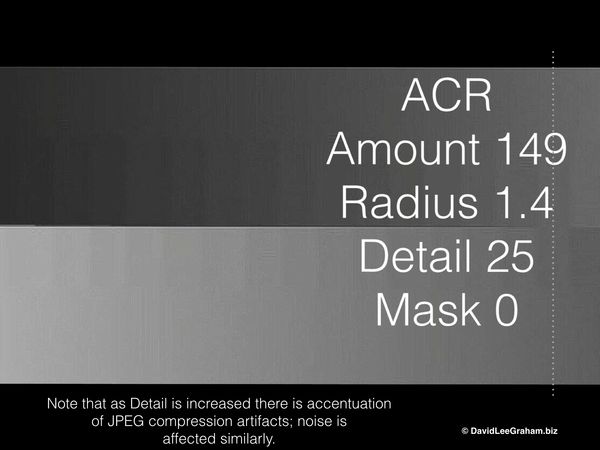
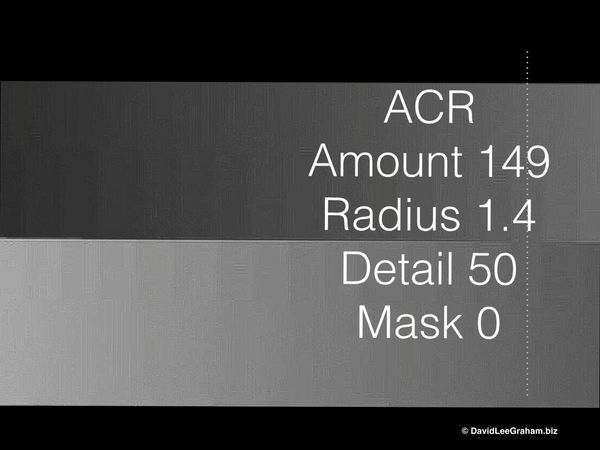
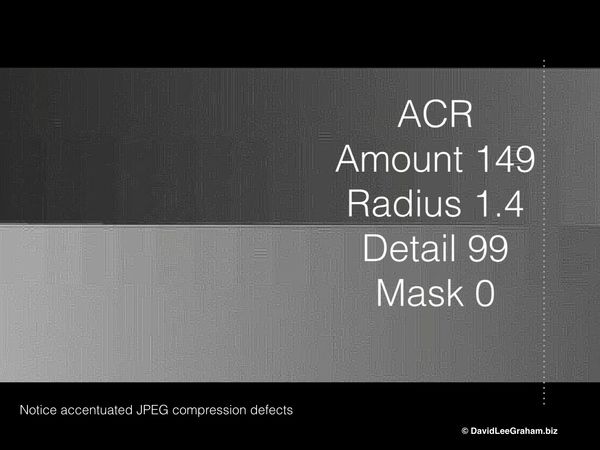
DETAIL: Moved left from the neutral, central "0" setting it decreases the brightness of the sharpening halos. Moved right from the central "0" it increases the brightness of the halos (through use of deconvolutional sharpening). Moved to the right, Detail can also, and usually unfortunately, enhance previously reduced luminous noise.
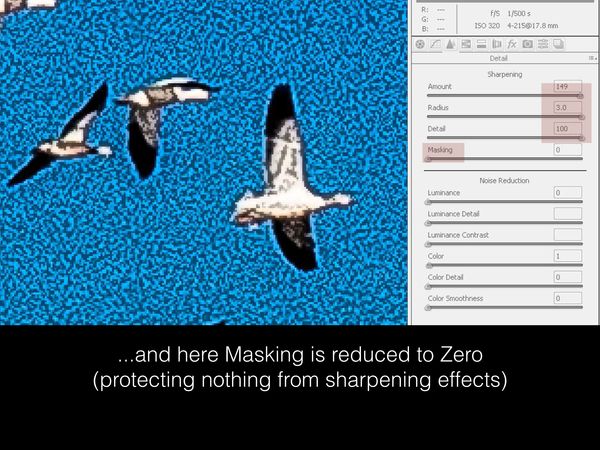
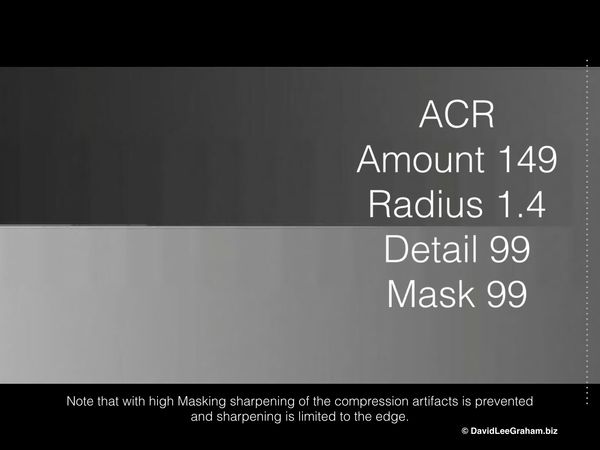
MASKING. as the control is moved to the right it progressively masks the lower density details in "planar" or "open" areas and progressively concentrates sharpening at stronger edges...it protects more-and-more areas from sharpening. It effectively decreases unintended sharpening of noise in open areas. As you move the Masking control slider right and then left you'll see why it's effect has been called "masking on-the-fly".
LUMINANCE noise reduction is considered by many to be the "fifth" sharpness control, acknowledging the role of noise reduction...and sometimes enhancement...in sharpening.
See the attached images illustrating (with heavy-handed control) the effects of RADIUS, DETAIL, and MASKING. Note that the images are displayed at 300X magnification to most clearly demonstrate the effects of the controls discussed.
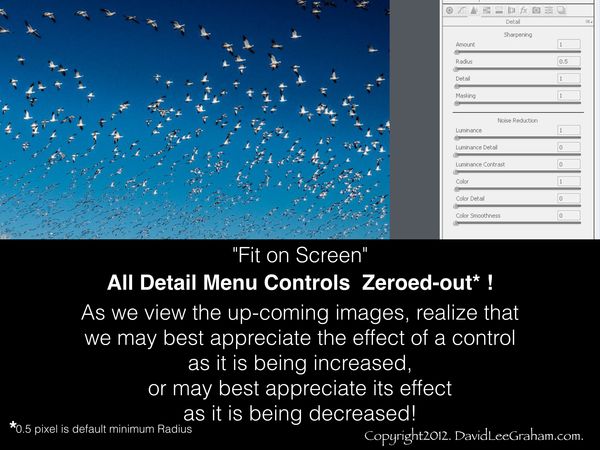
When practicing to become familiar with the effects of the sharpening controls, use a high magnification view. As your confidence in predicting the effects of each control increases, you can reduce magnification until routine sharpening is performed at 100X (1:1) with far more delicate, refined control than used in the coarsely controlled illustrations below.
Be certain to view the downloads of the images provided.
Dave in SD
Reality Check A:
Every digital image that has received ANY sharpening, either in-camera or during post-processing, will display halos. Edge sharpening cannot occur without brightening the bright edge of an image detail. That brightened bright edge is, in fact, a "halo".
Halos do not become a problem until they become noticeable at normal viewing distance of the intended image at its intended size, whether on your computer display or as a print.
Reality check B:
Some details, for example a well-focused slender twig silhouetted against a clear, light blue sky, will, with no in-camera sharpening and SOOC, have no halo, nor, likely, any need to be sharpened. Other details,in the image, however, do require some sharpening, if only to overcome the "sensor fog" introduced by subdividing the continuous tonal gradations of the scene into tone-averaged pixels. The process of global "Capture sharpening" will, if properly applied, not result in objectionable halos even on the edges of the aforementioned twigs against the sky....but if examined at high magnification, the inveterate halo-haters will be able to cry out: "See? Halos!" That's O.K. Watch their disappointment when the targets of their derision become indiscernible at normal viewing distance (NVD).
Reality check C:
Discussion of edge sharpening solely from the perspective of using only "Strength" and "Radius" controls is very much like doing fine woodworking with only a ripsaw and a hammer. Which is why edge sharpening in Adobe Camera Raw (ACR) and Lightroom (based on ACR) provides the greatest opportunity possible for the most precisely refined control of edge sharpening, and, specifically,offers a means of specific control of those halos that may reach the point of being noticeable and objectionable.
The ACR/Lightroom edge-sharpening controls are:
AMOUNT: The "strength" control. As the slider is moved right, it strengthens the effects of the other three controls (Radius, Detail, and Masking).
If "Amount"is set to Zero, the other controls exert NO EFFECT !
RADIUS: determines the width of brightening of the bright side of a detail edge(the bright halo) , and the darkening of the dark side of that edge.
DETAIL: Moved left from the neutral, central "0" setting it decreases the brightness of the sharpening halos. Moved right from the central "0" it increases the brightness of the halos (through use of deconvolutional sharpening). Moved to the right, Detail can also, and usually unfortunately, enhance previously reduced luminous noise.
MASKING. as the control is moved to the right it progressively masks the lower density details in "planar" or "open" areas and progressively concentrates sharpening at stronger edges...it protects more-and-more areas from sharpening. It effectively decreases unintended sharpening of noise in open areas. As you move the Masking control slider right and then left you'll see why it's effect has been called "masking on-the-fly".
LUMINANCE noise reduction is considered by many to be the "fifth" sharpness control, acknowledging the role of noise reduction...and sometimes enhancement...in sharpening.
See the attached images illustrating (with heavy-handed control) the effects of RADIUS, DETAIL, and MASKING. Note that the images are displayed at 300X magnification to most clearly demonstrate the effects of the controls discussed.
When practicing to become familiar with the effects of the sharpening controls, use a high magnification view. As your confidence in predicting the effects of each control increases, you can reduce magnification until routine sharpening is performed at 100X (1:1) with far more delicate, refined control than used in the coarsely controlled illustrations below.
Be certain to view the downloads of the images provided.
Dave in SD


Feb 13, 2016 10:45:33 #

To better see what is effected by the Detail and Masking keys, hold down alt while you adjust them.
Feb 13, 2016 10:54:10 #
Rich1939 wrote:
To better see what is effected by the Detail and Masking keys, hold down alt while you adjust them.
absolutely, Rich,
Thanks for the reminder.!
I'd have included images of that very useful aid to the process if I could figure out how to get a screen shot of it!
Dave
Feb 13, 2016 11:14:19 #
Uuglypher wrote:
Every digital image that has received ANY sharpening, either in-camera or during post-processing, will display halos. Edge sharpening cannot occur without brightening the bright edge of an image detail. That brightened bright edge is, in fact, a "halo".
Significantly incorrect
When color is encoded with a Bayer Color Filter Array it is impossible to get an image that goes from one shade of color to another in fewer than the number of pixels across on the matrix used to demosaic the image. Hence if a tone transition has values of 100 on one side and 200 on the other side, there will be a wide line between the two that is a gradient. For example if the matrix is 8x8 then one side will be 100, and 4th or 5th pixel into the transition the pixel value will be 150 and only at the 9th pixel will it become a value of 200.
The purpose of sharpening is to remove as much as possible of the gradient. If the "radius" is just large enough to match the width of that gradient, and the amount is just right to make the 4th pixel equal to the pixel at 0 and the 5th pixel equal to the value of 9th pixel, the result will be a 1 pixel transition from a tonal value of 100 to a tonal value of 200. With no halo at all! (To get that exactly right also requires a "sigma" value, which is the shape of the intensity curve over the spread of the radius.)
In practice that actually can be done, with a great deal of work, to get results that are close enough to be visibly no different than perfect.
Supposedly that is what "Capture Sharpening" does, and otherwise does not increase the accutance above an accurate data capture. Of course often we do want to do exactly that, so sharpening is increased farther or a different kind of sharpen (for example Unsharp Mask) is used.
Uuglypher wrote:
When practicing to become familiar with the effects of the sharpening controls, use a high magnification view. As your confidence in predicting the effects of each control increases, you can reduce magnification until routine sharpening is performed at 100X (1:1) with far more delicate, refined control than used in the coarsely controlled illustrations below.
This is another serious fallacy. Re-sampling an image to a smaller size is a very effective low pass spatial filter. Since sharpening is essentially a high pass filter that amplifies high frequencies in the spatial domain, it is exceedingly counter productive to first sharpen an image area and then remove the effects before viewing it to judge if sharpening is useful. The only way to sharpen by inspection is while viewing a 100% crop of the image at the size it will eventually be viewed at either as a print or on a monitor.
Feb 13, 2016 11:41:58 #
Apaflo wrote:
This is another serious fallacy. Re-sampling an i... (show quote)
Floyd,
Please don't follow your usual act of befouling a lucid discussion of the practical, applicable aspects of sharpening with introduction of meaningless detail in pretense of it being substantive argumentation. You do this in many discussions not only of sharpening but a variety of other topics without ever beginning one of your own. You recently posted some images dealing with the sharpening controls "Strength" (Amount" ) and "Radius". Why limit your sharpening repertoire to those two controls? Can't contribute in those areas?
You make seemingly definitive comments with no basis in fact.
a example: (besides your present interruption) was a recent statement that
"Sharpening is not significantly effective at overcoming blur from out of focus, from poor lenses, or from camera shake." This is simply a statement made from ignorance of the facts. If the statement had been qualified by "Edge sharpening..." it would have been true, but that may have been too much to expect, eh?
I'll be glad to introduce you to the concept of deconvolutional sharpening if you wish.
C'mon, Floyd, make some positive contributions ...if you are able.
It's well past beginning to be obvious that your home-town acquaintances have you pretty well pegged.
You might well review the information on digital image sharpening in the following sources:
Image Sharpening With Adobe Photoshop,
Camera Raw, and Lightroom". Bruce Fraser and Jeff Schewe, Peachpit Press, 2nd Edition, 2010
(an older reference, but unexcelled in explaining the mechanisms by which sharpening is accomplished! It helps immeasurably to understand the mechanisms in order to apply them most effectively.)
A contrast range "Target Edge" of the sort used by Schewe in explaining how the sharpening controls work is available for download at:
http://www.uglyhedgehog.com/t-289434-1.html
Also very helpful will be the sharpening discussions in:
"Adobe Photoshop CS5 for Photographers"
Martin Evening, Elsevier Ltd., 2010
"The Adobe Photoshop Lightroom 5 Book",
Martin Evening, Adobe Press, 2013
"The Digital Negative", Jeff Schewe, Peachpit Press, 2013
"The Digital Print". Jeff Schewe, Peachpit Press, 2014
"Photoshop CC", Elaine Weinmann and Peter Lourekas,
Peachpit Press 2014
Dave
Feb 14, 2016 10:50:30 #
Dave, I appreciate your practical discussion and examples. It builds on my limited knowledge and experience and it takes me forward in a way I can see and understand.
With help like that, I hope to make more effective use of these powerful tools at our disposal.
Judging your common sense approach as right or wrong just is not helpful, as everything has some wrong, and nothing is perfectly right.
With help like that, I hope to make more effective use of these powerful tools at our disposal.
Judging your common sense approach as right or wrong just is not helpful, as everything has some wrong, and nothing is perfectly right.
Feb 14, 2016 15:09:31 #
pfrancke wrote:
Dave, I appreciate your practical discussion and examples. It builds on my limited knowledge and experience and it takes me forward in a way I can see and understand.
With help like that, I hope to make more effective use of these powerful tools at our disposal.
Judging your common sense approach as right or wrong just is not helpful, as everything has some wrong, and nothing is perfectly right.
With help like that, I hope to make more effective use of these powerful tools at our disposal.
Judging your common sense approach as right or wrong just is not helpful, as everything has some wrong, and nothing is perfectly right.
xxxxxxxx
Hi, Piet,
I'm glad to hear you found this thread helpful, well....mostly so.
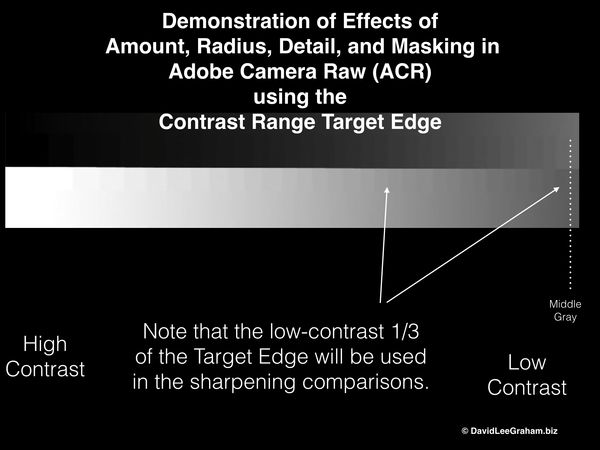
it occurred to me that some might prefer to see the effects of the ACR sharpening controls exerted on a contrast range "target edge". The low-contrast region of the edge (where sharpening can be most crucial for discernment of the greatest amount of detail) is the region upon which these illustrations concentrate.
Notice that the dotted vertical line identifies where middle gray appears on both sides of the edge, and thus provides zero contrast.
I'll be curious how useful these are judged to be. In my classes and workshops some get more out of the real image samples / snow geese images posted earlier, and some make more sense out of the test-edge samples.
Go figure.
Dave
the "Contrast Range Test Edge"
(Download)
All controls at minimum
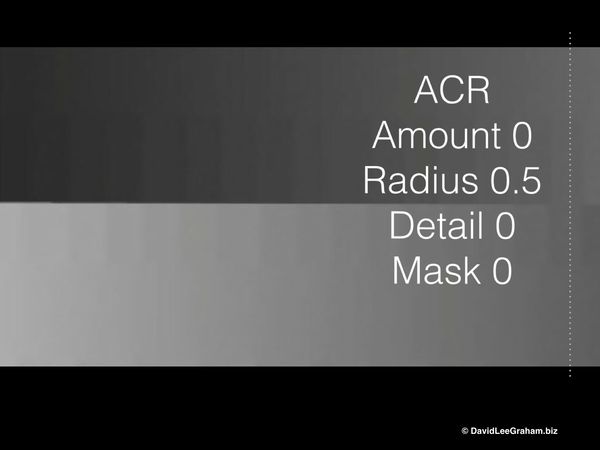
(Download)
Amount near max
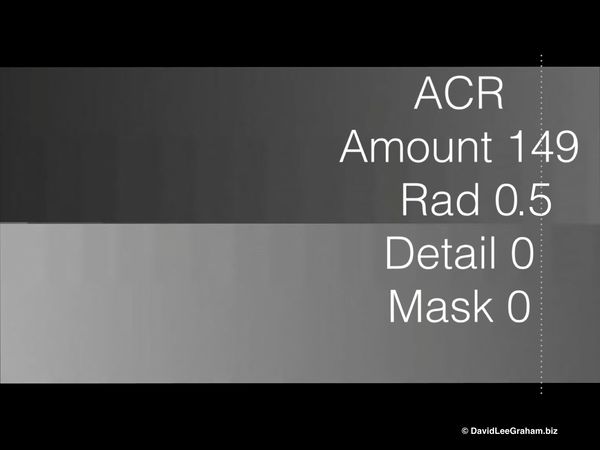
(Download)
Radius 1.4
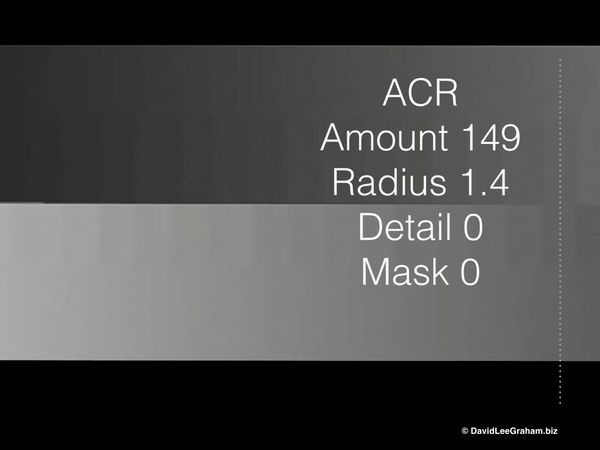
(Download)
Detail 25
(Download)
Detail 50
(Download)
Detail 99
(Download)
Masking 90
(Download)
Feb 15, 2016 10:32:33 #
Uuglypher wrote:
xxxxxxxx
Hi, Piet,
I'm glad to hear you found this thread helpful, well....mostly so.
Hi, Piet,
I'm glad to hear you found this thread helpful, well....mostly so.
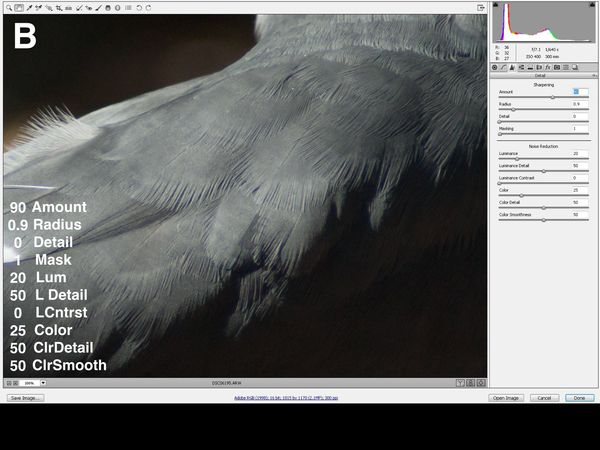
And here is more evidence of the added value of understanding the effects of the "Detail" and "masking" controls in Adobe Camera Raw/ Lightroom.
The first image of bird plumage is un-sharpened.
The second image illustrates reasonable sharpening of feather structural detail ( the closely parallel barbs within the two vanes of each feather on either side of the central "rachis") using "Amount"(Strength) and "Radius".
The third image demonstrates enhancement of sharpening by the participation of the increased "Detail" control that brightened the halos (not perceptible at NVD, but clearly effective in the additional sharpening) of each of the fine barbules connecting adjacent, parallel barbs. Note that "Masking" has remained at zero up to this point in the sequence.
The fourth image illustrates the negative effect on this image of increasing the "Masking" setting. Why so? Because in regions of "high frequency" (high detail density) the least possible restriction of over-all sharpening is advantageous. In this fourth image a high Masking" setting has blocked previously achieved sharpening except at strong,high-contrast edges (which this image lacks except at the margin of gray feathers and black background) and thus reduced discernibility of fine, densely packed details within and among the feathers themselves.
The aim of this thread has been to illustrate that there are no "tricks" to sharpening...no "hints" or "secrets" to sharpening when using the Adobe Camera Raw /Lightroom sharpening menu. Sharpening is best achieved by practiced awareness of the effects of each of the controllable factors involved in the sharpening workflow.
No "secrets" ...no "tricks"
Constructive discussion?
Questions?
Dave
1 unsharpened

(Download)
2 Amount and Radius
(Download)
3 Detail

(Download)
4 should "Maskng" be increased?

(Download)
Feb 15, 2016 12:46:31 #
Uuglypher wrote:
The aim of this thread has been to illustrate that there are no "tricks" to sharpening...no "hints" or "secrets" to sharpening when using the Adobe Camera Raw /Lightroom sharpening menu. Sharpening is best achieved by practiced awareness of the effects of each of the controllable factors involved in the sharpening workflow.
No "secrets" ...no "tricks"
Constructive discussion?
Questions?
Dave
I have to carefully read this again and get that practice. One thing though... I use PS CS6, for some reason I have been unable to figure out how to invoke the camera-raw editor once I have been fooling around with PS. I guess I am thinking that sharpening in general might be best done last.. (but getting it "properly sharpened" in camera-raw might be superior). Perhaps my solution is as simple as saving the image as a TIF or some such and then opening it via bridge?
Feb 15, 2016 13:13:53 #

pfrancke wrote:
I have to carefully read this again and get that practice. One thing though... I use PS CS6, for some reason I have been unable to figure out how to invoke the camera-raw editor once I have been fooling around with PS. I guess I am thinking that sharpening in general might be best done last.. (but getting it "properly sharpened" in camera-raw might be superior). Perhaps my solution is as simple as saving the image as a TIF or some such and then opening it via bridge?
Look for camera raw under your filters menu in PS.
Feb 15, 2016 14:20:56 #
minniev wrote:
Look for camera raw under your filters menu in PS.
hi Minnie, no luck for me doing this. It shows up under Help>About Plug-In, but is no where to be found in my Filter list.
BUT.. I finally DID figure out that by saving the image, I can do an Open-As and then I can force it into Camera Raw. So this is good for me, prior to this only knew how to open my CR2 files from within bridge. Now I can do all that, work in PS, save as TIF and then reopen it back into Camera Raw. A little kludgy, but it certainly works!
Feb 15, 2016 22:16:06 #
pfrancke wrote:
I have to carefully read this again and get that practice. One thing though... I use PS CS6, for some reason I have been unable to figure out how to invoke the camera-raw editor once I have been fooling around with PS. I guess I am thinking that sharpening in general might be best done last.. (but getting it "properly sharpened" in camera-raw might be superior). Perhaps my solution is as simple as saving the image as a TIF or some such and then opening it via bridge?
Hi, Piet,
A general purpose workflow to be used by someone capturing raw image data is to do as much of your post-processing as possible in the linear, non-destructive environment of Adobe Camera Raw / Lightroom before converting to a TIFF file (16 Bits) and going into PS CS6 or CC for layer/masking work and other processing you can't do elsewhere. Camera Raw accepts, besides raw files, JPEG and TIFF files.
Color temperature, all tonal normalization(exposure, highlights, shadows, whites, blacks, contrast, clarity get done linearly in ACR. If poor sharpness is not interfering with other post-processing, I urge that sharpening be performed as the last act after sizing for printing, and the printing itself.
...and I do wish it were always that simple.
I am preparing a tutorial on evaluating and characterizing image detail as a basis for sharpening decisions from the perspectives of the ACR/LR Sharpening ("Detail" ) menu.
Best regards,
Dave
If you want to reply, then register here. Registration is free and your account is created instantly, so you can post right away.