Printing in Lightroom Tutorial
Jul 14, 2015 09:33:21 #
Part 1 - Introduction
Like everything, once you know how, its easy. Printing from LR gives you a great deal of control over the size, quality and colour, but first it helps to understand how those controls work and what they actually do.
In this tutorial I am going to make some assumptions that will help print a non-standard image.
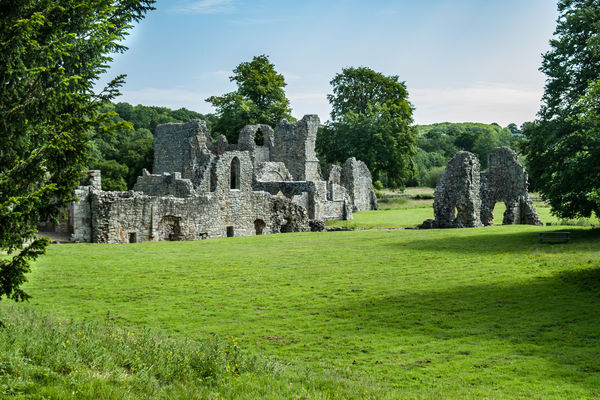
My original is shown below, its a basic photo size 3872 x 2581 pixels so the aspect ratio is 3 x 2. For this exercise I want to print 10 x 8 which means I must change the aspect ratio to 5 x 4.
I am deliberately using a non-calibrated monitor (as I believe the great majority of monitors are) and
therefore will make a test strip (just like in the old days of film) so I dont waste a ton of paper and ink trying to get a good print.
Like everything, once you know how, its easy. Printing from LR gives you a great deal of control over the size, quality and colour, but first it helps to understand how those controls work and what they actually do.
In this tutorial I am going to make some assumptions that will help print a non-standard image.
My original is shown below, its a basic photo size 3872 x 2581 pixels so the aspect ratio is 3 x 2. For this exercise I want to print 10 x 8 which means I must change the aspect ratio to 5 x 4.
I am deliberately using a non-calibrated monitor (as I believe the great majority of monitors are) and
therefore will make a test strip (just like in the old days of film) so I dont waste a ton of paper and ink trying to get a good print.
Jul 14, 2015 09:36:37 #
Part 2 Gamut
Im not going to throw figures and charts at you, (there are other Hoggers who can do that), but first thing I do is to ensure the colours in the image are printable.
In the Develop Module check Soft Proofing on the toolbar.
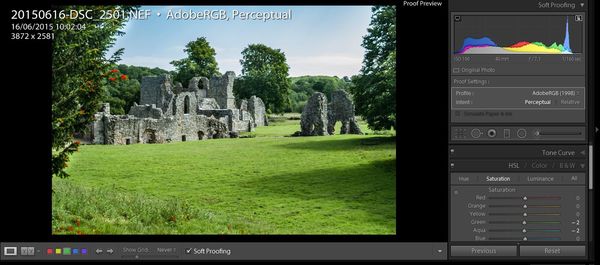
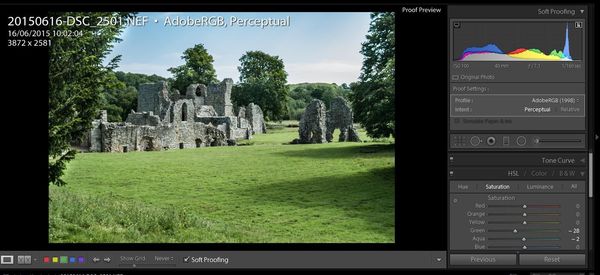
In the histogram click the right hand icon which looks like a piece of paper with a corner turned down . Now check your image on screen, some parts may have turned red, see attached photo, some of the green foliage on the trees and some of the grass on the left bottom has turned red. LR is telling you that these marked areas will not print correctly. Open the HSL panel in Develop, and in this case all I need to do is to move the green slider a tiny way to the left to make the red overlay go away. Whilst you are doing this you may get an annoying pop up, just click the middle button Use this as Proof and the pop-up will go away. Once the red overlay has disappeared by LIGHT touches in the HSL panel, turn off soft proofing, the Gamut should now be fine.
In this case the Gamut correction was miniscule but some images may contain large areas of out of gamut colours and these do need correcting or you will end up with a very disappointing print.
Notice that the file name now has a descriptive suffix: Adobe RGB, Perceptual.
The colour space in Lightroom is usually Pro-Photo, but by checking Soft Proofing, the RGB colour space is invoked which matches (nearly) my printer.
Later in this tutorial we shall discuss Perceptual and Relative
Im not going to throw figures and charts at you, (there are other Hoggers who can do that), but first thing I do is to ensure the colours in the image are printable.
In the Develop Module check Soft Proofing on the toolbar.
In the histogram click the right hand icon which looks like a piece of paper with a corner turned down . Now check your image on screen, some parts may have turned red, see attached photo, some of the green foliage on the trees and some of the grass on the left bottom has turned red. LR is telling you that these marked areas will not print correctly. Open the HSL panel in Develop, and in this case all I need to do is to move the green slider a tiny way to the left to make the red overlay go away. Whilst you are doing this you may get an annoying pop up, just click the middle button Use this as Proof and the pop-up will go away. Once the red overlay has disappeared by LIGHT touches in the HSL panel, turn off soft proofing, the Gamut should now be fine.
In this case the Gamut correction was miniscule but some images may contain large areas of out of gamut colours and these do need correcting or you will end up with a very disappointing print.
Notice that the file name now has a descriptive suffix: Adobe RGB, Perceptual.
The colour space in Lightroom is usually Pro-Photo, but by checking Soft Proofing, the RGB colour space is invoked which matches (nearly) my printer.
Later in this tutorial we shall discuss Perceptual and Relative
Jul 14, 2015 09:37:09 #
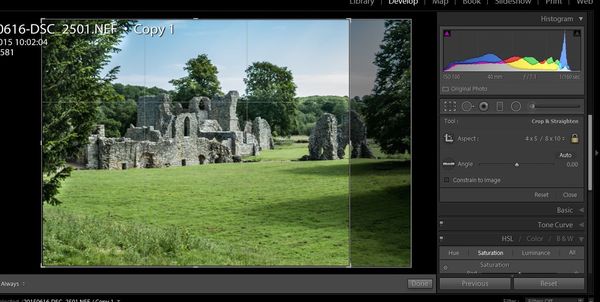
Part 3 Aspect Ratio
I said earlier that my image had an aspect ratio of 3:2, that is the width is 1 ½ times longer than the height, and to print a 10 x 8, the length needs to be 1 ¼ times longer than the height. Aspect ratio of 5:4
At this point I would create a virtual copy. Right Click on your image and choose Create Virtual Copy. You dont have to do this, but it preserves the original 3:2 for and 6 x 4 prints you want.
Open the Crop Tool and click on the padlock to unlock it. Click where it says 2 x 3 / 4 x 6 to open a dropdown list and choose 4 x 5 / 8 x 10
You will now see an overlay on the image, the aspect ratio of this overlay is 5:4, and however you position the image within that overlay, or even reduce the size by dragging a corner handle, the aspect ratio is 5:4. I have shifted the image to the right as you can see in the photo below.
Click Done
Jul 14, 2015 09:37:22 #
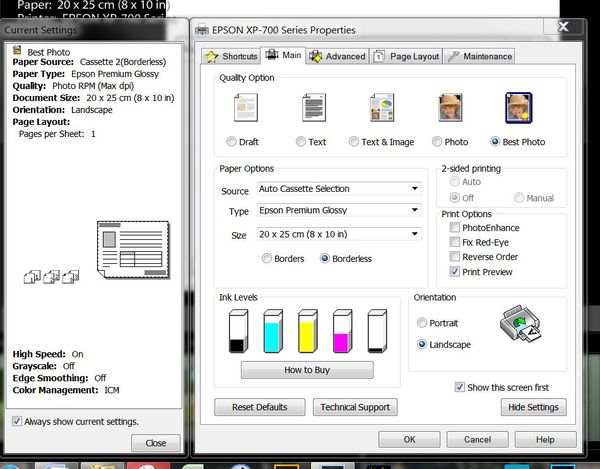
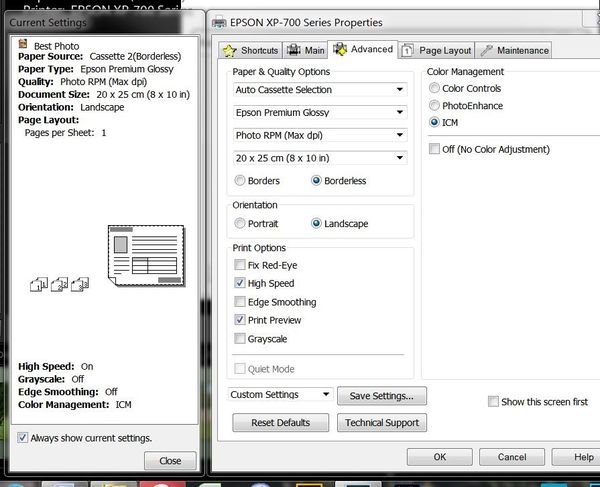
Part 4 - Setting up the Printer
Life in tutorial writing gets tricky now because we all have different printers and different set up screens and although the set up is all fundamentally the same, its just the layout that is different.
Make sure the virtual copy (with its Aspect Ratio of 5:4 is selected and go to the Print module.
Click on Page Set up at the bottom of the left hand panel. Make sure the correct printer is selected and click on Properties
Bear in mid this is now specific to my printer, I have chosen Best Photo, Auto Cassette, Epsom Premium Glossy, 8 x 10 in, borderless. The only option I have chosen from the Print Options panel is the Print Preview. The other options are used when you allow the Printer to manage the colours.
On the advanced tab I have chosen Landscape, High speed and most important to me is the ICM (profile).
When set up just OK out of the Page set up section.
Jul 14, 2015 09:37:31 #
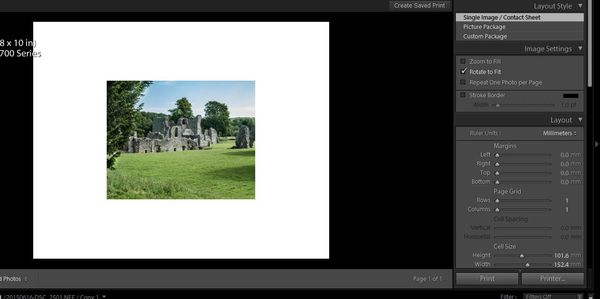
Part 5 Setting up Lightroom
Working down the right hand panel:
Highlight Single image / Contact sheet
Check Rotate to fit
Layout
Move all margin sliders to the left so that Margins are 0.0 mm or ins
Move Paper grid sliders to the left
Cell spacing should be greyed out
Cell size Move both sliders to the right
Notice how the borders disappeared
Uncheck everything else until you have scrolled down to Print Job
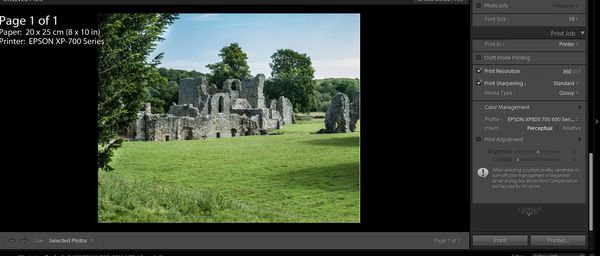
Print Job
Uncheck Draft Mode Printing
Check Print resolution and enter a number (I use 360 but your printer may have a different requirement)
Check Print sharpening (and choose by clicking on whatever is displayed, I use Standard.
Media Type choose Matte or Glossy
Colour Management
This is where you can choose the profile. Click on whatever is showing and choose an appropriate profile for your paper. You can also choose Managed by Printer if you wish, but then you may have to go into page set up Properties and instruct the printer how to handle the colours in your photograph.
Intent: I leave mine on Perceptual, I cannot see a difference between Perceptual and Relative on prints. Your printer is possibly more receptive than mine to this command.
Print Adjustment:
You cannot see the result of this unless you print something. I print test strips to get the brightness correct if I am using a non-calibrated monitor. The next tutorial will demonstrate this.
Load your printer with paper and press Print
Working down the right hand panel:
Highlight Single image / Contact sheet
Check Rotate to fit
Layout
Move all margin sliders to the left so that Margins are 0.0 mm or ins
Move Paper grid sliders to the left
Cell spacing should be greyed out
Cell size Move both sliders to the right
Notice how the borders disappeared
Uncheck everything else until you have scrolled down to Print Job
Print Job
Uncheck Draft Mode Printing
Check Print resolution and enter a number (I use 360 but your printer may have a different requirement)
Check Print sharpening (and choose by clicking on whatever is displayed, I use Standard.
Media Type choose Matte or Glossy
Colour Management
This is where you can choose the profile. Click on whatever is showing and choose an appropriate profile for your paper. You can also choose Managed by Printer if you wish, but then you may have to go into page set up Properties and instruct the printer how to handle the colours in your photograph.
Intent: I leave mine on Perceptual, I cannot see a difference between Perceptual and Relative on prints. Your printer is possibly more receptive than mine to this command.
Print Adjustment:
You cannot see the result of this unless you print something. I print test strips to get the brightness correct if I am using a non-calibrated monitor. The next tutorial will demonstrate this.
Load your printer with paper and press Print
Jul 14, 2015 10:12:37 #

Jul 14, 2015 10:28:11 #

Great work, Searcher. I wish you had a Canon printer so that you could do this with it instead of an Epson. I have trouble getting the printer set with profiles and color management. Thanks! I've saved this all as a PDF so that I can refer back to it when I'm trying to print.
Jul 14, 2015 11:10:50 #

Yes, thanks for clearing up some things that frustrated me. It seems much more simple now.
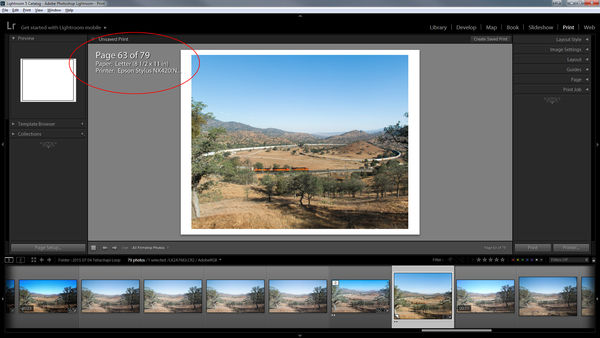
Edit: It went well except that it wanted to print all 79 images and I only had one image selected. Luckily I had print preview selected and it didn't actually print 79 images.
Double Edit: I still can't seem to get only one image selected to print in the print module. It sees the whole folder as a print job so all 79 images are going to print.
Triple Edit: you see a white border on my image because I'm using 8.5x11 paper to print a 8x10 image.
Jul 14, 2015 16:16:47 #
jeep_daddy wrote:
Yes, thanks for clearing up some things that frust... (show quote)
There are only two ways I can make LR do this, the first is to select all images in the film strip and the 2nd is in Page Set up, printer properties. On my printer this is under the Layout tab.
I suggest you Control A to select all images in the film strip, then Control D to deselect all, then just select the one you want.
The image to the left of the selected image is definitely not selected, but the other images are a middling shade of grey, possibly indicating a secondary selection. Control + D, then select the one you want to print.
Jul 14, 2015 22:10:40 #
None of the other images are selected. So it must be some kind of glitch. But I did figure out that I can change the print properties to print from page such and such to page such and such.
Searcher wrote:
There are only two ways I can make LR do this, the... (show quote)
Jul 15, 2015 08:14:02 #

Jul 15, 2015 09:39:15 #

Jul 15, 2015 10:11:22 #
Jul 15, 2015 11:53:45 #
Great job. Cleared up some of my confusion. Can't wait for the next tutorial. Thank you!
Jul 16, 2015 15:18:02 #
Tarfun
Loc: Red Bank NJ USA
James, Part 2: "Soft Proofing" does not appear in my Develop Module (LR 5.7). Now what? Leo
If you want to reply, then register here. Registration is free and your account is created instantly, so you can post right away.