Help with exposure
May 19, 2015 09:14:50 #
collhart wrote:
Would expose compensation, plus or minus be of any help??
Exposure Compensation causes the auto exposure and auto ISO functions to allow higher or lower amount for the same light meter reading. What it actually does is bias the light meter up or down.
The effect though is to change the captured window of dynamic range, which in this case was 8 fstops, up or down over the dynamic range of the scene, which was probably between maybe 15 to 20 fstops.
So setting EC to +2 would cause added exposure. The highlights in the background would be blown to the point of clipping, and the shadows on the birds would be lifted up to a more pleasant level.
If EC were set to -2 the opposite would happen, and there would be less exposure. The shadows in the foreground would get even darker and all detail would be blocked; but the background would not be overexposed and all the detail of the water would be more clearly visible.
Shooting at a lower ISO allows the camera to capture a greater amount of the dynamic range, and shooting at a higher ISO allows less. At ISO 400 with that camera it is about 8 fstops. At ISO 100 that goes up to almost 9 fstops, but at ISO 6400 it is down to only 4.75 fstops, and that is about as low as can be used to get anything close to a reasonable picture, and with this shot it would be very high contrast (the background would be totally blown and the shadows would all be totally blocking).
So the value of adjusting exposure, either manually or using EC to control the auto modes, depends very much on the ISO used. And on the actual brightness range of the scene being photographed.
May 19, 2015 09:47:58 #
Silvermeteor
Loc: South Carolina, USA
My first thought would be to expose for the birds by using spot metering.
A polarizing filter may also be an option to reduce the glare on the water.
You could also use exposure compensation.
Those would be my in camera thoughts.
Once you were home I would consider using a brush to lower the exposure on the water rather than raising the exposure on the birds. I find the bright water to be distracting.
May 19, 2015 11:07:24 #
LiamRowan wrote:
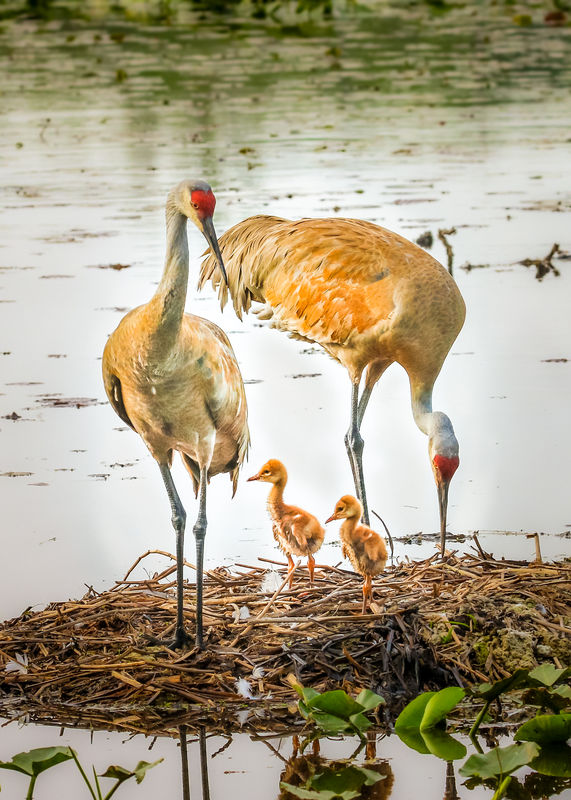
I uploaded the image below straight from raw; no exposure, color processing, etc., at all. The cranes are underexposed, the water behind them quite overexposed. How does one deal with such a lighting situation? Multiple different exposures is out; they are constantly moving.
Thx for ideas.
Thx for ideas.
I Tone Mapped the image in NIK HDR Eflex Pro 2 and then used Shadows/Highlights in Photoshop to lighten the image a little.
Swede

May 19, 2015 11:38:57 #

Liam, what a great composition. I couldn't resist bringing into lightroom to see what I can do with it. I used a few basic exposure adjustments and then a couple of radial filters to lighten the birds and a second radial to bring down the surrounding water. The water was is pretty overexposed thus couldn't really bring back much detail..so opted to blur it ever so slightly.
LiamRowan wrote:
I uploaded the image below straight from raw; no exposure, color processing, etc., at all. The cranes are underexposed, the water behind them quite overexposed. How does one deal with such a lighting situation? Multiple different exposures is out; they are constantly moving.
Thx for ideas.
Thx for ideas.
May 19, 2015 11:48:11 #

I downloaded into my iPad and ran the Adobe PS Express app on it. It's Auto Fix feature brought out lots of detail in the feathered backs, but no detail in the eye areas of the heads of the big pelicans. So I would guess no amount of PP would do much. Both LR and PS have stronger tools than the 'free' PS Express, so not all hope is lost.
May 19, 2015 12:58:47 #

The editing that others have shown you here will work even better on the original raw image you've got on your hard drive. Use a good raw editing program such as Lightroom or Adobe Camera Raw and you'll see even better results than those posted here.
May 19, 2015 13:58:32 #

On the prevention side, I can tell you what simple steps I would take to minimise the risk of blown highlights. I would use matrix metering, and I would experiment to see how much exp. comp. I could get away with before blown highlights became a problem. I would also play safe with the exp. comp. For instance I might find that I could get away with +1.7 with the scene that I was experimenting with, but when shooting in a new environment I wouldn't go above +1, just to give a bit of a buffer zone.
I would also set the camera to use low ISO values, because you don't want a lot of ISO noise coming through if you're going to lighten shadows for all you're worth.
On the remedial side you can lighten shadows and lower highlights, but I find that once you've done that more than two or three times it stops doing anything much. After doing that I resorted to selecting the persistent shadows and lightening them.
There are various ways you can apply extra helpings of Highlights and Shadows beyond what Basic gives you. You can use the adjustments brush, a radial filter, a grad filter (using just the top portion of the selection that it gives you), and with all of these, if you right-click on the white spot for that particular adjustment you can select Duplicate. But as I said, after two or three applications it stops working.
Lifting shadows and lowering highlights causes a loss of contrast, and I find that with each application it needs about +10 of Contrast to compensate. This is separate from whatever you gave the whole frame in the Basic section.
This is my edit doing more or less what I mentioned.
-
May 19, 2015 16:23:30 #
psychomom wrote:
A polarizing filter may help in this kind of a situation to eliminate the reflections on the water, so that the birds can stand out better against the background.
A polarizing filter would have no influence on the exposure problem in this case.
May 19, 2015 16:36:26 #
May 19, 2015 16:49:46 #
Additional responses to other contributors:
First, thank you for the many insightful responses, and especially to those who have taken the time to adjust the jpeg and illustrate PP possibilities.
Ronz: Yes, I have LR and PP. I generally get sufficient acceptable images SOOC that I throw away problematic ones such as the photo that initiated this post (I do always make adjustments for exposure, contrast, clarity, but typically very minor). I have been photographing these parent cranes for several weeks and have been happy with the results. However, the babies were born recently and the family abandons the nest within a day or so. It has been very tough to get an image of the entire family; trees will be in the way, one parent is off somewhere, birds in an unattractive arrangement, on and on. Thats why I found myself wishing I could save this one.
Winterrose: Yes, the post processed image is worth 1000 words. Would you consider adding another 50 words or so describing the adjustments you made? That would really be helpful as I am not used to working with images that need so much work.
Judy: Thx for the Better Beamer recommendation Ill check it out.
Psychomom: I have a polarizing filter and will try that in a similar situation.
Apaflo: Thanks for your detailed response to colhart very informative.
Silvermeteor: Your strategy sounds quite viable. I would have liked to have seen what could be done with the birds exposed correctly and a polarizer to cut down the water glare (see note to Psychomom above). Although I see above winterrose thinks the polarizer would not help here. I've asked for clarification.
Llindstrand and Lloyd2: thx for your reworked images. Multiple versions is illuminating.
R.G.: Thx for your strategy both on scene and post process. One of the problems especially for a not-so-accomplished photographer, is that the scene lasted perhaps 15-20 seconds tops. Someone in the family will wander off, turn their rear end towards you, get behind another creature, etc., before any "thoughtful" changes can be made to the settings. I really appreciate your edited version and the detailed description of how you got there. I will try to come close working from the raw file.
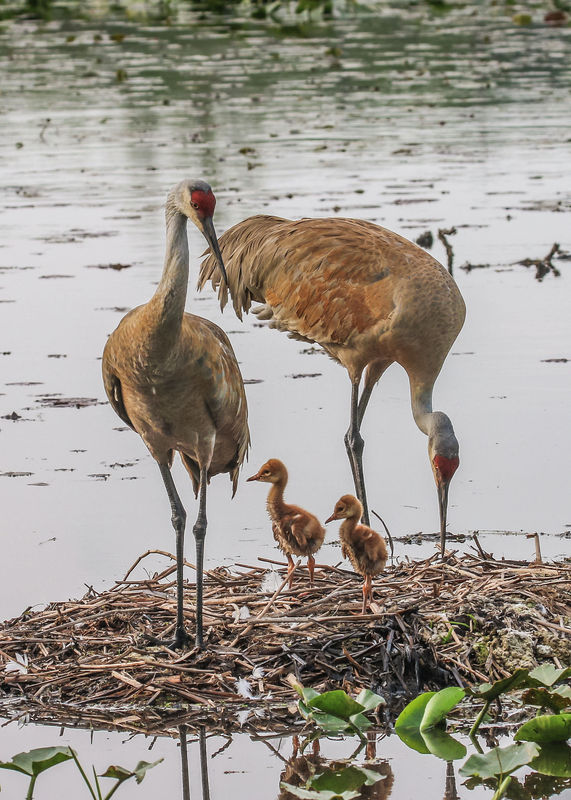
I'm adding a couple images where I was happy with the exposure for reference.
First, thank you for the many insightful responses, and especially to those who have taken the time to adjust the jpeg and illustrate PP possibilities.
Ronz: Yes, I have LR and PP. I generally get sufficient acceptable images SOOC that I throw away problematic ones such as the photo that initiated this post (I do always make adjustments for exposure, contrast, clarity, but typically very minor). I have been photographing these parent cranes for several weeks and have been happy with the results. However, the babies were born recently and the family abandons the nest within a day or so. It has been very tough to get an image of the entire family; trees will be in the way, one parent is off somewhere, birds in an unattractive arrangement, on and on. Thats why I found myself wishing I could save this one.
Winterrose: Yes, the post processed image is worth 1000 words. Would you consider adding another 50 words or so describing the adjustments you made? That would really be helpful as I am not used to working with images that need so much work.
Judy: Thx for the Better Beamer recommendation Ill check it out.
Psychomom: I have a polarizing filter and will try that in a similar situation.
Apaflo: Thanks for your detailed response to colhart very informative.
Silvermeteor: Your strategy sounds quite viable. I would have liked to have seen what could be done with the birds exposed correctly and a polarizer to cut down the water glare (see note to Psychomom above). Although I see above winterrose thinks the polarizer would not help here. I've asked for clarification.
Llindstrand and Lloyd2: thx for your reworked images. Multiple versions is illuminating.
R.G.: Thx for your strategy both on scene and post process. One of the problems especially for a not-so-accomplished photographer, is that the scene lasted perhaps 15-20 seconds tops. Someone in the family will wander off, turn their rear end towards you, get behind another creature, etc., before any "thoughtful" changes can be made to the settings. I really appreciate your edited version and the detailed description of how you got there. I will try to come close working from the raw file.
I'm adding a couple images where I was happy with the exposure for reference.


May 19, 2015 22:04:27 #

I really like that first picture, and there the water reflection is perfect.
May 20, 2015 06:17:57 #

Spot metering for all your wildlife as the subject is what's important. If at all possible, approach subject with the sun at your back which means the subject will be in the best possible light. Selecting specific hours of the day, with the sun either rising or setting and using the method of the sun on your back will give you the Best possible results. Note, polarizer is of little use for serious wildlife. You want the lowest possible ISO, highest shutter speed and reasonable DoF. The polarizer robs you of light, so kills the best possible settings.
May 20, 2015 06:51:15 #
martinfisherphoto wrote:
Spot metering for all your wildlife as the subject... (show quote)
Thanks for this explanation, Martin.
May 20, 2015 07:36:49 #
winterrose wrote:
That would depend on what metering mode is set. Spot, or average etc.
Either way it is a guide.
May 20, 2015 12:11:09 #
LiamRowan wrote:
......Someone in the family will wander off, turn their rear end towards you, get behind another creature, etc., before any "thoughtful" changes can be made to the settings.....
What I was suggesting was finding a safe level of exp. comp. and leaving the camera set to that when you're in that kind of environment. If you end up taking shots that didn't really need any exp. comp, it's a very simple matter to drop the brightness in PP.
Some people have been recommending spot metering, and that will give you a properly exposed subject. However, in that kind of situation, spot metering is a recipe for very blown highlights - which in the case of your posted shot would be most of the background. Using matrix metering gives the best protection from blown backgrounds, and using a safe level of exp. comp. gives a degree of protection from over-darkened subjects. Keeping the ISO low gives some protection from noise when lightening the darker areas. The only thing you'd have to be wary of is that the exp. comp. will work mainly through slowing the shutter, especially if you've set the camera to use low ISO values.
Using a polarising filter will reduce the overall light levels reaching the sensor, but it will work mainly on the light that's reflected off of the water, and it is that which is keeping the exposure low. With a polarising filter the camera will be able to raise the exposure quite a bit. The more light you have reflected off of the water, the better a polarising filter will work. For best effect you would have to experiment by rotating the filter to see which position gave the best reduction of glare.
If you want to reply, then register here. Registration is free and your account is created instantly, so you can post right away.