Help for VERY gloomy day action shots.....please
Feb 26, 2012 18:16:19 #
Bobber wrote:
This is working with a mask that ate too much of the bird. When trying something like this, it is best to work with layers and paint the bird in, using short strokes..../...
When using layers, a small reminder: Black is transparent and the white is not. If you could post the original (as out of your camera), it would help.
Feb 26, 2012 21:07:36 #
Bobber wrote:
Sorry I took so long. Hey, I got involved in som... (show quote)
WOW!! That is fantastic. I am waiting eagerly for the tutorial. Thank you for your help!
Feb 26, 2012 21:08:49 #
English_Wolf wrote:
When using layers, a small reminder: Black is transparent and the white is not. If you could post the original (as out of your camera), it would help.
Bobber wrote:
This is working with a mask that ate too much of the bird. When trying something like this, it is best to work with layers and paint the bird in, using short strokes..../...
When using layers, a small reminder: Black is transparent and the white is not. If you could post the original (as out of your camera), it would help.
Here it is for you. Again thank you for your help.
Feb 26, 2012 22:03:14 #
English_Wolf wrote:
When using layers, a small reminder: Black is transparent and the white is not. If you could post the original (as out of your camera), it would help.
Bobber wrote:
This is working with a mask that ate too much of the bird. When trying something like this, it is best to work with layers and paint the bird in, using short strokes..../...
When using layers, a small reminder: Black is transparent and the white is not. If you could post the original (as out of your camera), it would help.
I have some idea of what you are suggesting, but I have not worked with the painting techniques very much. There is alway more to learn in PS, and more improvement to make.
Feb 26, 2012 22:05:06 #
I used Photo Shop C4.
I think elements would work fairly much the same. There are most likely other ways to approach this job. That is one thing that makes these PP software's powerful, each approach offers some kind of advantage.
Procedure:
x. Preparing the Battlefield!
1. Copy your original by opening it and doing an Edit-Copy or use the Windows key combination Control-C. The picture will wait on the clipboard.
2. Use Edit,New to start a new picture file. Click OK. You can give it a new name later or on the drop down window if you like.
3. Open the Layer's Palate. By either going to the Windows tab above or clicking on the icon in the palliate selection tool bar.
The layer's palate will open and you will see a bottom layer labeled, Background, that usually has your original in thumbnail, but this time will be a blank white. These steps will insure not messing up the original.
3. Activate your original and use the Edit tab to select Copy or press the Windows key combination Control-C. This will copy the original to the
invisible clipboard to wait there for the next step.
4. Activate the new picture file. Use Edit, Paste or press the Windows key combination Control-C. This will stick the image of the original
picture from off the clipboard into a new layer, which you will see on the little layer's window.
5. Repeat step 4. or Open the Layer's tab above and click on Duplicate Layer.
X. If you are not familiar with the Layer's Window, explore it . Click on a layer (the space to the right of the eye icon and the little thumbnail
picture) and it will activate. Check out the others that way. The little eye Icons will toggle on and off a layer. We can work on any layer by having its eye on and the layer activated. So your main picture window (the big full sized one) the imate from the top layer with its eye icon
on will appear or such parts of other layers that have holes down to them in the layers above. Keep in mind we have what the effect of the
state of the layers stacked up to be seen in the main display. Then we have the layers stack display to keep us informed of just what the status is in the layers function. Play around.
X. Now the nitty gritty.
6. Click the Magic Wand tool into life and set a low Tolerance number in the little window up above. I used something under 10, perhaps 5.
Click the tool on the sky with the current top layer active. This selects the sky from that layer. .
7. Open the Selection tab and click on inverse. This switches the selection from the sky to the bird.
8. Edit Copy or press the Windows key combination Control-C. This copies only the selected bird leaving out the sky.
8. Edit Paste or press the Windows key combination Control-C. This pastes the bird minus the sky selection into a new layer on top of the layer
stack.
9. It will help to keep these layers straight in our heads, if we give them names. In the Layers window, double click on a layer name and it will
become editable. Name the top layer Bird.
10. Search your files for a photo with a large swath of sky, that would look good behind the bird.
11. Copy this photo to the clipboard as we have been doing.
12. Go back to your work and make sure the second layer down is activated, then paste the sky layer in. Label it Sky.
13. Look at the main window with the full sized picture. You will have the sky picture showing up behind the bird. We need to move it around.
14. Go to the tools menu and grab the move tool. Click-hold and move the sky around until it is satisfactory.
15. Look at the bird for imperfections around the edges. Maybe there are some small area sticking out unnaturally into the sky or notches
gaps in the bird's edges. We can fix these.
16. Two tools that can be used for these corrections. are the Clone tool and the Smudge tool applied very carefully.
17. By activating in turn the bird layer and the sky layer, brightness and contrast, or other actions can be applied to tweak the picture into
something suiting the eye.
18. If you want to keep this layered file for future work, name it and save as is.
19 For a finished JPEG file go to the Layer's tab and down at the bottom of the window that opens, click on Flatten Image. This will collapse
all the layers into one.
20. I hope this helps. It is not the last word. There never is in Photo Shop, as we keep learning. Feel free to PM me if you feel stuck. If there are typos or other defects in this account, that will surly be necessary, if they are too bad to decipher.
.
Synopsis.
A. copy original.
B. create new file
C. past the original into it.
D. Duplicate the Layer
E Select the sky
F invert the selection ,thus selecting the bird.
G Copy the bird selection
H Paste to create a new layer Naming it Bird.
I. Find in your picture files one with a large swath of sky that would look good behind the bird.
J. Copy that file onto the clip board.
K. Making sure the second from the top layer is active, Paste the sky file.
L. Move the sky around using the move tool until it looks right.
M. Activate the bird file.
N. Make the bird and sky look good and flatten the image.
O. Save with an appropriate name.
Feb 27, 2012 00:29:12 #
Shane T wrote:
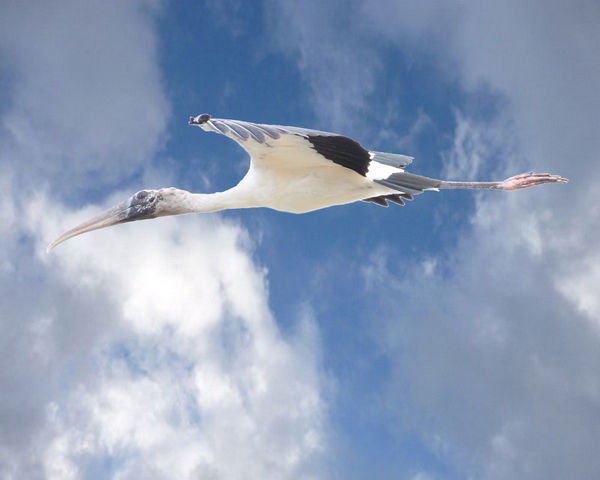
Here we go, Here it is for you.
Using mask and layers:
1) Open the file
2) create a LEVEL adjustment layer. Push all to the right. - This works because everything is basically white but the bird. -
3) Click on quick selection tools, drag the brush inside the bird, don't need much here.
4) Magnify to 200% or more
5) Using the lasso tool, add or subtract to the selection (Shift-click-drag adds, Alt-click drag subtracts)
6) Fix the mask using refine edge
6) Save selection (I skipped steps 5 and 6)
7) right click on selection create layer from copy (You can adjust anything you want on this layer levels, tone curve... Anything)
8) open a sky image, select all, copy
9) Paste the sky, it will create a new layer, the image of a heron with a sky is instantly created.
10) Uncheck background
11) Save (photoshop)
12) Save as JPG
13) select JPG Options
You are done with this method. Be aware that creating a mask is rarely that simple. I am not posting the original because:
1) it is not good enough
2) I am a sadist, you have to sweat to recreate this!!!
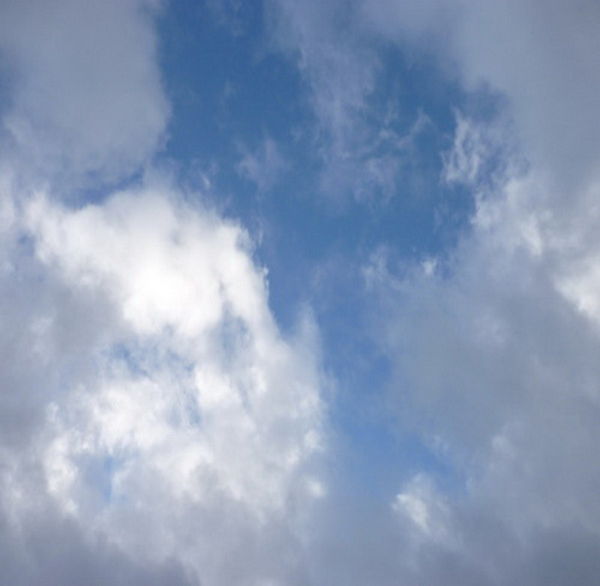
Notes: I took the sky from the WEB. Since it was too small, I re-sized it up using ACDSee.
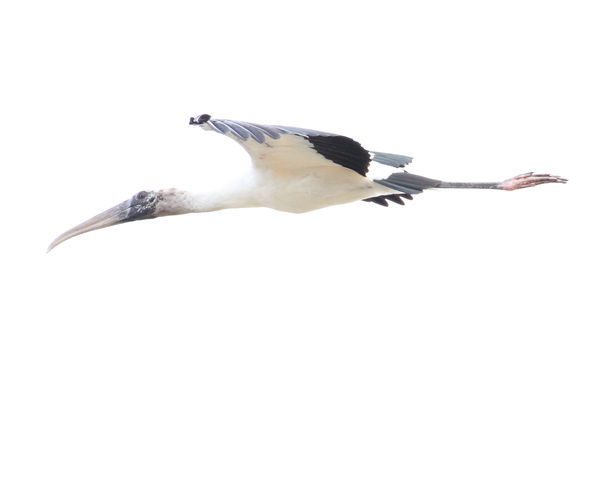
Finished (ah!) Notice the white edges, this can be corrected with step 6 (that I skipped)
Sky
Feb 27, 2012 00:51:51 #
Feb 27, 2012 00:56:06 #
Bobber wrote:
This is way better than my childish thing.I hope this is helpful.
Tutorial?
Feb 27, 2012 01:08:35 #
English_Wolf wrote:
Here we go,
Using mask and layers:
Using mask and layers:
Et Cetera
This a lot simpler looking than the method I used. I'll be studying it. My last effort wore me out. Later.
Feb 27, 2012 01:20:11 #
English_Wolf wrote:
Tutorial?
Bobber wrote:
This is way better than my childish thing.I hope this is helpful.
Tutorial?
Don't jump on that conclusion too soon. I used the method described in my post above. As I just said, what you did was a lot faster looking. As you said, you skipped some stuff and perhaps rushed it some too going for the demonstration rather than a huge polish job. The big time consumer for me was smashing that halo around the bird. My selection was not perfect and there were some gaps that needed cloning in. That was on top of the neck in particular. I used the lasso on every pixel enlarged hugely to get the control necessary to deal with that thin light toned zone.
I just about have to relearn the whole schemer every time I jump on a project. I have to back up all over the place, when I forget that this has to precede that, and I have left it out. It does not help to be at the end of a long day either.
What the devil. Its fun.
Feb 27, 2012 09:10:51 #
Can't wait for that tutorial myself, take your time, and thank you. Vinnie
Feb 27, 2012 10:16:21 #
Shane T wrote:
I shot these yesterday and the sky was very gloomy... (show quote)
Buy a circular polarizer for your lens. If you have to shoot before then, set your ISO down some and/or decrease the exposure compensation.
If you have done none of those and would still like to rescue the shots, in Photoshop CS5 you could click on "apply image." Set the blending mode to "multiply." In edit menu the fourth entry is "fade." It will allow you to decrease the latest action, in this case "apply image." The fade selection will change to "fade apply image." Click on this to open it. You will have a slider, which you can drag to the left while eyeballing your picture. When it looks right click "Okay" in the upper right of the box.
Finally, if your only issue is the sky, there are many ways to replace the blown out sky with something else. If you would like to do that, let me know, and I will take you through it step by step.
Feb 27, 2012 10:51:05 #
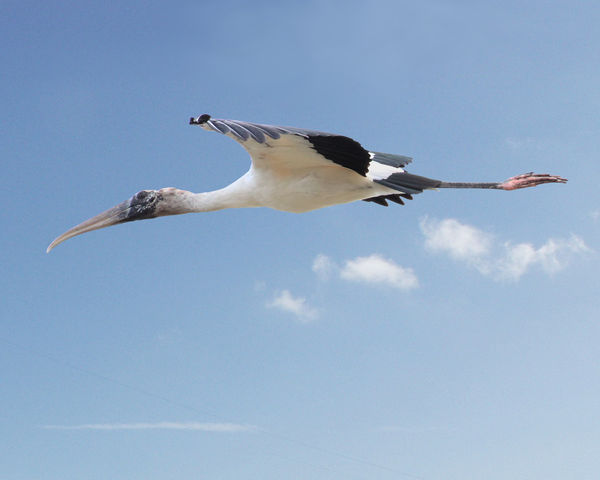
English_Wolf wrote:
Skipped a couple of steps here! :hunf:
Correction:
Using mask and layers:
1) Open the file
2) create a LEVEL adjustment layer. Push all to the right. - This works because everything is basically white but the bird. -
3) Click on quick selection tools, drag the brush inside the bird, don't need much here.
4) Magnify to 200% or more
5) Using the lasso tool, add or subtract to the selection (Shift-click-drag adds, Alt-click drag subtracts)
6) Fix the mask using refine edge
6) Save mask (I skipped steps 5 and 6)
a) delete adjustment layer (or keep it unchecked)
b) load saved mask onto background layer
7) right click on selection create layer from copy (You can adjust anything you want on this layer levels, tone curve... Anything)
8) open a sky image, select all, copy
9) Paste the sky, it will create a new layer, the image of a heron with a sky is instantly created.
10) Un-check background
11) Save (Photoshop)
12) Save as JPG
13) select JPG Options
The key here is to creation of a mask and be able to save it.
You are done with this method. Be aware that creating a mask is rarely that simple. I am not posting the original because:
1) it is not good enough
2) I am still a sadist, you have to sweat to recreate this!!!
See what a good night does?
Feb 27, 2012 10:54:09 #
PNagy wrote:
Not Shane T but please do..../...If you would like to do that, let me know, and I will take you through it step by step. .../...
Feb 27, 2012 15:13:22 #
Shane T wrote:
I shot these yesterday and the sky was very gloomy... (show quote)
When I have a difficult lighting situation, I usually shoot a group of 3 images exposure like an HDR image. I will only use one of the three but it gives me a selection to choose from in order to pick the most editable picture. The other option is to substitute a different background either by cutting the bird out and pasting on another one or using software such as OnOne add on to Photoshop or stand alone.
Swede
If you want to reply, then register here. Registration is free and your account is created instantly, so you can post right away.