HEEELLLLLPPPP!
Feb 24, 2012 07:45:32 #

cosmo54 wrote:
Would you be willing to recommend a meter? I have heard lots of comments re these and I seriously want to check them out. Meanwhile I will search here & everywhere for info. Thanks
I sure will.
I would stick with a few of the well known brands.
The way I see it...there are three ways to go: Sekonic Gossen, and...the other guys. :)
The Sekonic L-308 is the popular no-frills model and you can get it for just under 200.00.
I know, I know...ouch....but trust me...you'll learn a lot and your shots will improve when you know what the correct exposure is.
I went cheaper....I got the Polaris SPD100. It's comparable to the 308 and it was 165.00 shipped from Adorama. it gets great reviews and I love it.
The other thing to note here is that a light meter will NOT make your lighting choices for you....lol...it only does one thing...it tells you what you HAVE NOW...its up to you to make the decision as to how to light your shot.
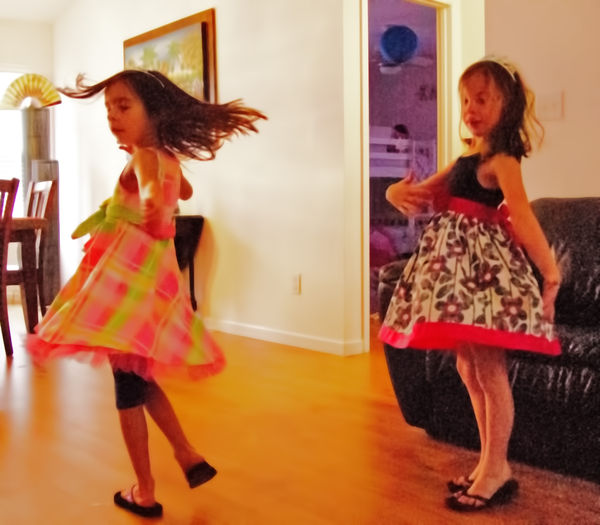
for example in your shot in this thread....your in-camera meter was fooled by the backlighting....and you didn't have enough experience to realize how to deal with it...no shame there....we all learn.
If you used an incident meter, you could have metered for the window (lets pretend it was ISO 800, f/11, SS 1/125.) and then you could have metered for the kids and you'd have seen that it metered (lets pretend: ISO 800, f/2.8, SS 1/125) notice that the difference between the light amounts is quite large....4 stops....if you meter for the window...you'll get what you got underexposed kids...if you meter for the kids...the window will go nuclear.
So...you now know based on metering that you have to get some light back into the kids faces and bodies....
You set up a flash on a stand or on your camera and you set it to just under/over the value of the window...or the same value....
And take your shot....bingo...perfect exposure.
I hope this helps....
Feb 24, 2012 09:59:25 #
Digiphot2 wrote:
.../... But remember this, If you shoot all your shots in RAW, and never concentrate on the real problem at hand. .../...
Couples of things.
1) the camera is an incident light meter. You can us average to spot metering, in case you do not know
2) fill light is not the panacea indoor or anywhere you have a 'mood' as in this case. Using a flash here would have killed the intimacy of the picture. You might want to study 'moody light' and flash use, especially the part about using filters on the flash to match ambient light tone.
3) RAW is always dark due to the way the data is stored, look it up. There is no PP wizardry, just the knowledge on how RAW works.
4) That the program used by shutter shedd did not import the image correctly is the main problem. Raw import filters are made to adjust to the native RAW format w/o user intervention.
Finally and more importantly: Why do you post your own pictures on this thread? This is not about but about the topic author.
Feb 24, 2012 10:00:56 #
Lucian
Loc: From Wales, living in Ohio
You don't need the added expense of a hand held light meter if you just learn about light. You can use your camera as a guide, it has a light meter in it too. A light meter only means you have something else to learn how to use and carry with you. Your hand held light meter will tell you the same thing your camera will. If you don't understand light and don't know how to use the hand meter, which seems to show as being the case here, then you won't have any advantage.
All you need to know is that there will be certain levels of light contrast that will never be able to be overcome, no matter how many different light meters you have. The only way to get an all over acceptable exposure in such situations would be to bracket and do post HDR of all the bracketed images. Yes the hand held meter has some advantages over the in camera meter but you need to understand light first in order to use the info it is giving you.
If you understand light, you won't need to go with a hand held meter. Therefor we can forget it and move on to what has to be learned here. First off, it is not your RAW image that caused this to be dark, that has absolutely nothing to do with it, nor does or would a Jpeg image be any cause here. The cause here is the person taking the photo, because he stated it was shot on manual. Therefore the photographer set the camera wrong, either because he did not know what he was doing or he had an idea of what to do but misunderstood the info he was using to set the exposure.
Your image is dark because of wrong setting in the camera for what you were wanting to achieve. We need to make that clear, so as not to fog the issue with misconceptions here. So let's break it down to understand what went on.
The photographer composed the image in the frame and shot the scene. If he wanted to get the windows correctly exposed, he got what he was out to achieve both in Jpeg and RAW, those windows are fine. If you want those windows exposed correctly you need to understand the light and know the value there was the highest (the most amount of light in the whole shot).
You can't expect to have such a bright object correctly exposed and hope to have a very dimly lit subject, like the children dancing, also correctly exposed because the lighting ratio is waaaaay off. With such a contrast in lighting values there is no way it will ever work at both ends of the spectrum. Now if you want the children correctly exposed, you will need to open up to a sufficient f-stop or lower the shutter speed to a point whereby the children are correctly exposed.
With that said, you will now find that due to the very low lighting on the children, your windows will be way over exposed or blown out. You can't have it both ways, other than was suggested with HDR and multiple exposures at different settings. So lets go back to the camera and play around.
The best way to tackle the problem is to understand first just how much light in available in the room. Often in a room you will find areas from very low to very high in light value (the amount of light available to illuminate an object. Don't use the Auto setting or green box icon on your camera because this will always turn on the flash when the light value drops. Instead use the P setting and no this is not for Professional, it is for Programme.
When shot in the P setting or mode it will never turn the flash on, that is for you to decide on doing. It will do its best to expose for what you have given it as settings such as ISO and W/B for example. So take a shot on P and see what you get. In the situation you show in your photo, you would have gotten the same kind of exposure.
That means the camera would have detected a large area of bright light and exposed itself correctly to capture that scene and it would have been dark other than the windows. We'll assume you did not want to or could not turn the camera more to the right, away from the windows, which would have given the camera a different light reading causing the camera to open up the exposure more. Therefor you had to work with what you had in front of you.
So looking at the scene, you see lots of window light and you see kids against that light with mostly shadowed areas on them. You take the shot and see it is too dark on the kids and we assume you wanted them more bright. So you then go to the little icon that show the symbol something like this (-/+) either as it's own button or somewhere in the info on the camera screen.
This is the exposure compensation button and adds to or takes away light from your scene. So lets say the kids were sitting where they happened to be dancing. Your first shot showed them to be too dark. So you adjust by using this plus and minus button setting. You know from the image on the screen that it is too dark you you need to add plight or plus the light into the scene, so you push the plus side of this button or setting. It moves in increments, either what you determine or what the camera uses by default.
So, asses the scene and then decide how much you need to go up to get the children properly exposed. Take a guess right now, say go to +.7 and try again and look at the image recorded. Still not enough, then go up another stop or two and shoot again. Keep doing this, but be sure to frame the scene exactly the same each time otherwise you will learn nothing about lighting here.
Once you have an acceptable exposure of the kids and you must understand the windows will be blown out here, check the actual setting to see what the shutter and f-stop were set at as well as noting the ISO. Now look at the scene and study everything you see. Let it all sink into your mind. Then set the camera to manual mode and re-shoot the scene framing exactly the same way again. Now you are beginning to understand the light available and its value in all the different areas of the scene you just shot.
With practice using unusual lighting situations such as this and taking the shot on P and then playing with the plus and minus setting to get the exposure of a scene you want. Each time let all the light and dark areas sink into your mind and soon you will begin to see light differently and understand it. You will get the same exposure in RAW or JPEG, it is just that you will be able to fine tune your RAW image a lot more than the Jpeg image.
Before long you will be able to look at a scene, assess the light and either set your camera to what you need or set it to P and adjust the plus or minus exposure compensation setting to get exactly what you want to get correctly exposed. Remember that the (+) plus sign is for adding light to your exposure and the (-) minus sign is for subtracting light from your scene or subject.
This button does not work when you are in manual mode by the way because you are not in a mode that is being automated by the camera. Manual is manually setting things and modes P or A or S or Auto setting means that you are allowing the camera the choice to set what it think it needs to give you an averagely/correctly exposed image and that is when you can over-ride those setting with the exposure compensation button. Hope I made it clear enough for you.
Feb 24, 2012 10:03:53 #
English_Wolf wrote:
Couples of things.
1) the camera is an incident light meter. You can us average to spot metering, in case you do not know
Digiphot2 wrote:
.../... But remember this, If you shoot all your shots in RAW, and never concentrate on the real problem at hand. .../...
Couples of things.
1) the camera is an incident light meter. You can us average to spot metering, in case you do not know
No it's not. Even spot metering with the camera is reflective metering.
Feb 24, 2012 10:22:19 #
rpavich wrote:
Correct. It is reflective. No it's not. Even spot metering with the camera is reflective metering.
Thank you.
(Should have read again). :oops:
Feb 24, 2012 10:33:25 #
[quote=Lucian.../... You will get the same exposure in RAW or JPEG, it is just that you will be able to fine tune your RAW image a lot more than the Jpeg image.../...[/quote]You seem to ignore that JPG compresses the image into a narrow dynamic range of 2 stops when RAW covers 6 stops.
This is all about learning to use RAW. The exposure for RAW is correct in this instance. The problem I see is the high ISO (6400). If it was exposed for JPG, all you said is right.
JPG is adaptive like the eye and films, RAW is linear, unlike anything we have dealt before. There is a real need for understanding and training on this format.
Then you have to add: Exposing for RAW is a b*** as there is a need to experiment per camera model to get it right. All RAW do not have same behavior at exposure time due to the manufacturer interpretation of what is right or what is wrong.
Feb 24, 2012 10:35:32 #
rpavich wrote:
quote=cosmo54 Would you be willing to recommend a... (show quote)
Thanks! It sure does help
Feb 24, 2012 10:45:40 #
docrob
Loc: Durango, Colorado
Digiphot2 wrote:
It is a shame that nobody suggested that you own a... (show quote)
I agree totally on learning to see light.
In 1981 in-camera meters were crap so yeah one would use an incident light meter.
Feb 24, 2012 11:08:12 #
cosmo54 wrote:
Would you be willing to recommend a meter? I have heard lots of comments re these and I seriously want to check them out. Meanwhile I will search here & everywhere for info. Thanks
It's been a while since I researched meters but the last time I did, both the meters used by Digiphot2 were right up at the top, and I quote Digiphot2, "I own a Pentax V Spot Meter, and a Minolta IIIF Flash/Ambient light meters." I have those two and an older Gossen Luna Pro with a spot meter attachment left over from my large format days. It was/is considered to be top of the heap stuff as well although it's as big of my 5D MkII and a short lens. :-) I constantly check those three against each other and against my camera meters. You can do a lot with the in-camera meter if you understand it and can work it but a handheld is tough to beat. Using a handheld forces you out of the "it's all free with digital - run and gun mode" as it becomes part of a slowed down process of "getting it right in the beginning" by forcing you to understand the lighting you're dealing with which is never a bad thing with photography.
Feb 24, 2012 11:21:09 #
I think you knowwa-a-ay too much about waaaay to little. I think we covered back lighting about the second day in class. Even my wife immediately saw what your problem was. I suggest you buy--and READ a basic book on photography--or maybe even take a beginner class at your library or YMCA.
Please excuse me if I am overly harsh on you and other folks who have not paid their dues. You are like guppies swimming with whales.
I have no objection to helping those who are willing to help themselves; its the freeloaders who bug me !!! :cry: :x ALYN
Please excuse me if I am overly harsh on you and other folks who have not paid their dues. You are like guppies swimming with whales.
I have no objection to helping those who are willing to help themselves; its the freeloaders who bug me !!! :cry: :x ALYN
Feb 24, 2012 11:24:08 #
senad55verizon.net
Loc: Milford, NJ
To start with, raw doens't cause "darkness". Inadequate exposure causes darkness.
In Camera Raw, add 2.35 stops of Exposure. Set WB to Daylight. Set doorframe in the middle to vertical.
In PS5, crop image. Vusualize HORRENDOUS amount of noise. Do 100% Noise reduction in Topaz Denoise (my first time ever using that much). Use Filter>Despeckle twice. Use Filter>Dust removal once. Use the Sharpen tool to clarify the girls' faces.
It's still a lousy photograph, sort of like rescuing a valued photo from the ashes.
Feb 24, 2012 11:36:56 #
senad55verizon.net
Loc: Milford, NJ
Sorry, I forgot to answer the question "What did I do wrong?"
1. You didn't expose for what you were interested in, the girls faces. Better light source would help, of course.
2. You didn't use avaialble postprocessing to get whartever you could from a seriously underxtosed image.
Keep shooting! Lots of good suggestions above.
1. You didn't expose for what you were interested in, the girls faces. Better light source would help, of course.
2. You didn't use avaialble postprocessing to get whartever you could from a seriously underxtosed image.
Keep shooting! Lots of good suggestions above.
Feb 24, 2012 11:38:20 #
docrob
Loc: Durango, Colorado
ALYN wrote:
I think you knowwa-a-ay too much about waaaay to l... (show quote)
great! So post a shot of what you learned about backlighting from one day of class...............and how much were your dues?
Feb 24, 2012 14:58:04 #

I don't know if the camera you are using has it, but the Nikon cameras utilize the Autoexposure Lock method. In this situation, I would point the lens in the direction of the darker area and press your shutter realease button down half-way to set the aperature then frame your shot with the lighted area as it is on the left and your subject(s) on the pre set area on right and press the sutter button down for your exposure and hopefully a good image.
Feb 24, 2012 15:15:08 #
Send me an email at my home and include your phone number! I would enjoy chewing the fat about meters! One does not need a $300.00 meter, but if money isn't an impediment, then we will talk turkey about what is out there in Photo land. jameshumberg@gmail.com Will get back to you tonight
If you want to reply, then register here. Registration is free and your account is created instantly, so you can post right away.