Using the Local Adjustments Brush in Lightroom
Aug 26, 2014 16:44:37 #
This thread is a quick tutorial on the use of the brush, it is not an exposition on my use of the rule of thirds or story telling etc.
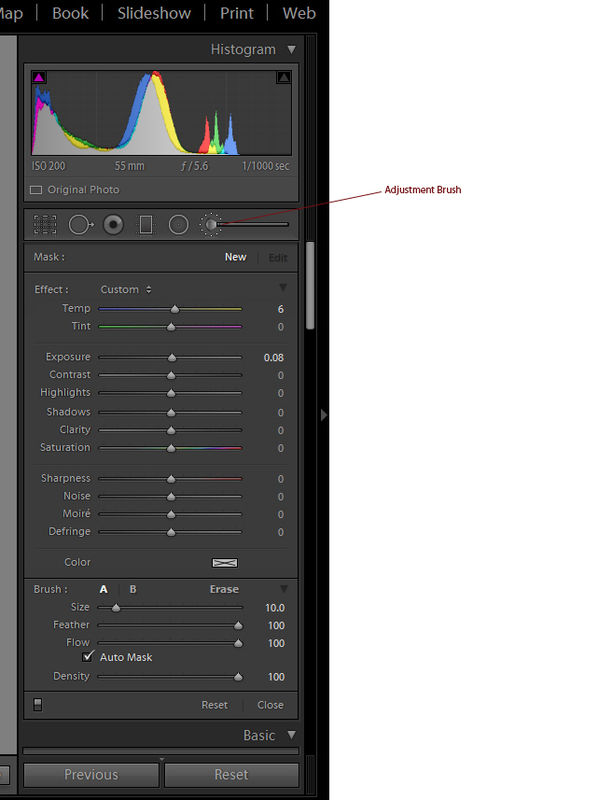
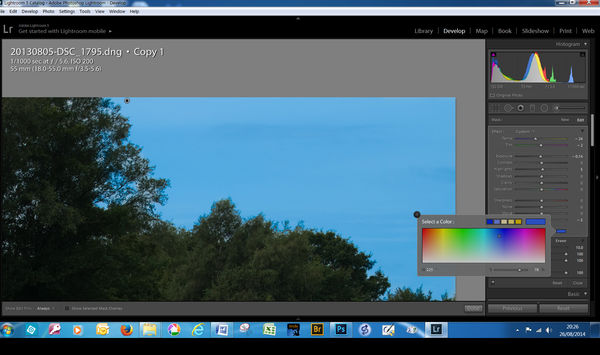
Image 1 shows the brush panel in its entirety. When opened all the sliders above the brush should be centred and reading zero. New should be highlighted and the little rectangle with a X (looks like an envelope) should be white. The brush controls are sticky and will be whatever they were the last time used.
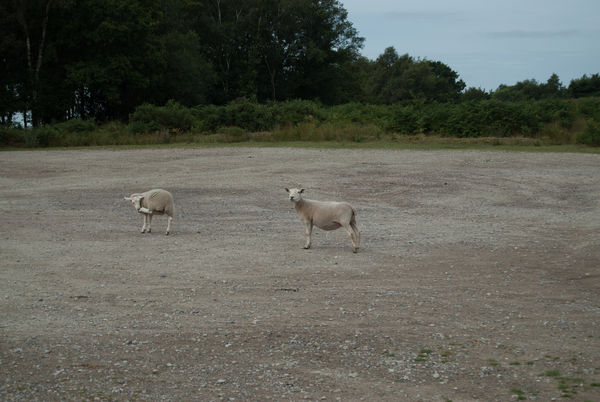
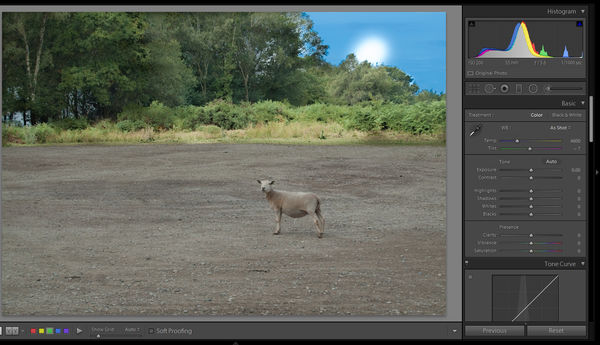
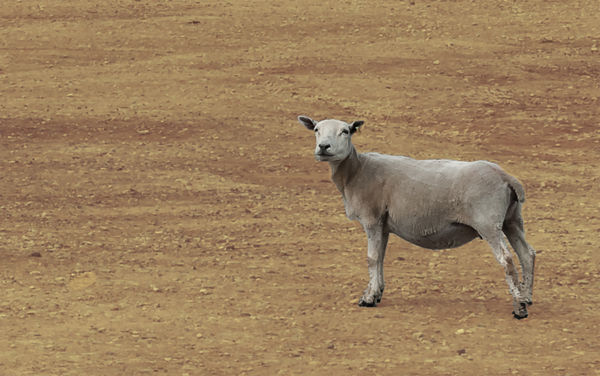
Image 2 is the original photo. Sky is bland and grey, the bushes in the background are underexposed.
Sky: Image 3
Open the image in the Develop Module, (you might want to enlarge the sky to fill the screen),Choose the Brush tool.
Click the box at the bottom of the screen "Show selected Mask Overlay" (#4) and start painting the sky. If you increase the feather and adjust the size and flow of the brush you will be able to get better edges than I have. When you are finished the sky area should be covered with the red mask.
Image 1 shows the brush panel in its entirety. When opened all the sliders above the brush should be centred and reading zero. New should be highlighted and the little rectangle with a X (looks like an envelope) should be white. The brush controls are sticky and will be whatever they were the last time used.
Image 2 is the original photo. Sky is bland and grey, the bushes in the background are underexposed.
Sky: Image 3
Open the image in the Develop Module, (you might want to enlarge the sky to fill the screen),Choose the Brush tool.
Click the box at the bottom of the screen "Show selected Mask Overlay" (#4) and start painting the sky. If you increase the feather and adjust the size and flow of the brush you will be able to get better edges than I have. When you are finished the sky area should be covered with the red mask.

Aug 26, 2014 17:15:37 #
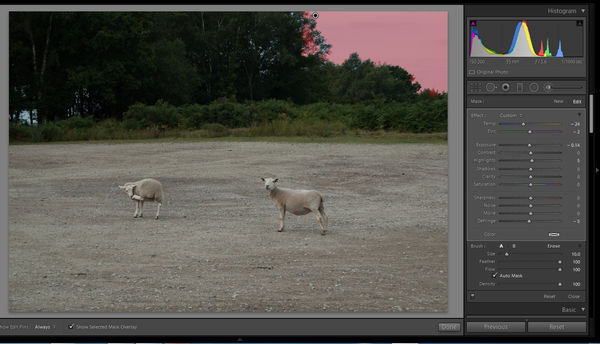
Uncheck the mask box to remove the red overlay, nothing so far has changed. Decrease the exposure a little by moving the Exposure slider a little to the left and notice that only the sky darkens. Unfortunately, the sky is mainly grey so the next move is to add a little blue.
Click on the Color Picker (it is the small rectangle with a cross in it) and click on a colour (I chose dark blue). Move the slider left and right and watch the sky in the image change colour. The rectangle now reflects the chosen hue. When done, close the colour picker.
Important: the colour picker is a sticky box, so whenever you use the brush, look at that rectangle, if you dont want that colour in your image, open the picker and move the saturation slider all the way to the left.
Aug 26, 2014 17:29:25 #
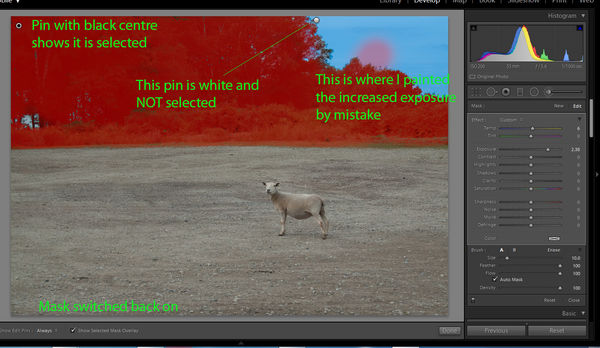
Now to do something about the background trees. Assuming you still the Brush Panel open, click on New. All the sliders should zero, ensure that the colour picker rectangle is white with a cross in it which shows it to be inactive.
Check the mask overlay at the bottom of the screen and paint over the trees. In my illustration the shepherd has lost one of his sheep, sorry about that I was playing with the clone tool. You will notice the new two pins on the photo, one white one (inactive) on the sky, and a new one top left for this new brush. (I have also made a deliberate mistake by painting a blob onto the sky.)
Uncheck the mask overlay and click Done to see where it all is at the moment.
Notice the white blob in the sky where I painted the mask in error?
Aug 26, 2014 17:52:48 #
Getting rid of the error in the sky.
Click on the Brush icon, and at the bottom of the screen it should read "Show Edit Pins - Always"
Click the edit pin in the top left of the image, while the curser is over the pin the mask will show and you will easily see where I erred. Ensure the pin is selected (black inner) and at the bottom of the brush panel choose Erase.
Paint over the White Blob without making any changes to the sliders. The White will disappear and the sky will show through.
Click done, you now have the finished image.
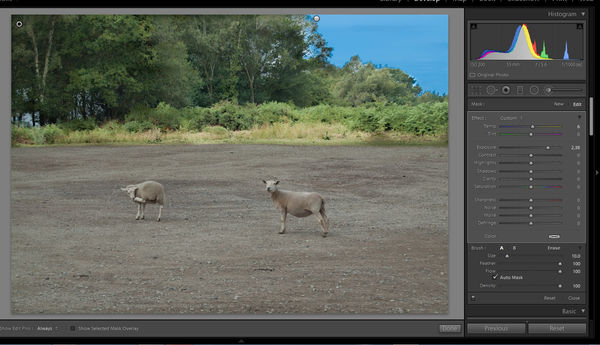
This has been a quick intro into using the brush. The finished tutorial image is below, and that is followed by the same photo with a little more brushwork.
Click on the Brush icon, and at the bottom of the screen it should read "Show Edit Pins - Always"
Click the edit pin in the top left of the image, while the curser is over the pin the mask will show and you will easily see where I erred. Ensure the pin is selected (black inner) and at the bottom of the brush panel choose Erase.
Paint over the White Blob without making any changes to the sliders. The White will disappear and the sky will show through.
Click done, you now have the finished image.
This has been a quick intro into using the brush. The finished tutorial image is below, and that is followed by the same photo with a little more brushwork.
Aug 26, 2014 18:02:22 #
Thank you for a great explanation. I've only recently gone to using it more than the graduated filter and find it much more flexible.
Aug 26, 2014 19:22:50 #
You have a gift for explaining things, Searcher. I always enjoy your posts. Keep up the good work. I saw an Adobe tutorial on this very subject and you are every bit as good.
Aug 27, 2014 06:55:43 #
Thanks, Searcher, for this excellent post. I have been wanting to learn more about how to do this and your explanations are excellent. Much appreciated.
Aug 27, 2014 08:07:01 #

Here is another way to achieve similar results. Go to Develop>HSL/Color/B&W. To adjust the patch of blue sky, click on the blue rectangle, decrease the luminance and increase the saturation. How much? Experiment for yourself. I refer to the sky adjustment as the poor man's polarizer. It also avoids uneven polarization that may occur. Do the same for the trees by selecting the green patch.
This approach brings out the detail and texture better creating a more realistic look. It is also self-masking. It works if the color being adjusted occurs mainly in one area. For example, if the picture has a blue sky and a person wearing a blue shirt, then both sky and shirt will change.
As has been mentioned, the radial filter is a great alternative to the brush. Although you can adjust its shape, you can usually localize its effect. Ultimately, nothing is as good as masking and layering but these tools can do an acceptable job without leaving LR.
Aug 27, 2014 08:19:08 #
abc1234 wrote:
Here is another way to achieve similar results.
There is always more than one way, but this a tutorial for using the Adjustments Brush, not for any of the other methods. This thread was written in response to a question about using the brush.
Aug 27, 2014 08:54:34 #
Searcher wrote:
There is always more than one way, but this a tutorial for using the Adjustments Brush, not for any of the other methods. This thread was written in response to a question about using the brush.
As usual, you did an admirable job and I applaud you for all the work you did in posting. You are probably the most helpful contributor for post-processing. Thank you.
Aug 27, 2014 09:40:09 #
Aug 27, 2014 20:59:13 #
Thank you Searcher. I've never been able to find the time to learn the "brush" adjustment. This will make it so much easier.
Aug 28, 2014 05:33:31 #
Jim, I wanted to thank you again for this teaching example using the Adjustment brush. I just finished using your example on a landscape photo and it worked really well. Your pictures and explanations were easy to follow and the results were excellent. Much appreciated.
Oct 30, 2014 19:21:31 #
Dear Searcher et al,
As they say, "I don't know what I'm doing wrong." Have watched three tutorials and Searcher's excellent, painstaking, step-by-step tutorial on the Lightroom adjustment brush, (among others on UH), but it still won't work. I paint something red, slide the sliders, but the whole picture is affected, not just the selected area.
As they say, "I don't know what I'm doing wrong." Have watched three tutorials and Searcher's excellent, painstaking, step-by-step tutorial on the Lightroom adjustment brush, (among others on UH), but it still won't work. I paint something red, slide the sliders, but the whole picture is affected, not just the selected area.
Oct 31, 2014 12:33:42 #

Thanks for some really useful info. I didn't know about the "Erase" option.
One question - where it says BRUSH: I have A | B | ERASE.
"A" seems to be the current settings, but I was wondering what the "B" option is.
One question - where it says BRUSH: I have A | B | ERASE.
"A" seems to be the current settings, but I was wondering what the "B" option is.
If you want to reply, then register here. Registration is free and your account is created instantly, so you can post right away.