Grain in my photos
Jul 9, 2014 08:04:14 #

Meives wrote:
Post a sample. Click on "store original" and ask again. I want to see all the camera data
That's what I was thinking, the 70D shouldn't be producing noisy images... I've got a D7000 which, I think, is pretty much the same camera and produces great shots unless I've cranked up the ISO.
Jul 9, 2014 10:04:13 #
Jul 9, 2014 10:04:20 #
zigipha
Loc: north nj
amehta wrote:
"But surely F1.2=F1.2=F1.2?" No, because f-stop is a calculation. If you quote one of the numbers in your calculation differently, and say the lens is an 85mm lens instead of a 42mm lens, then the f-stop has to be stated differently also.
"But surely F1.2=F1.2=F1.2?" No, because f-stop is a calculation. If you quote one of the numbers in your calculation differently, and say the lens is an 85mm lens instead of a 42mm lens, then the f-stop has to be stated differently also.
I think it depends on what you want to use the number for
1. for DOF, then the answer is no, 1.2 is not the same as 1.2. But the DoF calculators already have sensor size as an input and no further fudging is needed"
2. for "what F do i use for this manual flash setting", then (I believe) yes, 1.2 is 1.2. For exposure, you are looking at the light intensity per mm2 of sensor, and in that case 1.2 is 1.2 regardless of sensor size.
Jul 9, 2014 10:46:56 #

RegisG wrote:
I have taken some very satisfying shots with my 70... (show quote)
I use the Topaz DeNoise #5 program to get rid of the noise situation. It's easy to use.
Jul 9, 2014 10:56:31 #
Regis wrote:
I use the Topaz DeNoise #5 program to get rid of the noise situation. It's easy to use.
Thanks Regis. I may have to do that. I just posed a couple grainy photos in new thread about grain I'm encountering.
These were at 600 on my 150-600 and for sure not as clean as yours.
RegisG
Jul 9, 2014 10:59:15 #

RegisG wrote:
I'm trying to comprehend this but, sure like the result. You didn't say how to test a camera for ERADR. I like the idea of getting best shot possible in camera and relying less on pp.
Thanks,
RegisG
Thanks,
RegisG
Hi, Regis and Meves and any others interested:
here's the "workflow" for getting started with EBTR (Expose beyond the Right) to get the best possible image data quality with your digital camera. Gotta admit, I think "workflow" is a hoity-toity term for "...here's how t' do it..." that I would have heard when I started in 'tography in 1947!
Determine Your Camera's ERADR
Abbreviations:
ETTR = Expose to the right (using histogram, move the "light pile" with either brighter shutter speeds or brighter apertures so its right end is as close as possible to the right standard of the Histogram frame without clipping highlights).
ERADR = Extra RAW-Accessible Dynamic Range
EBTR -Expose Beyond the Right
DR = dynamic range (number of stops of exposure available for any exposure with a particular camera)
Find scene or subject within Histogram DR
Put camera on tripod
Set: RAW format
ISO 100 or 200 ("native ISO for your camera)
White Balance (NOT Auto)
Shutter priority - 1/100sec. or 1/ 200 sec.
Then Set MANUAL EXPOSURE
Find exposure for ETTR and expose for ETTR ("exposure #1)
Subsequent exposures
Add 1/3 stop slower shutter speed with each exposure
(up to three addl. full stops. Who knows, maybe your camera
will set a record?)
Download to computer,
Open in RAW converter (ACR) starting with the ETTR exposure.
Normalize tones with exposure slider.
Find longest exposure with no clipped highlights.
Those addl. stops beyond ETTR with NO clipped
highlights are your camera's ERADR.
Then:
For any exposure when ETTR is practical, use EBTR by adding
the stops of ERADR to the ETTR exposure.
Be aware that as ISO increases, the ERADR will decrease to some greater or lesser extent, so you'll need to detetmine your camera's ERADR at the ISOs you commonly use.
--------------------------------
How to modify your camera...without voiding its warranty...to enable it to use the Extra RAW-Accassible Dynamic Range:
Stick a "Post It Note" saying;
"Set to ETTR , then add ERADR" to the back of your camera!
Then....GO OUT AND DO IT!
Attached are three un-cropped full frame images made with ISO 6400 just as an explicit response to the "it won't work" theoretical crowd who say "it won't work...especially at higher ISOs.
Note that these images are the result of tonal normalization in A.C.R. the LED display of each was "washed out" with "blown highlights" by virtue of having to be displayed in the JPEG-adjusted thumbnail that all cameras use, ignoring the fact that use of their unacknowledged extra RAW-Accessible Dynamic Range requires a significantly longer histogram frame (I guess they just figure it's easier to pretend that a single exposure is adequate for both RAW capture as well as JPEG capture...which, as we can see, just isn't true.)
I've been using EBTR ever since I got good with consistency of using ETTR.
ETTR obviously provides the advantage of less noise capture. You can see that EBTR provides significantly even less noise capture.
EBTR hinges on accurate use of ETTR...finding that exposure that just barely avoids the Clipping warning...one more 1/3 of a stop and it's BUST! Kind of like Blackjack! So once you can routinely use ETTR, EBTR is a piece of cake.
The camera used for these images has ERADR of 5/3 stops (one and 2/3 stops) at ISO 100 to 200, but only 2/3 stops at ISO 1600 (as in these exposures). So....never again sneeze at or distain a measly 2/3 stop advantage!
Each camera/sensor is different. I've found cameras tested at ISO 100 to have from 2/3 stop of ERADR to as High as 2 and 2/3 stops of ERADR. Seems to be a crap shoot, because I've seen those extremes in three cameras of a single brand and model
Best regards,
Dave Graham
"normal"exposure..histogram "centered"
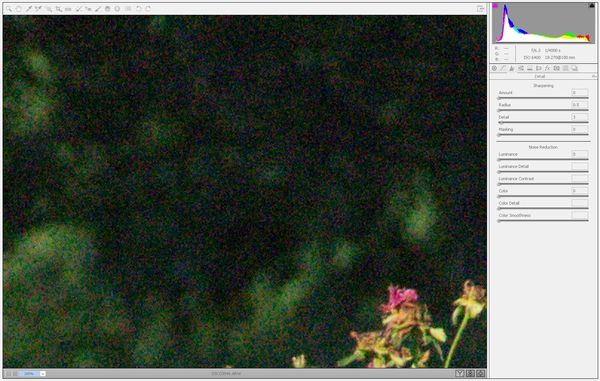
(Download)
ETTR
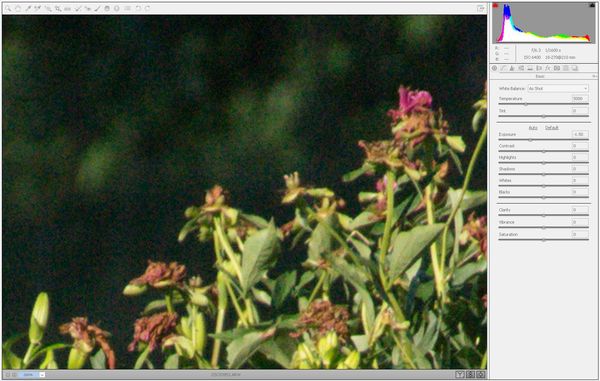
(Download)
EBTR (ETTR + ERADR (2/3 stop in this case)
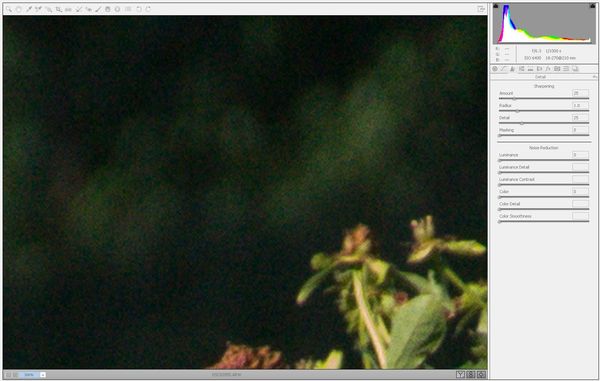
(Download)
Jul 9, 2014 11:37:40 #
RegisG wrote:
Thanks Regis. I may have to do that. I just posed a couple grainy photos in new thread about grain I'm encountering.
These were at 600 on my 150-600 and for sure not as clean as yours.
RegisG
These were at 600 on my 150-600 and for sure not as clean as yours.
RegisG
I can clean those up if you tell me where to find the photos.
Jul 9, 2014 12:21:03 #

I agree with Mike. I don't see noticeable grain with my 70D using a Canon 18-135mm and a Sigma 50mm 1.4.
mikedidi46 wrote:
I have a 70D and the only time I see grain is when I am up at 6400-12800 ISO. I get excellent results with my FF 24-105mm 'L' from CANON and also my 70-300mm DG OS from SIGMA.
But then I may see grain when I blow the photo's up to 200%.
But then I may see grain when I blow the photo's up to 200%.
Jul 9, 2014 12:23:58 #
[quote=Uuglypher]Hi, Regis and Meves and any others interested:
here's the "workflow" for getting started with EBTR (Expose beyond the Right) to get the best possible image data quality with your digital camera. Gotta admit, I think "workflow" is a hoity-toity term for "...here's how t' do it..." that I would have heard when I started in 'tography in 1947!
xxxxxxxx
You had asked for camera info.
the camera used for these images was a Sony Alpha99.
Look under the histogram of each full frame image for exposure info.
I often encounter scepticism that my low-noise captures haven't received some post-exposure noise rduction treatment with one or another "plug in" or in ACR or in PS.
These Images have received absolutely no noise reduction. The only process by which a difference in noise is appreciable among these three images is where the "light pile" was placed relative to the camera's JPEG-adjusted thumbnail and histogram before squeezing the shutter.
These three images are presented to demonstrate the differences in noise capture between "normal exposure" (histogram "centered" in the camera's histogram, ETTR (with the light pile nudged as far as possible to the right without tripping "clipping warnings of whatever sort your camera provides, and EBTR in which the predetermined ERADR is added to the ETTR exposure. Note that the EBTR exposure show up in the LED's thumbnail as washed out, totally blown images...which they would be if that exposure were being used for a JPEG image file! But these are perfectly exposed RAW captures which the camera manufacturers, with their JPEG-adjusted histograms, refuse to acknowledge.
Dave in SD
Jul 9, 2014 14:02:13 #

mikedidi46 wrote:
I have a 70D and the only time I see grain is when I am up at 6400-12800 ISO. I get excellent results with my FF 24-105mm 'L' from CANON and also my 70-300mm DG OS from SIGMA.
But then I may see grain when I blow the photo's up to 200%.
But then I may see grain when I blow the photo's up to 200%.
Noise not grain. Grain went away with film (except for those still shooting film, of course.) My D7000 shoots ISO 6400 with very little noise. What little is there succumbs to Topas DeNoise (Or some other good software.)
Jul 9, 2014 18:35:36 #
Regis ..........
Let me make this simple. The 70D is clean up to about 1000, the Nikon 7000/7100, have a glean ISO rating of around 1200. Meaning you can go up to 1200 with very little noise, anything above that and you will need to tackle the problem in PP.
For comparison, the Canon 5D Mark III (full frame) is good up to about 3800 and the Top end Nikon is on the top of the pile at about 4600.
That doesn't mean you can't hoot above those numbers, just you will have some clean up to do.
Anyone who says 6400 on a crop 70D or 7100 is pulling your leg, they might think it noise free but that is relative, the numbers I just gave you are from a 3rd party lab who does comparisons for Adorama who doesn't have a bone to pick or a favorite, they would love to sell you a Canon or Nikon, no difference.
Jul 9, 2014 18:58:48 #
DavidPine
Loc: Fredericksburg, TX
Really interesting. I'm not sure I totally understand everything but I'm going to study it. Thank you.[quote=Uuglypher]
:thumbup: :thumbup:
Uuglypher wrote:
Hi, Regis and Meves and any others interested: br ... (show quote)
:thumbup: :thumbup:
Jul 9, 2014 19:03:27 #
I really do appreciate all the help here. Will require some study & testing but, it is good to get confirmed that my 70D should be clean up to 1000 iso
Thanks all for the discussion,
RegisG
Thanks all for the discussion,
RegisG
Jul 9, 2014 19:14:07 #

RegisG wrote:
I have taken some very satisfying shots with my 70... (show quote)
You don't say what your camera settings are, what you are shooting or whether you are using using a tripod. These are important pieces of the puzzle.
Perhaps it was mentioned elsewhere in the article that you quoted, but quote leaves out an important piece of information. It isn't only the amount of light that hits the sensor, it's the ISO setting that allows the sensor to collect more or less light. I think what the quote meant to say is that, the more light is available, the lower you can set the ISO, producing less noise than higher ISO settings would. Shooting a 150-600mm f/5-6.3 lens will require higher shutter speeds to reduce shake, and more light due to the smaller f-stops, thus you are probably setting your ISO too high. Bring your ISO down as low as you can.
The Canon 6D is a great low light camera - very forgiving and can be shot at higher ISO's than most cameras before noise becomes an issue.
Jul 9, 2014 19:49:43 #
RegisG wrote:
I really do appreciate all the help here. Will require some study & testing but, it is good to get confirmed that my 70D should be clean up to 1000 iso
Thanks all for the discussion,
RegisG
Thanks all for the discussion,
RegisG
It's already been answered but let me simplify it. The 6D is a full frame, the 70D is a 1.6X cropped sensor.
The 6D is good up to about 3000 - 3200 ISO whereas a 70D is only good in the 1000 - 1200 range. Remember we are talking a huge difference when your needing light.
If you want to reply, then register here. Registration is free and your account is created instantly, so you can post right away.