Light box for close-ups
Jan 22, 2012 12:55:52 #

The following link inspired me to reconsider how I do close-ups.
http://strobist.blogspot.com/2006/07/how-to-diy-10-macro-photo-studio.html
I liked the flower and made my own light box the details of which follow. However, an unexpected lesson that changed how I shoot is at the very end.
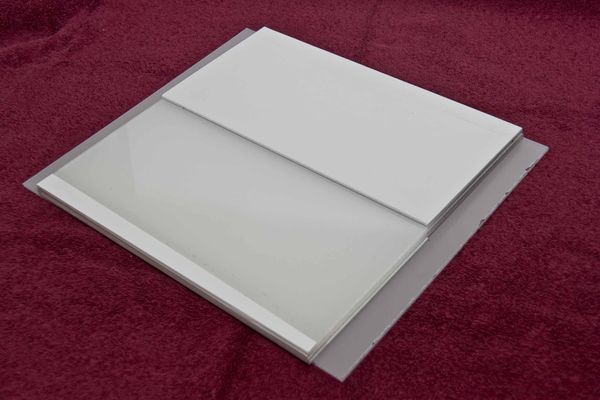
Since I own a sign company, I had some cut-offs laying around and a very talented production person to make a light box for me. Scott took clear Plexiglas(r) and covered it with a special diffusing vinyl from 3M. He cut three 12x12 squares for three sides and a 12x14 piece for the top. He cut two 6x12 pieces of a white opaque plastic for barn doors. He taped the squares and barn doors together so that they create the light box and then fold for storage. Finally, I placed a rollable plastic in the box to serve as a seamless backdrop. See the first two photos below.
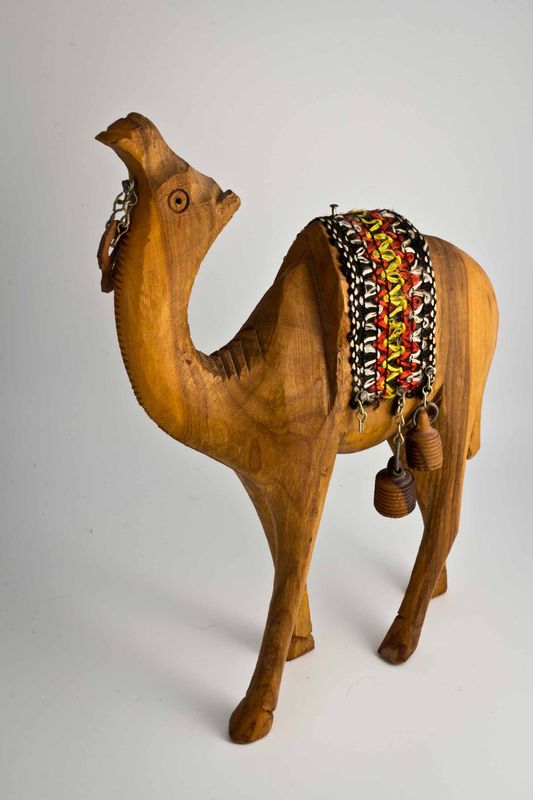
As for the actual photography, I took an olive wood camel off my shelf and put it inside. The camera was on a tripod and connected to the flash with an extension cord. Now comes the fun. By varying the position of the flash, direction of the flash head and by using or removing the flash's diffuser, the camel's appearance changes considerably. The brightness relative to the background changes, the highlights vary and shadows on the camel create drama. The shadows from the camera also vary in directions, definition and amount.
As for the backdrop, you do not have to use white. You can use whatever color, material or texture you want. If you use a color not present in or on the edges of the subject, you can eliminate the background in a program like Photoshop and substitute anything you want. For example, I could return the camel to its native habitat, the desert.
To make the box, you do not have to use the same materials as I have. I used what I had around. However, you can use white translucent Plexiglas(r) or white Lexan(r). These are the best known trade names for acrylic and polycarbonate, respectively. The latter is heavier, stronger, and more expensive than the former. Note that Plexiglas(r) has three whites: two levels of translucent and an opaque. You want either translucent. For the barn doors, I used Sintra or rigid foam pvc. Go to a sign company, plastic fabricator or plastic supply house and buy scraps. Or contact me for scraps.
I am planning some improvements on my next box. It will be about twice the size so I can handle larger objects and move objects around to change the light falling on them. I will also put silver chrome vinyl on the inside of the barn doors to increase reflections to bring out the specular highlights. I will also make a separate piece with silver chrome vinyl that I can use in the box for the same reason.
I almost forgot the surprising lesson: exposure. I started with using the fully automatic and aperture-priority modes. Both gave me very good exposures but I could not get the automatic flash to stop down. I was not satisfied with the sharpness and thought that the narrow depth of field was to the culprit. I went to manual mode for both the exposure and flash. I set the camera to 1/60th and f 22. Using the histogram, a flash power of 1/8 gave me the best exposure. In other words, the lesson was use manual camera and flash settings with a small aperture and histogram for exposure. None of this is new except to me.
I hope this introduces some to the possibilities of close-up photography in the studio.
http://strobist.blogspot.com/2006/07/how-to-diy-10-macro-photo-studio.html
I liked the flower and made my own light box the details of which follow. However, an unexpected lesson that changed how I shoot is at the very end.
Since I own a sign company, I had some cut-offs laying around and a very talented production person to make a light box for me. Scott took clear Plexiglas(r) and covered it with a special diffusing vinyl from 3M. He cut three 12x12 squares for three sides and a 12x14 piece for the top. He cut two 6x12 pieces of a white opaque plastic for barn doors. He taped the squares and barn doors together so that they create the light box and then fold for storage. Finally, I placed a rollable plastic in the box to serve as a seamless backdrop. See the first two photos below.
As for the actual photography, I took an olive wood camel off my shelf and put it inside. The camera was on a tripod and connected to the flash with an extension cord. Now comes the fun. By varying the position of the flash, direction of the flash head and by using or removing the flash's diffuser, the camel's appearance changes considerably. The brightness relative to the background changes, the highlights vary and shadows on the camel create drama. The shadows from the camera also vary in directions, definition and amount.
As for the backdrop, you do not have to use white. You can use whatever color, material or texture you want. If you use a color not present in or on the edges of the subject, you can eliminate the background in a program like Photoshop and substitute anything you want. For example, I could return the camel to its native habitat, the desert.
To make the box, you do not have to use the same materials as I have. I used what I had around. However, you can use white translucent Plexiglas(r) or white Lexan(r). These are the best known trade names for acrylic and polycarbonate, respectively. The latter is heavier, stronger, and more expensive than the former. Note that Plexiglas(r) has three whites: two levels of translucent and an opaque. You want either translucent. For the barn doors, I used Sintra or rigid foam pvc. Go to a sign company, plastic fabricator or plastic supply house and buy scraps. Or contact me for scraps.
I am planning some improvements on my next box. It will be about twice the size so I can handle larger objects and move objects around to change the light falling on them. I will also put silver chrome vinyl on the inside of the barn doors to increase reflections to bring out the specular highlights. I will also make a separate piece with silver chrome vinyl that I can use in the box for the same reason.
I almost forgot the surprising lesson: exposure. I started with using the fully automatic and aperture-priority modes. Both gave me very good exposures but I could not get the automatic flash to stop down. I was not satisfied with the sharpness and thought that the narrow depth of field was to the culprit. I went to manual mode for both the exposure and flash. I set the camera to 1/60th and f 22. Using the histogram, a flash power of 1/8 gave me the best exposure. In other words, the lesson was use manual camera and flash settings with a small aperture and histogram for exposure. None of this is new except to me.
I hope this introduces some to the possibilities of close-up photography in the studio.

Jan 23, 2012 13:45:03 #
Jan 23, 2012 14:03:59 #
If you want to reply, then register here. Registration is free and your account is created instantly, so you can post right away.