Sunset and post Process
Jan 3, 2012 19:34:08 #

I'm not sure what editing software you have hun ... but in a lot of them you can use a layer mask to hide the enhancement from the foreground.
I'm not sure if you are familiar with using layer masks but here is the process ... it should be relatively the same in photoshop, gimp, and elements.
First make a copy of the photo layer (ctrl/j)
Do all your enhancing on the top layer. Just as you did to make the sky pop.
Then when finished with that part .. hold the alt and click on the add new layer mask ( the camera icon ) at the bottom of the layers pallette. This will make the top layer seem to disappear... it's supposed to.
Get the brush tool ... Make sure you have white as your foreground color... and just paint the sky back in ... as you paint with the white paint it removes the layer mask from the painted area.
If you go too far change the foreground color to black and paint the mistake back out ... you can't hurt it at all no matter what .....
The last step will bring back the enhanced sky while leaving the foreground of your original photo as is.
Jan 3, 2012 20:01:44 #
Let's see, going from the bottom up, Thank you everyone for comments and help,
Don- Thank you for the MAJOR compliment.
Coco, I like it, but it doesn't have a realistic look. Too bright.
Peter, you've got a great talent for words, I've never really given that much thought to "telling a story" with my pictures, although, that's what a photograph should do, isn't it?
ABC, I'll check that out. Right now, I'm limited on funds and the Canon software is what I've got to work with. I don't think it supports that feature, but it does sound like something good.
Rodger, Interesting techniques, but again, not available to me at this time, but I will keep them in mind.
Docrob, The technique I use is to meter on a dark to middle area, press the shutter half way to lock in that setting, hold it while getting the composition to where I want it. Kind of like what your talking about, right?
Erv, Your's looks "painted". I realize it was just a quick attempt, but by you listing what you did, it gave me some idea how do do what I wanted. Thanks everyone. I think this kind of feedback is what the moderator had in mind for this topic. :) Gary
Jan 3, 2012 20:18:08 #

Try this, aim the camera at the sky, not the brightest section, and push the shutter release half way down to get a foucs then point the camera at the forground and set the flash to go off at a low output and you will bring in the forground in detail.
Jan 3, 2012 20:19:14 #
Jan 3, 2012 20:25:59 #
Going Digital wrote:
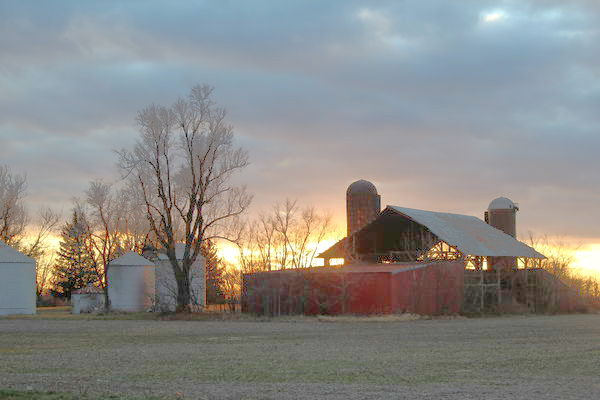
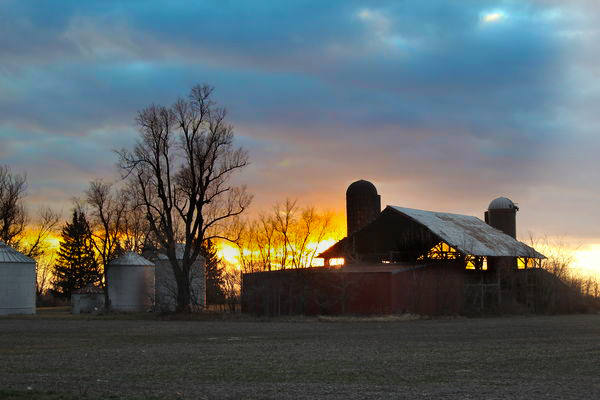
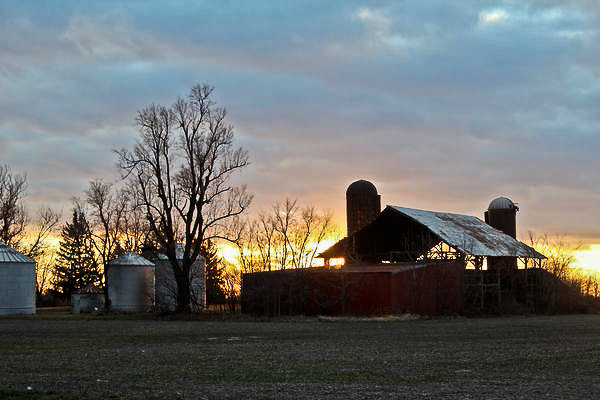
Here's a before and after. Canon T3i. Auto setting. 1/60 f5.6 ISO 125. Looking for did rights and did wrongs. Criticism welcome, that's how I'll learn. I'd like to maintain a little more lighting in the foreground, but intensifying the sky destroyed it. Using Canon DPP for post process. Any suggestions?
I like this forum where some are actually trying to learn a defined technique. AND your shot is so good you deserve to learn how to get it where you want it.
At first look I thought the black data was lost, but much of it came through in your submission. Someone suggests the whites are blown, but that is not so. There are only 4 rather small areas void of pixels three of them add character and #4 (sky @ 2 o'clock) is easily remedied.
Confining this to your question, lighting the foreground, there are 3 ways to do that. One is excellent but requires making a colour range separation for a alpha channel mask. Suspect this a bit much for you and your program. So here is an easy and pretty good way using almost any program. Understand I worked with the very small file posted. you with the large file can get far better results.
First, open the untouched file as shot, make copy then close original.
Select the brightest 50% pixels. Most programs can do that. You will need to read instructions cause I don't know what you have. ( PS on a Mac the command is command-option-shift-2). With the selection of marching ants select "inverse" and make a layer of that selection which will be a layer of the darkest 50% that is the foreground you want to work on. Select that layer now sitting over the background layer use either Levels or Curves or the equivalent in your program to bring up the darks to where you want Do not use 'brightness/Contrast' commands for those can not yield tones or graduations so the photo always fool unnatural. Merge the 2 layers and you're done.
What I could get from the little 700 K image on the forum is well defines tiny limbs of the large tree, a very nice reflected glow on the roof of the low shed, and the hint of green grass in foreground.
As you shot, the sky is very nicely toned. Some cropping on left & right will remove more hot spots which seem to draw my eye.
I say again, you got a nice photo, you have the eye to know what improvement you want. You did good, learn how to process them buy some frames.
Jan 3, 2012 20:56:36 #
Photogirl and pfredd, Thanks for the lesson. I don't think the Canon DPP supports layers, sounds like I need to find a program that does, when funding gets a little better. Think I'll check out GIMP, seems like someone said it was a freebie?? I'll look it up.
Jan 3, 2012 21:00:34 #
Going Digital wrote:
Photogirl and pfredd, Thanks for the lesson. I don't think the Canon DPP supports layers, sounds like I need to find a program that does, when funding gets a little better. Think I'll check out GIMP, seems like someone said it was a freebie?? I'll look it up.
Yes it is here is a link to it.
http://www.gimp.org/downloads/
Also here is a link to Picasa also a free download and it comes with Picnik for editing too.
http://picasa.google.com/
Jan 3, 2012 21:11:51 #

pfredd wrote:
quote=Going Digital Here's a before and after. Ca... (show quote)
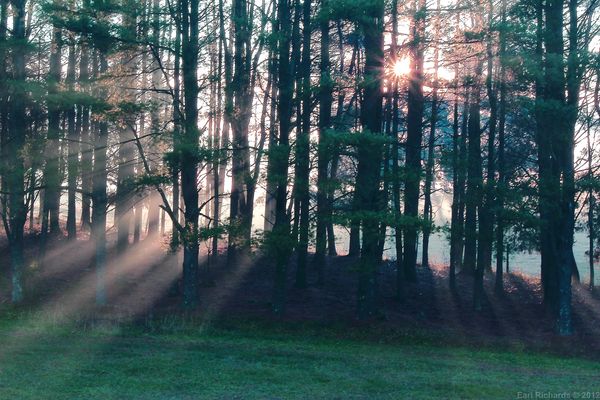
Now this is an impressive display of what good software can do. I am now convinced that I need to get something other than the Canon Digital Photo Professional that came with my T3i and learn how to use it. I understand the goal of getting the photo as close as possible to perfect "in the camera" but I find it amazing what you can do in post process. It's almost like you can fix anything. I would like to submit a sunrise I shot the last day of 2011 on a farm in Virginia for comments. I used the Canon DPP software for PP.
Sunrise Through The Trees
Jan 3, 2012 21:41:14 #

pfredd wrote:
quote=Going Digital Here's a before and after. Ca... (show quote)
This turned out really nice!
Jan 3, 2012 21:43:41 #
Going Digital wrote:
Photogirl and pfredd, Thanks for the lesson. I don't think the Canon DPP supports layers, sounds like I need to find a program that does, when funding gets a little better. Think I'll check out GIMP, seems like someone said it was a freebie?? I'll look it up.
I've downloaded GIMP. For a freebie, it works great. I go on Youtube for instructions since it doesn't come with a manual.
Jan 3, 2012 21:54:47 #
Going Digital wrote:
Here's a before and after. Canon T3i. Auto setting. 1/60 f5.6 ISO 125. Looking for did rights and did wrongs. Criticism welcome, that's how I'll learn. I'd like to maintain a little more lighting in the foreground, but intensifying the sky destroyed it. Using Canon DPP for post process. Any suggestions?
To me, both the original and PP version are great photographs and dont have a preference or suggestion for altering either. I love to see clouds ans sunsets and since the main object is the sky I think the silohette version is just fine. Theres nothing much to see of interest in the foreground anyway. Dont waste your time with more PP get out and take some more great shots like these.
Ian
Jan 3, 2012 21:57:52 #
To me, you have a center of interest - not just the colorful light. It draws my attention to the photo. I like them both but the second one a little more.
Jan 3, 2012 23:43:15 #
azycray wrote:
quote=pfredd quote=Going Digital Here's a before... (show quote)
Incredible picture, you should be proud of this one.
Ian
Jan 4, 2012 08:43:56 #

Jan 4, 2012 11:40:26 #
There is so much you can do with that photo. I used Lightroom to add some color saturation, fill light, and contrast.
If you want to reply, then register here. Registration is free and your account is created instantly, so you can post right away.