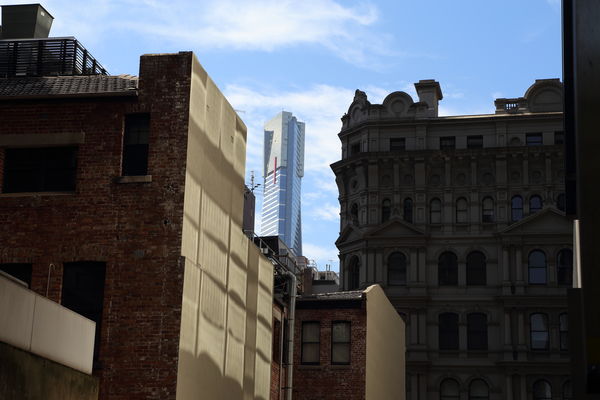
Eureka Tower from New Chancery Lane, Melbourne
Feb 9, 2014 04:35:11 #
andrew.haysom
Loc: Melbourne, Australia
I have previously posted an image of this view in this forum, for comparison purposes you can view it here;
http://www.uglyhedgehog.com/t-122344-1.html
This is a view I see nearly every time I drive into the city of Melbourne, as the car park I use is situated on this lane way.
It is an amazing juxtaposition of old vs new and architectural styles.
Some Melburnians dislike the Eureka Tower, I love it's unique look, it is my favourite building in the Melbourne skyline.
When I took this shot yesterday morning the conditions were very different to the previous day I've linked to above. It was a very hot day (40 degrees celcius) and very bright sun. This brought out a lot more of the detail in the old buildings, especially the exposed brickwork. There were also some very cool shadows from the building that is unseen on the left, on the blank wall on the right. It was also a much more interesting sky.
As you'll see from the original zero exposure below, this was definitely an image that required some HDR, a big range of light conditions.
I thought I would also provide some details of the image settings and my processing steps for those that are interested.
Camera & Lens: Canon EOS 6D with Canon EF 24-105mm f/4L IS USM Lens @ 73mm
ISO: 100
Aperture: F11
Seven bracketed exposures: +3, +2, +1, 0, -1, -2, -3
Shutter speed: 1/13 to 1/800 (Zero exposure 1/100)
Processing steps:
1. Convert RAW images to 16-bit TIFFs in DxO Optics Pro V9. Used "DxO Standard" preset with additional options to select the Prime noise removal and full CA removal.
2. Merge the seven exposures in Photomatix 5, ghosting options off, alignment set to "tripod mounted", no noise removal or CA removal selected here.
3. Started with the Enhanced preset, adjusted White Point slider to remove some blown sky. Save as 16-BIt TIFF.
4. Open again in DxO Optics Pro, use the "No correction" preset to turn off all corrections, and use the Force Parallel tool to fix up the vertical perspective issues. Save again as 16-bit TIFF.
5. Open in PS Elements 11 and;
- Crop (to remove building on left and some of the sky)
- Use Spot Healing Brush to remove a sensor dust spot in sky
- Use the Clone tool to modify two small sky sections that looked blown
- Use adjustment layer to remove bright sun sections on top of building at top right
- Use Topaz Clarity (Brick Building preset) to pull a little more detail from the building
- Save as final JPG
Comments and critiques are welcomed.

Feb 9, 2014 14:08:05 #

Hi Andrew,
I have recently acquired a Canon 6D and have began testing using HDR. So far I found the in-camera HDR works well. I've also taken several exposures and used external software with varying results. But now I just shoot in RAW and post process to improve the dynamic range. Sort of like burning and dodging in the darkroom.
Regarding your photo, I am drawn to the top of the dark gray building on the left. Some additional post processing there might be an improvement.
Pete
:D
Feb 9, 2014 15:41:27 #
andrew.haysom
Loc: Melbourne, Australia
pete-m wrote:
Hi Andrew, br br I have recently acquired a Canon... (show quote)
Pete, Thanks for the comment. I agree about the top of that building, I spent a little time darkening the bright sun streak, but not long enough.
I haven't tried the in-camera HDR feature yet, I guess I should.
Feb 10, 2014 12:10:42 #

Feb 10, 2014 13:00:11 #

If you want to reply, then register here. Registration is free and your account is created instantly, so you can post right away.