Some before & After shots
Jan 10, 2014 19:32:12 #

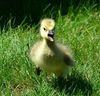
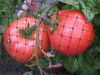
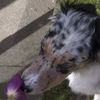
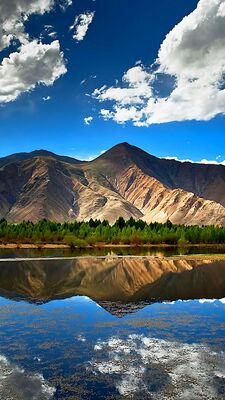
I want to show how powerful editing a picture can be. Here are some examples of a before & after photo. When I take a picture, i have an idea of what i want it to look like when I'm done editing, and then the work begins to get it there. Some of these pics are ones that I wouldn't have taken if I didn't have an idea for them before I took them. I'm not sure if it's because of Winter or what, but lately things have had a 'dark' feel to them. I already know what I'm shooting tomorrow, and it'll be dark as well.
Original
http://farm4.staticflickr.com/3695/11879026373_188cbd4215_c.jpg
4531 Original by Ace and Deuce, on Flickr
Edit
http://farm3.staticflickr.com/2808/11846788405_bc3f3f1c95_c.jpg
Day #8 - January 8, 2018 by Ace and Deuce, on Flickr
Original
http://farm4.staticflickr.com/3768/11878773245_ca85e8f858_c.jpg
4562 Original by Ace and Deuce, on Flickr
Edit
http://farm4.staticflickr.com/3714/11878206514_dd7d8f75bd_c.jpg
4562 by Ace and Deuce, on Flickr
Original
http://farm4.staticflickr.com/3779/11879624666_975049abde_c.jpg
4544 Original by Ace and Deuce, on Flickr
Edit
http://farm4.staticflickr.com/3738/11863371665_1833f5933d_c.jpg
Day #9 - January 9, 2014 by Ace and Deuce, on Flickr
Original
http://farm3.staticflickr.com/2890/11878745755_d06bbd2773_c.jpg
4552 Original by Ace and Deuce, on Flickr
Edit
http://farm4.staticflickr.com/3771/11864219296_ca8a761ac7_c.jpg
King of the Hill by Ace and Deuce, on Flickr
Original
http://farm8.staticflickr.com/7290/11879629056_e358aa642f_c.jpg
4567 Original by Ace and Deuce, on Flickr
Edit
http://farm3.staticflickr.com/2811/11878060233_184b8cb4c8_c.jpg
Day #10 - January 10, 2014 by Ace and Deuce, on Flickr
Thanks for taking the time!
~ace
Original
http://farm4.staticflickr.com/3695/11879026373_188cbd4215_c.jpg
4531 Original by Ace and Deuce, on Flickr
Edit
http://farm3.staticflickr.com/2808/11846788405_bc3f3f1c95_c.jpg
Day #8 - January 8, 2018 by Ace and Deuce, on Flickr
Original
http://farm4.staticflickr.com/3768/11878773245_ca85e8f858_c.jpg
4562 Original by Ace and Deuce, on Flickr
Edit
http://farm4.staticflickr.com/3714/11878206514_dd7d8f75bd_c.jpg
4562 by Ace and Deuce, on Flickr
Original
http://farm4.staticflickr.com/3779/11879624666_975049abde_c.jpg
4544 Original by Ace and Deuce, on Flickr
Edit
http://farm4.staticflickr.com/3738/11863371665_1833f5933d_c.jpg
Day #9 - January 9, 2014 by Ace and Deuce, on Flickr
Original
http://farm3.staticflickr.com/2890/11878745755_d06bbd2773_c.jpg
4552 Original by Ace and Deuce, on Flickr
Edit
http://farm4.staticflickr.com/3771/11864219296_ca8a761ac7_c.jpg
King of the Hill by Ace and Deuce, on Flickr
Original
http://farm8.staticflickr.com/7290/11879629056_e358aa642f_c.jpg
4567 Original by Ace and Deuce, on Flickr
Edit
http://farm3.staticflickr.com/2811/11878060233_184b8cb4c8_c.jpg
Day #10 - January 10, 2014 by Ace and Deuce, on Flickr
Thanks for taking the time!
~ace
Jan 10, 2014 19:37:31 #
Jan 10, 2014 19:40:24 #
Jan 10, 2014 19:48:10 #
These are great and I really enjoyed seeing them. Now, if you would provide some "how-to" info, that would be even better!! I like how you add intensity and tone to increase the impact of your photos.
Jan 10, 2014 19:58:36 #
good temp set. on that cooker.. :thumbup:
don't think this your first day on job...
don't think this your first day on job...
Jan 10, 2014 20:01:05 #
Jan 10, 2014 20:08:15 #
Heirloom Tomato wrote:
These are great and I really enjoyed seeing them. Now, if you would provide some "how-to" info, that would be even better!! I like how you add intensity and tone to increase the impact of your photos.
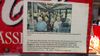
Thanks, guys! Sure, I'll tell you how I edited the trailer pic...
First off, when I took it, I knew I wanted that dark, deep feel to it. I shot it a bit lighter than I usually would so I wouldn't lose detail when I edited it.
Then, I opened up the RAW file in Adobe Camera Raw. I sharpened a little, added about 15% luminance, and checked the lens correction tab since I'm shooting on a crop sensor camera. I also remove Chromatic Aberration. Then I drop the exposure to around -50, increase contrast +30, drop the highlights -75 and the white -40 to bring out the sky without affecting the trailer or background. I leave the shadows alone, but drop the blacks -20. Then, I add saturation +20 or so.
Then I save as a jpeg, and open in PhotoShop CS6. I use the quick selection tool to select the sky, then I adjust the hue to give it a blue-ish feel, then darken it to bring out the rest of the detail. Then I save it again...
...and open it up in PhotoSuite 8. This is where all the magic happens (for me). I add Gaussian Blur, increase contrast, a touch of HDR, then switch it to black and white, but back the slider down so it's kind of in between black and white and color. Then I increase the orange saturation for the trailer and distant sky, added a 'warm' filter, then I added a subtle black vignette to highlight the center of the image, and lastly, add a black border.
Total time, about 15-20 minutes.
If you read all that, thanks for looking!!
~Ace
Jan 10, 2014 20:14:28 #

These effects are not really my favorite shot of tequila...but I do like these...a touch too much...but that being said... very well done!
Keep it up.
Keep it up.
Jan 10, 2014 20:15:22 #
Ace and Deuce wrote:
Thanks, guys! Sure, I'll tell you how I edited th... (show quote)
Thanks, Ace! Very interesting, and obviously it's a very good recipe!
Jan 10, 2014 20:19:59 #
Jan 10, 2014 20:22:25 #
ggttc wrote:
These effects are not really my favorite shot of tequila...but I do like these...a touch too much...but that being said...these are very well done.
Keep it up.
Keep it up.
Thanks! It's new for me, and I'm trying to learn as much as I can through trial and error. I worry about over-doing it, but try to push it pretty far without going over the top. My big thing is, I live in a small, run-down suburb, and after two years and 75,000+ shots, I need to see through a new set of eyes. Editing let's me take the non-interesting sights that I see every day and make them new & interesting. I can only shoot the same bird shots so many times, my kids don't really like getting their picture taken, and the wife is more of a 'summer gal', so i have to expand my horizons. It's honestly getting to the point where I'm almost having as much fun editing as I do taking pictures...scary, lol!!!
take care, and thanks for the look!
~Ace
Jan 10, 2014 20:46:52 #
Ace and Deuce wrote:
Thanks! It's new for me, and I'm trying to learn ... (show quote)
I think all of us do PP for different reasons...I do it to make a technically mundane shot a technically better shot...you might do it for artistic effect...
Don't mean we cant appreciate the others point of view.
Jan 10, 2014 20:56:56 #
ggttc wrote:
I think all of us do PP for different reasons...I do it to make a technically mundane shot a technically better shot...you might do it for artistic effect...
Don't mean we cant appreciate the others point of view.
Don't mean we cant appreciate the others point of view.
Exactly. This type of editing is brand new for me, but that doesn't mean that's all I'm going to do, it just depends on the subject. This 365 project has me looking for things to shoot on days that I probably wouldn't be shooting at all, so I have to keep it interesting to stay with it. I'm not sure if you looked at my flickr page, but you'll see that I'm a 'technical' shooter, too, just learning something new.
Take care,
~Ace
Jan 10, 2014 21:21:35 #

Very cool post-production work... I like the direction you are taking. Hang in there and keep the faith.....
Jan 10, 2014 21:33:48 #
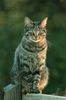
You are truly an 'ace' at this! great job; love the birds.
:thumbup: :thumbup: :thumbup:
:thumbup: :thumbup: :thumbup:
If you want to reply, then register here. Registration is free and your account is created instantly, so you can post right away.