Help
Sep 23, 2013 18:31:17 #

MtnMan wrote:
I can't help directly on your camera but it is imp... (show quote)
I know how to change the focus points but not the meetering points. I am going to have to break out my book for that one.
Sep 23, 2013 21:16:33 #
MtnMan wrote:
The metering options usually give similar options ... (show quote)
I have different meetering option and I just read in my book how to use them. One thing I need to know is my metering is in the center of the view finder. If I focus and meter at the center of the screen (on the bridge) and move my composision will it still be metered for the bridge or will it meter in the new location?
Sep 23, 2013 21:58:38 #
loony wrote:
I have different meetering option and I just read in my book how to use them. One thing I need to know is my metering is in the center of the view finder. If I focus and meter at the center of the screen (on the bridge) and move my composision will it still be metered for the bridge or will it meter in the new location?
Push the trigger half way and it will lock.
Sep 23, 2013 22:14:22 #
Meives wrote:
Push the trigger half way and it will lock.
That is what I was wanting to know. Thanks
Sep 23, 2013 23:38:50 #

loony wrote:
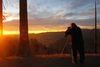
I need some help. I am shooting a canon eos 7d. I love this camera however when I go and shoot I end up with picuter that look great on the camera and when I get them on a computer they are really dark. These 2 pictures were taken within 10 min of each other. One is really dark the other is not. I don't understand what I am doing wrong. I did have my polorizer on and I am begaining to think that was the problem. But what did it look good on the camera that is were I am stumped.
I would say it's because the dark bridge has about 70% of the composition as sky and metering chose the sky and let the bridge become silhouette. The second photo is partially mountain, partially bridge, and maybe 30% sky. The metering chose to make the majority of the composition correct and overexpose the sky.
Why did they both look good on camera? Maybe an auto-gain on your viewfinder/LCD that brings up or brings down the light gain of what you are viewing so you can see well in dark or in bright light no matter what the sensor is seeing?
Sep 24, 2013 02:21:03 #
loony wrote:
I need some help. I am shooting a canon eos 7d. I love this camera however when I go and shoot I end up with picuter that look great on the camera and when I get them on a computer they are really dark. These 2 pictures were taken within 10 min of each other. One is really dark the other is not. I don't understand what I am doing wrong. I did have my polorizer on and I am begaining to think that was the problem. But what did it look good on the camera that is were I am stumped.
Just looking at the first shot, it seems you had the camera on auto. Even it was shot on a cloudy day (well in this situation it darkened the shadows even more), the sky is still too bright and takes up too much of the image, so the camera compensated for it by underexposing the image.
Sep 24, 2013 05:47:11 #
speters wrote:
Just looking at the first shot, it seems you had the camera on auto. Even it was shot on a cloudy day (well in this situation it darkened the shadows even more), the sky is still too bright and takes up too much of the image, so the camera compensated for it by underexposing the image.
I never shoot full auto. Both shots were taken in Aperture Priority.
Oct 10, 2013 10:16:27 #

loony wrote:
I need some help. I am shooting a canon eos 7d. I love this camera however when I go and shoot I end up with picuter that look great on the camera and when I get them on a computer they are really dark. These 2 pictures were taken within 10 min of each other. One is really dark the other is not. I don't understand what I am doing wrong. I did have my polorizer on and I am begaining to think that was the problem. But what did it look good on the camera that is were I am stumped.
It looks like to me in the first image the camera is adjusting for the sky and this is making the bridge dark and in the second one the camera exposed for the bridge and blew out your sky
Oct 12, 2013 00:32:35 #
Changing the metering mode could help..(as would a hand held light meter) Though the one in your cameras does a decent job... I think the issue you're experiencing here is with the polarizing filter. The filter does spin,and adjusts the amount of polarization. they work best when shooting at a 90 degree angle to the sun and keep in mind that when using a polarizing filter you lose approximately 2-3 stops of available light. This can be adjusted by stopping down. (opening up your aperture) or by adjusting your exposure compensation. Polarizing filters are a fantastic and effective tool..but can be a bit tricky to learn. Keep playing and practicing!! you'll get that A-HA moment!
Oct 12, 2013 12:44:54 #
sixshooter wrote:
Changing the metering mode could help..(as would a... (show quote)
This is very helpfull, Thanks
Oct 16, 2013 10:39:53 #
rich808
Loc: Honolulu
I'd say the circular polarizer got turned inadvertently throwing off the shot?
Oct 16, 2013 12:52:22 #

normanhall wrote:
It looks like to me in the first image the camera is adjusting for the sky and this is making the bridge dark and in the second one the camera exposed for the bridge and blew out your sky
I think this is spot on. The sky is exposed correctly in the first photo and the bridge in the second. Even with a polarized filter, if you're shooting in aperture priority, the camera would see less light and compensate with an adjustment to your ISO or shutter speed.
Oct 25, 2013 15:35:26 #

Searcher wrote:
My camera screen can be adjusted to various levels of brightness, and if set too high, will give a false showing of the image.
I would try darkening your LCD a little.
I would try darkening your LCD a little.
:thumbup: :thumbup: :thumbup:
On all my bodies, I have the LCD at -2.
Oct 27, 2013 17:01:39 #

I noticed the first or top photo center is on the clouds or sky, and the next ones have the dark underside of the bridge in the center. If your camera meter reading is centered, the top shot will cause the under part of the bridge to be very dark as the back lite sky is the center of light reading. When the dark under part of the bridge is read, the over all photo will get more exposure as a result of the center weighted reading.
Some adjustments for 'back lite' or manual setting, or adjust the compensation to go off center to compensate, and test the results. Important shots can be bracketed or three or more shots taken form under exposed to over exposed. The work great for HDR or layered photos and the details in the lightest, darkest, and midrange areas can be captured in the finished jpeg, tiff, print or what ever form you choose. Experiment with subjects that are backlighted by white bright clouds and you'll get to know better for your next challenge.
Some adjustments for 'back lite' or manual setting, or adjust the compensation to go off center to compensate, and test the results. Important shots can be bracketed or three or more shots taken form under exposed to over exposed. The work great for HDR or layered photos and the details in the lightest, darkest, and midrange areas can be captured in the finished jpeg, tiff, print or what ever form you choose. Experiment with subjects that are backlighted by white bright clouds and you'll get to know better for your next challenge.
If you want to reply, then register here. Registration is free and your account is created instantly, so you can post right away.